Tag Archives: Xamarin Forms

Playing Audio with the MediaManager Plugin for Xamarin.Forms!

Let me show you how to play Audio in Xamarin.Forms across Android, iOS and Windows UWP using the super easy plug and play MediaManager Plugin.

So you wanna play Audio in your Xamarin.Forms app? Stream an audio file over the internet or stored locally in your device Gallery? Listening to songs or podcasts even when the app is in background mode or device is locked away? Then you’re in the right place! 😉

So playing audio in a music player style sounds like a complete nightmare for a cross-platform framework like Xamarin.Forms, but thanks to this incredible MediaManager plugin, just a breeze of work to deploy across Android, iOS and Windows UWP environments.

MediaManager Plugin!

Long time back I remember reading up the article in Xamarin Blog, Play Audio and Video with the MediaManager Plugin for Xamarin, https://devblogs.microsoft.com/xamarin/play-audio-and-video-with-the-mediamanager-plugin-for-xamarin/

Back then, I remember there were no direct support for Xamarin.Forms itself, but now we do, with simple plug and play capabilities in this MediaManager Plugin!

Github:
github.com/Baseflow/XamarinMediaManager
Nuget:
nuget.org/packages/Plugin.MediaManager/

Please feel free to take a look at their official github page, and the implementation code if you’re interested in digging down deep.

Backstory…

I was lucky enough to stumble upon the opportunity to explore the implementation of Audio playback in one of the Xamarin.Forms project I’m working on recently. The core feature of that app was to play audio sources that are stored online, with continuous app background playback enabled, similar to a music player or podcast player.

The first thing came to my mind was the MediaManager plugin. So I tried it out following the Github page and the Xamarin blog article.

But unfortunately I came across a lot of issues, trying to set up in a fresh Xamarin.Forms project itself, even though I followed the steps to the detail. So I had to scrape through old forums and sample projects off of Github, for a series of trial and error, figuring out the proper set up.

It turns out all the articles and documented setup guidelines are mostly outdated, and the Plugin has gone through so much new changes and improvements over the years. So I thought of sharing my experience on setting up the MediaManager Plugin for Xamarin.Forms, step by step from scratch! 😉
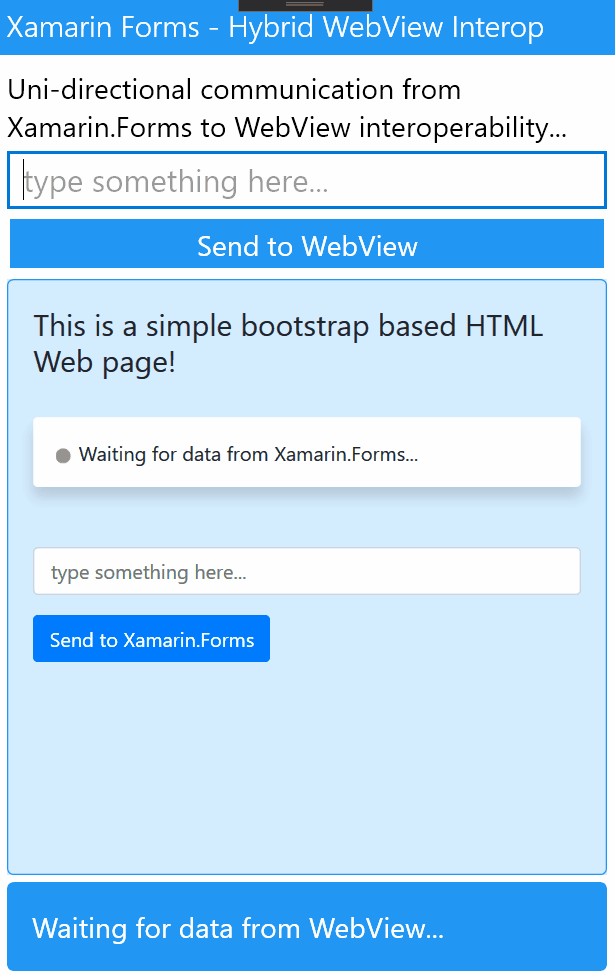
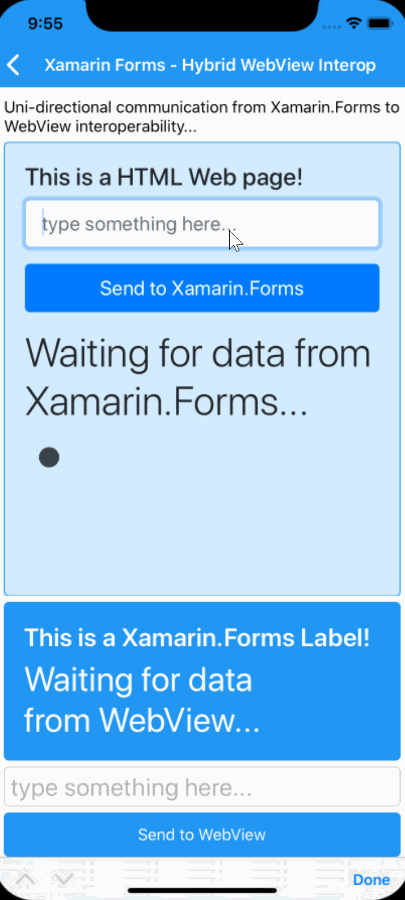
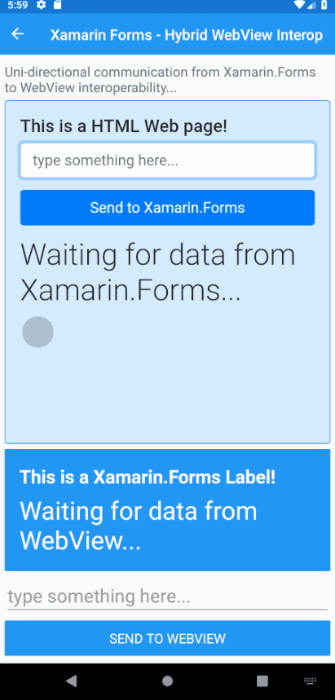
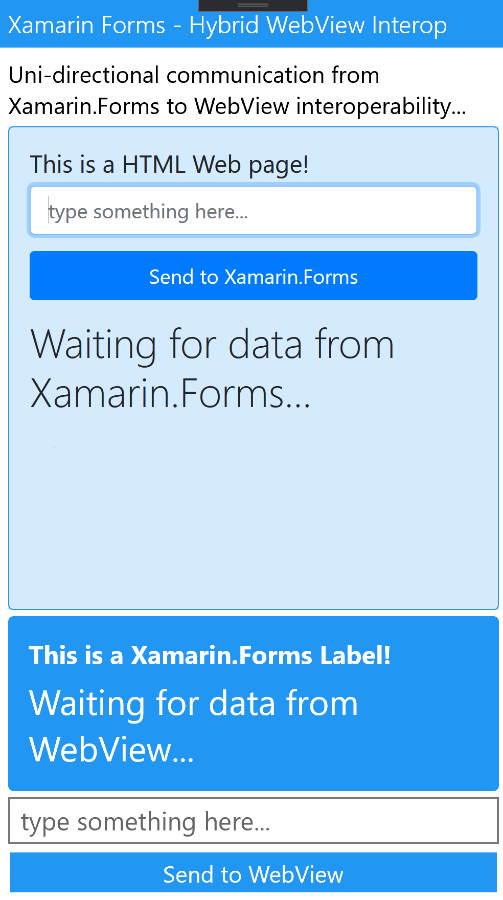
Sneak Peek!

Let me share a little sneak peek into the cute little demo I built…

That’s the beauty with a whole bunch of awesome features powered by MediaManager Plugin!

I’ve published this whole awesome demo up in my github repo,

Github repo:
github.com/UdaraAlwis/XFAudioPlayer

Feel free to take a look for a headstart before we begin! 😉

Setting it up!

Let’s begin with the set up of the Plugin with your Xamarin.Forms project. So I’m going to be using a fresh out of the box Xamarin.Forms project with the version 1.5.3.2, which is the latest updated version as of now.

Open up the Nuget Package Manager, on the Solution node, and search for Plugin.MediaManager.Forms package, and make sure to install it on your .NET Standard project node only, as shown below.

As of the writing of the blog post, I would recommend sticking to v6.94 version of the plugin as you can see above. The latest version had given me some run time issues.

It is important that you install the plugin only in the .NET Standard project, hence we’re using the Xamarin.Forms related package of the MediaManager plugin.

Also you may have noticed, there are multiple other packages related to MediaManager plugin, which caters for different purposes such as Plugin.MediaManager for Xamarin Native, Plugin.MediaManager.Reactive for Reactive Extensions, Plugin.MediaManager.ExoPlayer for ExoPlayer based implementations and so on.

Feel free to play around with them if you ever come across the need for such. Next we need to configure the initiation of the plugin.

No initiation setup required in platform projects, but in the App.xaml.cs of your Xamarin.Forms project node,

public partial class App : Application
{
	public App()
	{
		InitializeComponent();

		CrossMediaManager.Current.Init();

		MainPage = new NavigationPage(new MainPage());
	}
}

Oki doki, you’re good go!

Let the coding begin!

It’s actually easy to use Plugin.MediaManager in Xamarin.Forms! It provides a Singleton access to the complete player plugin instance, CrossMediaManager.Current, so you get full control of all the properties, behaviours and features in one place across the entire app context.

First, Play Audio!

Just hit the Play() for your audio as simple as below…

var audioUrl = "https://ia800605.us.archive.org/32/items/Mp3Playlist_555/Daughtry-Homeacoustic.mp3";
await CrossMediaManager.Current.Play(audioUrl);

Yes! it’s that simple. Check here the full list of Play() method overrides available: https://github.com/Baseflow/XamarinMediaManager#other-play-possibilities

Player Features!

Any Audio player should have the basic features such as Auto Play, Shuffle, Repeat mode and so on yeah? 😉

CrossMediaManager.Current.ShuffleMode = ShuffleMode.All;
CrossMediaManager.Current.PlayNextOnFailed = true;
CrossMediaManager.Current.RepeatMode = RepeatMode.All;
CrossMediaManager.Current.AutoPlay = true;

CrossMediaManager.Current instance provides you direct access to all those features you need.

Play, Pause, Stop, Resume?!?

Yeah well those key features of are easily accessible, and then some! 😉

var result = await CrossMediaManager.Current.Play();
var result = await CrossMediaManager.Current.Pause();
var result = await CrossMediaManager.Current.Stop();

All those returns a bool indicating the results of the action.

var result = await CrossMediaManager.Current.PlayPrevious();
var result = await CrossMediaManager.Current.PlayNext();

How about if it’s playing, then pause, it its pause, then resume play?

await CrossMediaManager.Current.PlayPause(); 

Yeah it’s got a feature for that too! 😀 which I’ve also used in my demo.

Step and Seek!

Yep, not hide and seek for sure…

// step forward or backwards
await CrossMediaManager.Current.StepForward();
await CrossMediaManager.Current.StepBackward();  

// seek to a specific position          
await CrossMediaManager.Current.SeekTo(timespan);

You can even adjust the default value for stepping actions using, CrossMediaManager.Current.StepSize and then directly seek to a specific location of the audio using SeekTo with a TimeSpan value! 😉

Access Media data…

You can load the metadata or media details of the audio source as follows,

IMediaItem currentMediaItem = await 
         CrossMediaManager.Current.Play(audioUrl);

Whenever you call Play() method it will return IMediaItem object which contains all the metadata regarding the audio source, such as Title, Artist, Album, Year, and etc…

Sometimes the retrieval of the metadata could take a while depending on the media source or the run time platform, so you can subscribe to the MetadataUpdated event to retrieve the data once they’re extracted.

var mediaItem = await CrossMediaManager.Current.Play(audioUrl);
mediaItem.MetadataUpdated += (sender, args) => {
	var title = args.MediaItem.Title;
};

This might be a bit troublesome, subscribing and unsubscribing, so you could access the metadata from the Queue instance directly, CrossMediaManager.Current.Queue.Current

IMediaItem currentAudioItem
       = CrossMediaManager.Current.Queue.Current;

Or directly as follows..

var title = CrossMediaManager.Current.Queue.Current.Title;
var artist = CrossMediaManager.Current.Queue.Current.Artist;
var album = CrossMediaManager.Current.Queue.Current.Album;
...

You can bind your UI properties to these values, once you execute Play() on your audio.

Now that I mentioned Queue, let’s get into that next…

Queue it up!

MediaManager simplifies a whole bunch features for you, and one of them is the Queue, which you can access directly through the instance, CrossMediaManager.Current.Queue which provides the IMediaQueue object. This one carries a whole bunch of awesomeness that you can use for your own player.

var currentMediaItem 
          = CrossMediaManager.Current.Queue.Current;
var nextMediaItem 
          = CrossMediaManager.Current.Queue.Next;
var previousMediaItem 
          = CrossMediaManager.Current.Queue.Previous;

In my demo I’m using the the override of passing a List of media urls to be played in a queue,

var songList = new List<string>() {
	"https://files.freemusicarchive.org/storage-freemusicarchive-org/music/no_curator/Yung_Kartz/July_2019/Yung_Kartz_-_02_-_Levels.mp3",
	"https://files.freemusicarchive.org/storage-freemusicarchive-org/music/Creative_Commons/Ketsa/Raising_Frequency/Ketsa_-_08_-_Multiverse.mp3",
	...
};

var currentMediaItem = 
	await CrossMediaManager.Current.Play(songList);

I could easily access it using the CrossMediaManager.Current.Queue.MediaItems

ObservableCollection<IMediaItem> mediaItemsInQueue 
	= CrossMediaManager.Current.Queue.MediaItems;

It returns an ObservableCollection of the MediaItems that I have queued up.

var mediaItem =
	CrossMediaManager.Current.Queue[index];

Just like that you could retrieve a specific item from the Queue as well.

Add to Queue…

To add an item directly to the Queue using the Queue.Add() method but, you need MediaItem object of that audio source. You can use the MediaExtractor object to create the MediaItem object you require and add that to the Queue as follows…

var generatedMediaItem =
	await CrossMediaManager.Current
	.Extractor.CreateMediaItem(mediaUrl);
	
CrossMediaManager.Current.Queue.Add(generatedMediaItem);

Now that new audio source will be added to the bottom of the Queue waiting to be played..

Play from Queue…

Use PlayQueueItem() to play an item from the Queue…

// from index
var isSuccess = 
     await CrossMediaManager.Current.PlayQueueItem(index);

// pass in the MediaItem
var isSuccess = 
      await CrossMediaManager.Current.PlayQueueItem(mediaItem);

Or better yet, pass in the MediaItem itself from the queue, it will return a bool whether it was found in the queue and started playing or not.

Player State matters!

You might say, Play this, Play that, but how do you know if it’s actually playing or not? even before that is it still loading the media source? or still buffering the data?

You can easily monitor this by subscribing to StateChanged event,

CrossMediaManager.Current.StateChanged += Current_OnStateChanged;
...

private void Current_OnStateChanged(object sender, StateChangedEventArgs e)
{
	if (e.State == MediaPlayerState.Playing)
	{
		// playing mode
	}
}

MediaPlayerState enum provides us 6 states of the media playback,

  • Loading
  • Buffering
  • Failed
  • Playing
  • Paused
  • Stopped

You could also check the state suing extension methods,

var result = CrossMediaManager.Current.IsPlaying();
var result = CrossMediaManager.Current.IsBuffering();
var result = CrossMediaManager.Current.IsStopped();

These nifty little extensions returns a boolean value with regards to the state.

Better yet you also got a singleton property you can bind to,

MediaPlayerState state = CrossMediaManager.Current.State;
if (state == MediaPlayerState.Playing)
{
	// playing mode
}

Yep multiple flexible ways! 😉 There’s another useful extension method, CrossMediaManager.Current.IsPrepared() which allows you check if the Player is already set up with Audio sources, and is running.

In my demo app I use this in the home page where I need to make sure the Player instance is already initialised or not with audio sources every time I activate the app from background.

protected override async void OnAppearing()
{
	base.OnAppearing();

	if (!CrossMediaManager.Current.IsPrepared())
	{
		await InitPlay();
	}
}

Pretty handy!

Useful Events…

There are plenty useful events you can subscribe to in order to monitor different properties and behaviors, https://github.com/Baseflow/XamarinMediaManager#hook-into-events

CrossMediaManager.Current.StateChanged
	+= Current_OnStateChanged;
CrossMediaManager.Current.PositionChanged
	+= Current_PositionChanged;
CrossMediaManager.Current.MediaItemChanged
	+= Current_MediaItemChanged;

I for one am subscribing to these events in my demo app, for monitoring Player State changes, current Media playback Position changes, current MediaItem Change. These events provides specific types of EventArgs parameters which you can use in the event methods.

Keep track of Time!

It’s important to keep track of the playback time data such as, Position and Duration of the audio that you’re playing. In my demo I use the PositionChanged event and Position, Duration properties to update the UI accordingly to show the user playback time data.

TimeSpan currentMediaPosition
	= CrossMediaManager.Current.Position;
TimeSpan currentMediaDuration
	= CrossMediaManager.Current.Duration;

Here’s how I update some of the UI elements based on the Position and Duration changes..

var formattingPattern = @"hh\:mm\:ss";
if (CrossMediaManager.Current.Duration.Hours <= 0)
	formattingPattern = @"mm\:ss";

var fullLengthString =
	CrossMediaManager.Current.Duration.ToString(formattingPattern);
LabelPositionStatus.Text =
	$"{CrossMediaManager.Current.Position.ToString(formattingPattern)}/{fullLengthString}";

SliderSongPlayDisplay.Value =
	CrossMediaManager.Current.Position.Ticks;

All kinds of cool UI bits you could implement with those data! 😀

Loading Local Audio files..

Now this is a cool little feature I decided to implement. My demo app will be able to load local Audio files from the local file system, into the app, and play! 😉

This should work seamlessly across Android, iOS and UWP. So I’m going to be using another nifty little library called, FilePicker-Plugin-for-Xamarin-and-Windows, which will simplify the whole file picking set up much easier.

I need to allow only MP3 audio file types to be picked in the app, so let’s define that first,

string[] fileTypes = null;
if (Device.RuntimePlatform == Device.Android)
{
	fileTypes = new string[] { "audio/mpeg" };
}

if (Device.RuntimePlatform == Device.iOS)
{
	fileTypes = new string[] { "public.audio" };
}

if (Device.RuntimePlatform == Device.UWP)
{
	fileTypes = new string[] { ".mp3" };
}

So based on the platform we need to set appropriate filter values before we execute picking. Next let’s pick the file using our FilePicker library and load into our media queue…

var pickedFile = await CrossFilePicker.Current.PickFile(fileTypes);
if (pickedFile != null)
{
	var cachedFilePathName = Path.Combine(FileSystem.CacheDirectory, pickedFile.FileName);

	if (!File.Exists(cachedFilePathName))
		File.WriteAllBytes(cachedFilePathName, pickedFile.DataArray);

	if (File.Exists(cachedFilePathName))
	{
		// Create media item from file
		var generatedMediaItem =
			await CrossMediaManager.Current
			.Extractor.CreateMediaItem(cachedFilePathName);
		// Add media item to queue
		CrossMediaManager.Current.Queue.Add(generatedMediaItem);
	}
}

Once the user picks the file, we get the FileData object. I’m writing that file object to the app cache directory with the help of Xamarin.Essentials.FileSystem helpers.

It is better to load the file into memory from the cache directory hence some platforms could flag directly accessing files outside the app directories as a suspicious activity and eventually break the flow of the app.

Once we store the file safely in App Cache directory, we load it into our app, using the Extractor to create the IMediaItem object and pass it on to the MediaManager’s queue. 😉

Well that’s all the tidbits I got to share regarding the little demo I built!

Demo time!

So I built a simple demo audio player which will be playing MP3 audio sources stored online, and as an extra functionality, it will allow us to play locally stored MP3 files as well.

Github repo:
github.com/UdaraAlwis/XFAudioPlayer

The first page, which is the Home page, will host the main Audio Play feature, such as Play/Pause, Next, Previous and so on. Then another page which will display the current audio Queue loaded into the Player. The same page will have the functionality to load local MP3 files and add to the Queue on the go…

Let’s fire it up and see the magic! 😉

Here we got iOS working like a charm! Well I’m not able to showcase the background or lock screen activity since I’m running it on the iOS Simulator and I don’t have an actual iPhone 😛

Next we got Android, working marvelously… 😉 Here I’m showcasing the full length of features including continuous playback on app background state as well!

Here’s the good old UWP Windows, working like a breeze! App will continue playing even if the app is minimized or device is locked as expected for background playback state! 😀

Remember I told yol about the extra little feature I added, being able to load local Audio files!? here we have it, working like a charm across iOS, Android and UWP Windows…

Let me flex a little bit more on the continuous background audio playback… 😉

As you can see on Android, we got direct access to media playback while the app is on background mode, and the audio is still playing even on lock screen…

Then on UWP Windows runtime we got the same exact features, it even complies with device native media buttons on the laptop keyboard!

Oh also on Windows 10 lock screen at the bottom right corner… 😉

Woot! Woot! 😀

Issues…

Even though I managed to build this cool little demo, with the help of MediaManager Plugin, I did notice some issues with it.

On UWP Windows runtime, it wasn’t loading Audio meta data for sources which are stored online. As in for any internet audio source, it would not be able to load the meta data of it. I saw some issues raised in the github page regarding this. So for now, just during UWP run time, we should rely on manually loading the audio source metadata, hopefully until the issue is fixed. Although my guess is, it could be a Windows File system security restriction!?

Another issue is that on Android, if the app is killed manually while its in background, the audio playback will stop it self. Usually this shouldn’t happen as far as I’ve seen with other Audio player apps. There’s a pending issue logged in github for this as well.

Well that was pretty much it for the issues I noticed!

Conclusion

Well it was certainly fun little walk down the memory lane, apart from the trouble I had to go through following out of sync documentation. lol but it was worth it. It’s incredible how far MediaManager Plugin has come so far since the early days of Xamarin, and kudos to the developer @martijn00

MediaManager Plugin takes away all the pain of dealing with platform native handling of audio files and provide us direct access to great audio features. If you ever come across implementing an audio player app, this would be a great plugin to consider. Hope this little documentation of my experience with it was helpful for anyone out there! 🙂

Share the love! 😀 Cheers yol!

So I took up on TravelMonkey, the Xamarin + Cognitive Services Challenge!

Let me share my little adrenaline filled panic adventure into earning some awesome Xamarin Swag! from the Xamarin + Cognitive Challenge hosted by Microsoft, the TravelMonkey Challenge! 😀

Well it’s come to 2020, in the middle of a pandemic, a lock down, and it’s been a while since I took up on an actual challenge outside my work and personal coding experiments! Then I suddenly came across this little challenge posted by Microsoft, TravelMonkey – the Cognitive Services + Xamarin Combo Challenge! (https://devblogs.microsoft.com/xamarin/cognitive-services-xamarin-challenge/)

Backstory…

As usual, the first thing I checked, what’s in it for me, you know what I mean! 😉 YES! they had promised some awesome Microsoft swag! Xamarin t-shirts, monkeys, and stickers!?! Say no more, I was in! 😀 well at least I thought to myself… their Submission deadline was April 30, 2020 11:59 PM PDT!

The days went by, one by one, without even any second thoughts, yeah I’d do it tomorrow, or day after or some time… I’ll get it done!

Then suddenly, it was 29th April, the Friday night, oh shoot! tomorrow’s the deadline for submission of the awesome TravelMonkey challenge! Yeah well I could say it was my own procrastination that got me in that situation, I had waited till the last day!

Procrastination is bad!

Just like in that GTA San Andreas scene, in my head I was like, “Ah sh*t, here we go again!” it was literally a moment of panic, and I was the fence about giving it up. But then it was Friday night, the day I usually watch a good night movie and fall asleep to wake up very late on Saturday! 😦

But then again, it was middle of a pandemic lock down, and I haven’t really had this kind of a fun challenge in a while, so I thought of pulling an all nighter and getting it done! at least something worth while before the next 24 hours ended… 😮

At this point, I didn’t have a plan of what I’m going to be building or expand up on, so I thought of simply exploring the current implementation and figure out where are the points in which I could improve as for the challenge. Once again, it was a bad idea to start working on it, at a time when it was less than 24 hours before the submission! lol 😀

Sneak Peek!

But at the end, here the beauty I ended up building…

I know right.. gorgeous!

Yeah well behind all that eye-candy glamour there was a painful sleepless all-nighter experience, waiting to be unraveled…

Getting started…

So first, I forked the github repo from https://github.com/jfversluis/TravelMonkey into my own github repo: https://github.com/UdaraAlwis/TravelMonkey and set up the Azure Cognitive services in Free tier with the following,

  • Azure Computer Vision
  • Bing Translation
  • Bing Image Search

Then I got the API keys and hooked up into the Xamarin Mobile app project.

New Featurettes!

This is a travel related app! even though it is fictional. lol So I wanted to think of it as being used by smart Monkeys like us, who would love to see beautiful scenic photos of the top travel destinations in the world.

Why stop there? I should allow the users to search for a destination and view the top scenic photos of that destination, as a little cherry on top! 😉

Also how about letting the user translate any text into any language they choose? That would definitely come in handy for any traveller!

Bing Image Search FTW!

So I picked up the most visited destinations by international tourist arrivals data from Wikipedia, https://en.wikipedia.org/wiki/World_Tourism_rankings and hooked it up into the Bing Search Service to load images of those destinations. Each destination would be taken up with 10 images and we would randomize through them in the Home page carousel.

var client = new ImageSearchClient(
new Microsoft.Azure.CognitiveServices.Search.
ImageSearch.ApiKeyServiceClientCredentials(ApiKeys.BingImageSearch));

var imageResult = await client.Images.
SearchAsync(
	$"{destination} attractions", 
	minWidth: 500, 
	minHeight: 500, 
	imageType: "Photo", 
	license: "Public", 
	count: 10, 
	maxHeight: 1200, 
	maxWidth: 1200);

See how I modified the Bing Image search query there, {destination} attractions where as it would be executed as “France attractions”, “Thailand attractions”, and etc. So just like that I refined the search terms for scenic tourist photos from Bing Images.

Destination scenic Gallery!

I decided to add a travel destination Gallery page, consisting of scenic travel photos from Bing. User would be able to pick a destination from a presented list of countries in the Home page itself, and then navigate to its Gallery page to view the top 10 most scenic photos from Bing.

Here I did a little trick to load a list of countries in C# by tapping into CultureInfo object provided by .NET framework, pretty handy!

private static List<string> GetCountries()
{
	List<string> countryList = new List<string>();

	var getCultureInfo = CultureInfo.GetCultures(CultureTypes.SpecificCultures);

	foreach (var getCulture in getCultureInfo)
	{
		var regionInfo = new RegionInfo(getCulture.LCID);
		if (!countryList.Contains(regionInfo.EnglishName))
		{
			countryList.Add(regionInfo.EnglishName);
		}
	}

	return countryList;
}

This would return the list of countries in the world which I will be presenting to the user to choose from! I will use the Bing Image Search that I had already modified to load the scenic travel images set on the go.

Bing Translation FTW!

So I thought of adding some improvements to the Translation features, where currently they had a pre-set of languages they would translate to given the input text. I wanted to make it completely dynamic, by getting the list of languages available in Bing Translation service, and letting the user pick the languages they want to translate to.

Here’s how I got the list of supported languages Bing Translation,

public async Task<List<AvailableLanguage>> GetLanguageList() 
{
	string endpoint = ApiKeys.TranslationsEndpoint;
	string route = "/languages?api-version=3.0";

	using (var client = new HttpClient())
	using (var request = new HttpRequestMessage())
	{
		...
		request.RequestUri = new Uri(endpoint + route);
		// Send request, get response
		var response = client.SendAsync(request).Result;
		...
	}

	List<AvailableLanguage> availableLanguages = new List<AvailableLanguage>();
	foreach (var item in translationStatsResult.Translation)
	{ ... }
	return availableLanguages;
}

Once I got the available languages list, I would present them to the user to pick from for translating their input text. But during the app’s first time launch I would randomly pick 5 languages and show the translations.

So here’s how I extended the Translation service call with the dynamic request language list,

public async Task<List<AvailableTranslation>> 
TranslateText(string inputText, List<AvailableLanguage> listOfLanguages)
{
	// build the translate url chunk
	string requiredTranslationsString = "";
	foreach (var item in listOfLanguages)
	{
		requiredTranslationsString = requiredTranslationsString + $"&to={item.Key}";
	}
	
	...
	request.RequestUri = new Uri(ApiKeys.TranslationsEndpoint + "/translate?api-version=3.0" + requiredTranslationsString);
	... 
	
	translations.Add( new AvailableTranslation()
	{
		InputLanguage = bestResult.DetectedLanguage.Language,
		InputText = inputText,
		TranslatedLanguageKey = t.To,
		TranslatedLanguageText = t.Text,
		TranslatedLanguageName = MockDataStore.Languages.FirstOrDefault(x => x.Key == t.To).Name,
	});
	
	return translations;
}

I’m dumping them all into a list of AvailableTranslation objects which I will be unpacking in the UI for displaying the results of the input text translation.

Caching a bit of data!

Now this is something I had kept till the last minute, hence I couldn’t complete it as I expected, but I still managed to store some data in the app memory during run time to reduce repetitive duplicate queries to Bing services, which will also help me reduce the free tier quota usage.

I managed to store the list of destination scenic image result data and translation text in memory as a simple static singleton data object.

Emoji Support 😀

It would be nice to have some Emoji support for our text labels in the app, I thought. So I added it with the following nice little snippet I came across, https://github.com/egbakou/EmojisInXamarinForms

So with that nice little snippet I could insert emojis into a text and bind them to any Label element in Xamarin.Forms, nice and easy!

Title = 
$"Something went wrong 
{new Emoji(0x1F615).ToString()} 
Here is a cat instead!"

It will display the given emoji natively to the run time platform hence we’re using unicode representation of that emoji! 😉

No more icon files!

I really don’t like using physical image files for representing icons, so I got rid of them and introduced full Font Awesome based icons to the entire app. Setting it up in Xamarin.Forms is pretty easy now!

[assembly: ExportFont("fa-regular.otf", Alias = "FontAwesomeRegular")]
[assembly: ExportFont("fa-solid.otf", Alias = "FontAwesomeSolid")]

Like this label that shows a little globe icon using Font Awesome!

<Label
	Margin="0,0,12,0"
	FontFamily="FontAwesomeSolid"
	FontSize="20"
	Text=""
	TextColor="Gray"
	VerticalOptions="Center" />

Yeah Font Awesome is pretty handy!

https://montemagno.com/xamarin-forms-custom-fonts-everywhere/
https://dev.to/codingcoach/using-font-awesome-in-xamarinforms–3mh

Fix Android Status bar…

I know its annoying to deal with Android Status bar styling, and most of the time devs don’t even bother fixing it accordingly to their app theme. They end up leaving the ugly blue color bar at the top of the app.

But I wanted to make it right. May be I am too much of a perfectionist! 😛

<resources>
    <style name="MainTheme.Base"
			parent="Theme.AppCompat.Light.DarkActionBar">
        ...
        <item name="colorPrimary">#bfbfbf</item>
		...
        <item name="colorPrimaryDark">#d9d9d9</item>
        ...
        <item name="colorAccent">#808080</item>
		...
    </style>
</resources>

So I updated the Android Status bar styling values accordingly to my intended color scheme for the app.

PancakeView is yummy!

Yo this right here is a gem, such an awesome element to have in your app, provides loads of features and customization. https://github.com/sthewissen/Xamarin.Forms.PancakeView

It’s super simple to use, where I’ve used it as a container for many elements to provide a beautiful Shadow effect.

<yummy:PancakeView
	Margin="7"
	BackgroundColor="White"
	CornerRadius="20,0,0,40"
	HasShadow="True">
	<Grid Margin="0">
		<Image Aspect="AspectFill" Source="{Binding ImageUrl}" />
	</Grid>
</yummy:PancakeView>

I’ve used this beauty across the entire app in all pages to give a gorgeous gradient effect of Page background as shown below…

<yummy:PancakeView
	BackgroundGradientAngle="40"
	BackgroundGradientEndColor="White"
	BackgroundGradientStartColor="#d9d9d9">
	<Grid>
	...
	</Grid>
</yummy:PancakeView>

I’m so glad I came across this awesome nugget thanks to this challenge! 😀

Beautify XAML…

One thing I noticed in the original project was that the XAML wasn’t properly formatted and it was inconsistent with different tabs and spacing.

I would recommend using any XAML formatting tool in Visual Studio like XAMLStyler which automatically formats your XAML properly while you code. Something nice to have I assume. 😉

Let me make it prettier…

On top of my head, I did not like the UI, not at all. Not blaming the original devs, who’s done a great job putting it together, but I wanted to re-skin it my way, and sprinkle a bit of eye-candy awesomeness… 😉

One thing I love for sure, is building sleek, responsive, minimalistic and yummy looking Mobile App UIs. So that’s what I did. 😀 I decided to implement a minimalistic unified-white color based gradient-ized sleek UI, which called for a whole bunch of restructures in the UI.

So I changed all the color schemes they used and replace them with a white and dark-gray based gradient style in almost all the elements across the app.

Let’s look at those one by one…

Gradient-zing!

Who doesn’t love some good old gradient effects, at least when its well done!

Thanks to the PancakeView we can now easily add this effect to Xamarin.Forms elements, which I have used extensively in my UI design changes as well…

Here’s one example where I modified the AddPicture page with my new color scheme.

Splash it up!

One of the first things I wanted to get rid of was the original splash screen, I did not like it at all, and it was honestly scaring to see a cute little monkey exploding in a high speed animation on the screen. lol

So I change the whole splash screen animation into a smooth zoom-in and fade-out effect as shows in the code below…

private async Task AnimateTransition()
{
	...
	await Task.Delay(1000);

	// Scaling up smoothly upto 5x and Fading out as the next page comes up.
	var explodeImageTask = Task.WhenAll(
		Content.ScaleTo(5, 300, Easing.CubicOut),
		Content.FadeTo(0, 300, Easing.CubicInOut));
	...	
}

Once it completes we navigate to the MainPage. Now that animation was much pleasing to look at…

I felt like that cute little monkey got some justice! lol

Home page!

So like I mentioned before I laid out a full layout design restructure and one of the main pages was the Home page.

  • Getting rid of confusing layout
  • Focusing on the travel photo background
  • Getting rid of the empty space
  • Making sure content properly fills the page

This is a travel related app, so it should be focused on giving such experience for the user so I decided to maximize on the scenic travel photos in the home page, thus resizing the Image element to take up to 70% of the page space.

Also I’ve added navigation for the user to click on the destination name to and to be navigated to that travel destination’s scenic travel photo gallery page.

Look at that beauty eh! 😉

The user picture grid at the bottom, while giving it a fixed height, I managed to fix a whole bunch of alignment issues inside the template container as well.

I added a new element above the translation text element for the user, to select a destination where they would like to view, and navigate to that page from home page itself.

Woot! woot!

Next’s let’s see that beauty in action…

Travel Destination Page…

So from the home page once User selects a travel destination to view, then they get navigated to this gorgeous page filled with scenic travel photos of that destination, pulled from Bing Image Search results…

It gets even better, here’s what you see when you select Italy…

Truly gorgeous… Well I’ve used Pancake View here for the full page background for the gradient effect and shadow effect for the Image containers.

<DataTemplate>
	<yummy:PancakeView
		... >
		<Grid Margin="0">
			<Image Aspect="AspectFill" Source="{Binding ImageUrl}" />
		</Grid>
	</yummy:PancakeView>
</DataTemplate>

Bingo!

Translation revamped!

So as I mentioned before I’ve implemented a new feature extending Bing Translation, allowing the user to pick the languages they want to have their input text translated into.

Here’s the new Page I implemented for it, where I load the list of languages for the user to choose from. I love how Bing translation actually provides the native word for the languages in their own language. 🙂 pretty neat eh!

Once the user selects the languages, I will be saving that in the memory as user preferences. Then next time User enters any text for translation, I would be showing them the list of translations according to their preferred languages. 😀

Now ain’t that handy! 😉

Last minute Pull requested!

Yes, literally last minute! So after all that panic filled sleepless all-nighter effort, I manged to finish up some good looking app with cool features added, and trust me when I say, I literally submitted the Pull Request at the very last minute, exactly at 11:58 PM on April 30, 2020 PDT. Just one minute before the deadline! 😀

Here’s my Pull Request on github: https://github.com/jfversluis/TravelMonkey/pull/25

That was such an adventure, I think this was the first time I stayed up all night for coding, after many years since graduation! 😀

Here’s the repo in my github: https://github.com/UdaraAlwis/TravelMonkey

Well I could have done a much better job, in terms of features, code refactoring and standards, if I hadn’t procrastinated till last minute. I wouldn’t blame someone, if they looked at the code and complained, hence its not the cleanest considering my usual quality standards! but I would consider it was a satisfying completion, given the whole last minute stress and staying up a whole night! 😛

We got Swag!

So as they promised we got them swags yo! 😀

But but… later I got even a better news,

Well at the end all the participants got $25 gift codes to spend at .NET Foundation store! 😀 yaay! 😍

Oh well.. what an adventure! Thank you Microsoft! ❤️

Conclusion

This was such an awesome opportunity, and I’m glad I pulled through somehow even if it was last minute effort! It was actually fun! Learned another lesson not to procrastinate stuff like these till last minute, at least not till 24 hours prior to submission deadline. lol

Sharing a bit of Azure bits, it was surprisingly easy to integrate all these kinds of cool features with Azure Cognitive Services without having to deal with any complicated computing. If it was few years back I would have to deal with all these language translation and image processing stuff all by myself.

So glad I found the new PancakeView thanks to this challenge, it was quite handful, specially in crafting those beautiful gradient and shadow effects.

Finally I should send special thanks to Microsoft and @jfversluis @codemillmatt for this awesome opportunity!

Share the love! 😀 Cheers yol!

Overriding Back Button in Xamarin.Forms Shell…

Let me share all about overriding the Back Button navigation in Xamarin.Forms Shell applications, oh and yes! it includes handling the Android on-screen back button as well! 😉

This topic has been quite a confusing and wobbly area in Xamarin.Forms for the longest time, even I remember having to write numerous customer renderers, and hacks to just to get this simple handle done, overriding the back button…

Yes, we got hope!

But with shiny new Xamarin.Forms Shell seems to have provided quite a promising solution for this, out of the box framework itself, without us having to do much work.

I’ve been working on trying to override the back button behavior on Xamairn.Forms Shell recently, both with Navigation bar button and Android hardware back button. So I decided to share my experience with yol and provide a proper solid solution for your worries.

Ways of the Backwards…

Fundamentally there are two ways how a backward navigation could occur, although there could be other ways depending on the flow of our app…

  • Navigation bar Back button (iOS and Android)
  • Android on-screen Back Button

So when we need to consider both those scenarios when taking control of backward navigation.

Investigation…

Since overriding the Backwards Navigation in Xamarin.Forms has always been quite confusing and difficult to handle, when I started off of Xamarin.Forms Shell, I thought of giving it a clean slate and a fresh try from scratch.

Based on that here are the findings I came up with…

Case 1: OnBackButtonPressed()

OnBackButtonPressed() This method has been there for quite a long time in Xamarin.Forms framework right out of the box, I remember using this long time back, but they kept on breaking its behavior during many releases, which was quite troublesome.

This is suppose to let you override the Android on-screen (hardware) back button action, where a developer can override this method and it would intercept that action giving the developer the option whether to allow it or cancel it.

protected override bool OnBackButtonPressed()
{ ... }

You can override this in a ContentPage but surprisingly, it DOES NOT WORK! Now I would argue it makes total sense for it to be used in such context, and if it worked, it would have made things so much easier, but no, unfortunately not. 😦

But in Xamarin.Forms Shell, if you override this in the AppShell class, it does seem to work. It will intercept every time you click the Android Back button in any page.

public partial class AppShell : Xamarin.Forms.Shell
{
	public AppShell() { ... }

	protected override bool OnBackButtonPressed()
	{
		// true or false to disable or enable the action
		return base.OnBackButtonPressed();
	}
}

But the only problem is you need to have it implemented in AppShell class, which calls for some complicated implementation in the code,

  • We have to handle each individual Page behavior in a global context
  • No async context available to perform some awaitable async operation

So that’s double the trouble I wouldn’t want to go down that mess! trust me, I’ve tried lol.

They have several bug tickets open for this issue from “time to time”, here’s one of them: https://github.com/xamarin/Xamarin.Forms/issues/7072

Just an extra, if you need to handle an awaitable operation in a non-async context, here’s a sytarting point: https://forums.xamarin.com/discussion/27752/how-to-await-a-displayalert-from-a-page-without-async-button-event

Case 2: Shell.BackButtonBehavior

Shell.BackButton Now this is something new that was shipped with Xamarin.Forms Shell, which lets you override the Navigation Bar Back button, even allowing you to customize the button appearance with an icon or text.

It allows you to cancel the user invoked backward navigation from the Navigation Bar Back button. You could also subscribe a command that will fire up and let you proceed as you wish.

<Shell.BackButtonBehavior>
    <BackButtonBehavior
        Command="{Binding GoBackCommand}"
        IsEnabled="True"
        TextOverride="Back" />
</Shell.BackButtonBehavior>

Microsoft Docs: https://docs.microsoft.com/en-us/xamarin/xamarin-forms/app-fundamentals/shell/navigation#navigation-events

Do not get this confused with the Android on-screen back button, this does not work for that.

But there’s a small bug in it right now, where as in iOS run time it wouldn’t fire the Command as expected unless you set the TextOverride or IconOverride property. But it works perfectly fine on Android. There’s an active bug on it: https://github.com/xamarin/Xamarin.Forms/issues/8546

Nonetheless this is a good option to keep in mind.

Case 3: Shell.OnNavigating()

Shell.OnNavigating event is also a nifty little feature shipped out with Xamarin.Forms Shell, which allows you to intercept any kind of navigation and override it.

Yes it works on both Android and iOS! allowing you to override any navigation, either forwards or backwards direction. This goes by saying that it supports handling Android on-screen back button navigation as well.

It passes in a parameter, ShellNavigatingEventArgs provides with the following,

  • ShellNavigatingEventArgs.Cancel() allows you to cancel the navigation.
  • ShellNavigatingEventArgs.Source property provides enum ShellNavigationSource, determines the type of navigation.
  • ShellNavigatingEventArgs.Current and ShellNavigatingEventArgs.Target provides the navigation path details, kind of like, from and to path.

Microsoft Docs: https://docs.microsoft.com/en-us/xamarin/xamarin-forms/app-fundamentals/shell/navigation#navigation-events

There are two ways to implement this, you can override OnNavigating() in the AppShell class

public partial class AppShell : Xamarin.Forms.Shell
{
    public AppShell() { ... }
 
    protected override void OnNavigating
                           (ShellNavigatingEventArgs args)
    {
        // implement your logic
        base.OnNavigating(args);
    }
}

or you can subscribe to the Shell.Current.Navigating event of it as follows…

protected override void OnAppearing()
{
	Shell.Current.Navigating += Current_Navigating;
}

private async void Current_Navigating(object sender, 
                           ShellNavigatingEventArgs e)
{
	// implement your logic
}

Also here you need to make sure to unsubscribe from those even handlers once you’re done with the override action, otherwise they will retain in memory and cause all kinds of weird issues in your app.

Given both solutions, I would say the most productive option is to use the event subscription, instead of overriding in a global context. But then again it should depend mostly on your requirement. You need to keep in mind, “With great power comes great responsibility” when implementing this method, you have to make sure you’re properly handling the resources here.

Case 4: Shell.GoToAsync() for backwards!

Shell.GoToAsync() is the method that is provided by Xamarin.Forms Shell for programmatically navigating forward in pages. Until very recently Shell didn’t provide any way to Navigate backwards, but with one of the latest update they now allow it as follows,

await Shell.Current.GoToAsync("..");

Microsoft Docs: https://docs.microsoft.com/en-us/xamarin/xamarin-forms/app-fundamentals/shell/navigation#backwards-navigation

This is quite important hence this fills an important part of the puzzle, where we need to override the backward navigation event, but also forward that action programmatically once we confirm it from our logic.

Alternatively you could also use the synchronous method call, which seem to be an Xamarin.Forms internal method,

Shell.Current.SendBackButtonPressed();
...
// or on Page level
page.SendBackButtonPressed();

https://docs.microsoft.com/en-us/dotnet/api/Xamarin.Forms.Page.OnBackButtonPressed?view=xamarin-forms

But I would not recommend this to be used since its synchrony and its meant for Xamarin.Forms internal framework calls.

Investigation Conclusion:

We need both Navigation Bar back button and Android on-screen Back Button to be handled for a complete solution in this case. Now given all 3 cases, we could derive a solution by using Case 2, Case 3, and Case 4 for a full fledge overriding of the Back Button behavior in Xamarin.Forms Shell. So that’s what we’re going to explore next..

Sneak Peek!

Before I get into the actual solution that I built up, let more share a little magic here!

So that’s the awesomeness I’m going to share with you guys! Let me explain…

The Solution…

Just like I explained in my little investigation conclusion, we’re going to make use of both Shell.BackButtonBehavior and Shell.OnNavigating counterparts to implement our overriding of the Back button in Xamarin.Forms Shell. This will take care of both App Navigation Bar back button and Android on-screen back button events.

Navigation bar Back Button: We shall implement the Shell.BackButtonBehavior in the Page with a Command handler attached to it, which will override the Navigation bar back button event, and hold that flow asynchronously until we get a confirmation from an Alert dialog. Once we got the confirmation, we will forward that backward navigation event using GoToAsync(“..”) execution.

Android on-screen Back Button: We could implement the Shell.OnNavigating event subscription to handle the Android back button navigation. This implementation will need a bit of work, hence we’re going to subscribe to the Shell.OnNavigating event upon the Page OnAppearing event and unsubscribe from it upon OnDisappearing event for cleaning up the event handlers. Once we get a hold of the back button event, we will asynchronously await for the Alert dialog confirmation and forward the navigation using GoToAsync(“..”), same as the previous execution.

Keep in mind that I will be showcasing how to handle both these scenarios at once, in perfect synchronous harmony with a beautiful non-conflict implementation. 😉

Additionally I will include them separately as well in my demo project for you to explore them separately as well just in case if you had such requirement. I have published this up in my Github repo, if you’re interested in taking a peak,

hosted on github:
github.com/UdaraAlwis/XFShellBackButtonOverride

Alright then, on ahead…

Before I begin, make sure to update the installed Xamarin.Forms version in your project, whereas for this demo I’m using version 4.6.0.847, so I would recommend using the same or newer version.

Let the coding begin!

Given that you have prepared your Xamarin.Forms Shell project solution, and ready to go, let me recap some basics I’ve set up this project with. I’m using pure out of the box Xamarin.Forms Shell project, with no additional libraries or dependencies. I have set it up accordingly to MVVM architecture with appropriate BindingContext set up for each XAML Page.

Let’s begin with our Navigation bar Back button override implementation, by adding Shell.BackButtonBehavior set up in our XAML Page.

<ContentPage
    ... >
 
    <Shell.BackButtonBehavior>
        <BackButtonBehavior Command="{Binding GoBackCommand}">
            <BackButtonBehavior.TextOverride>
                <OnPlatform x:TypeArguments="x:String">
                    <OnPlatform.Platforms>
                        <On Platform="iOS" Value="Go Back" />
                    </OnPlatform.Platforms>
                </OnPlatform>
            </BackButtonBehavior.TextOverride>
        </BackButtonBehavior>
    </Shell.BackButtonBehavior>
 
    <ContentPage.Content>
        ...
    </ContentPage.Content>
</ContentPage>

Remember the Xamarin.Forms Shell bug I mentioned earlier regarding the iOS run time? So here I’ve come up with a workaround for it by setting TextOverride property for iOS platform. You could even use the IconOverride property as well if it fits your requirement.

Now let’s wire up that Command, GoBackCommand in our ViewModel…

public class TestPageViewModel : BaseViewModel
{
	public Command GoBackCommand { get; set; }

	public TestPageViewModel()
	{
		...
		GoBackCommand = new Command(async () => await GoBack());
	}

	private async Task GoBack()
	{
		var result = await Shell.Current.DisplayAlert(
			"Going Back?",
			"Are you sure you want to go back?",
			"Yes, Please!", "Nope!");

		if (result)
		{
			await Shell.Current.GoToAsync("..", true);
		}
	}
}

As you can see I’ve wired up the Command to the GoBack() async method, where I’ve fired up an Alert dialog for the user awaiting confirmation asynchronously. Then once we get the go ahead confirmation we perform the backward navigation programmatically using GoToAsync(“..”) method.

Now that bit is completed, it should let you handle the Navigation Bar back button event as you wish! 😉

Next let’s take care of the Android on-screen Back button override implementation, by making sure we have hooked into the OnAppearing and OnDisappearing events in our Page, which could differ based on the MVVM library you use. But if you’re using pure Xamarin.Forms here like me, then you can hook up to them as follows…

public partial class TestPage : ContentPage
{
	public TestPage(){ ... } 

	protected override void OnAppearing()
	{
		base.OnAppearing();

		// execute OnAppearingCommand
		// informing ViewModel
		((TestPageViewModel)this.BindingContext)
				.OnAppearingCommand.Execute(null);
	}

	protected override void OnDisappearing()
	{
		base.OnDisappearing();

		// execute OnDisappearingCommand		
		// informing ViewModel
	}
}

The idea here is to inform our ViewModel that the Page is Appearing or Disappearing and based on that we subscribe or unsubscribe from Shell.OnNavigating event as follows…

public class TestPageViewModel : BaseViewModel
{
    ...
    public Command OnAppearingCommand { get; set; }
    ...
  
    public TestPageViewModel()
    {
        ... 
        OnAppearingCommand 
                = new Command(() => OnAppearing());
        ...
    }
 
    private void OnAppearing()
    {
        Shell.Current.Navigating += Current_Navigating;
    }
 
    private void OnDisappearing()
    {
        Shell.Current.Navigating -= Current_Navigating;
    }
 
    private async void Current_Navigating(object sender, 
                                ShellNavigatingEventArgs e)
    {
        if (e.CanCancel)
        {
            e.Cancel();
            await GoBack();
        }
    }
 
    private async Task GoBack()
    {
        // display Alert for confirmation
        ...
 
        if (result)
        {
            Shell.Current.Navigating -= Current_Navigating;
            await Shell.Current.GoToAsync("..", true);
        }
    }
}

As you can see we’re subscribing to Shell.Current.Navigating event based on Appearing and Disappearing events of the page, making sure that we’re cleaning up the event handlers as I explained before.

Here we’re intercepting the Navigation in the Current_Navigating() method, and we immediately cancel it and call up on awaitable GoBack() method, where we do the Alert confirmation for the user. Then from there, based on the confirmation, we perform go back or cancellation, and additionally we’re unsubscribing from the Shell.Current.Navigating event there itself, for preventing circular event.

Here I am unsubscribing from Shell.Current.Navigating in both GoBack() and OnDisappearing() is for safety, but you could handle this according to your own requirement as well.

Afterthought…

You can only keep the 2nd implementation and still have the Navigation Bar back button overridden, this is due to Shell.OnNavigating firing up for any kind of navigation happening in Shell. So you don’t really need to have the Shell.BackButtonBehavior implementation, but you could keep both in case if you need to implement any extra features, or for safe keeping of the navigation state. 😉 Your choice!

Also since the Android on-screen Back Button handling is only required on Android, you could restrict that code logic to be registered only for Android run time using Device.RuntimePlatform == Device.Android flag of Xamarin.Forms framework.

No! I don’t want both!?

Now having both the above implementation will let you override Navigation Bar and Android on-screen back button actions. But what if I only want to override one of them? Good question!

In that case you could only have one of the above implementation up on your choice, but if you want to keep both and dynamically switch between the options, you could easily do that by introducing a simple flag property in your ViewModel such as follows,

public class TestPageViewModel : BaseViewModel
{
    public bool IsBackwardNavAllowed { get; set; } = false;
 
    public TestPageViewModel()
    {
        ...
        NavBarBackButtonCommand = new Command(async () => 
        {
            IsBackwardNavAllowed = true;
            await Shell.Current.GoToAsync("..", true);
        });
        ...
    }
 
    ...
 
    private async void Current_Navigating(object sender, ShellNavigatingEventArgs e)
    {
        if (e.CanCancel && !IsBackwardNavAllowed)
        {
            e.Cancel();
            await GoBack();
        }
    }

    ...
}

Here I have the IsBackwardNavAllowed flag, where I use to allow backward navigation originated from NavBarBackButtonCommand which is bound to Shell.BackButtonBehavior, but I still override the Android on-screen back button navigation event. 😉

Little demo awesomeness!

So in my little demo app, I have implemented 3 separate scenarios of overriding the Back Button Navigation in Xamarin.Forms Shell!

You can take a look at each XAML Page and their ViewModel counter parts to see how I have implemented this awesomeness. Alright then without further a due, let’s see it in action!

Fire it up!

Here in our 1st Page we have Android and iOS side by side both with Navigation Bar Back Button overridden successfully… 😀

You can see here on Android we have the default Back button in the Navigation bar, but on iOS we have the Text overridden back button due workaround I used for fixing the iOS bug I mentioned earlier.

Then in our 2nd Page we have Android on-screen Back button overridden successfully, in which case there wouldn’t be any response to show on iOS obviously…

As you can see I’ve deliberately disabled the overriding of the Navigation Bar Back button action using the implementation that I discussed earlier, hence we’re nicely overriding only the Android on-screen Back Button action.

Finally in our 3rd Page we have Android and iOS side by side with both Navigation Bar Back Button and Android on-screen Back Button overridden successfully…

There you go, Navigation bar back button events are overridden in both Android and iOS, while also overriding the Android on-screen back button event as well! 😉 This this implementation you don’t have to deal with the iOS bug of Shell.BackButtonBehavior…

Oh look at that beauty eh! 😉

hosted on github:
github.com/UdaraAlwis/XFShellBackButtonOverride

Once again feel free to check out the code on github! 😀

Conclusion…

The whole idea of overriding backward navigation in classic Xamarin.Forms was quite tedious, having to implement custom renderers and all kinds of platform specific hacks. But with Xamarin.Forms Shell it seems to be made easier, but still need a bit of work, and few pending bugs needs fixing from Microsofts.

So using the awesomeness of Xamarin.Forms Shell we explored how to override the Navigation Bar Back Button and Android on-screen Back Button events, with multiple customization possibilities for catering to your specific requirements.

Hope this was helpful for any of my fellow devs out there!

Share the love! 😀 Cheers yol!

Publishing the Nuget of my Color Picker Control for Xamarin.Forms!

Let me share the journey of me publishing the Nuget Package of my interactive Color Picker Control for Xamarin.Forms that I built using SkiaSharp.

So some time back I built an Interactive and responsive Color Picker Control for Xamarin.Forms (Android, iOS, UWP) with a whole bunch of awesome features. On a Canvas with a beautiful Color spectrum similar to a rainbow gradient effect spreading across, drag, drop, swipe and pan over the Canvas to pick the Color you need easily, in a fun-to-use interactive experience. Built from pure Xamarin.Forms based on SkiaSharp, lightweight and fast!

Backstory…

In my previous blog post I shared with you guys how I built my interactive Color Picker Control for Xamarin.Forms, https://theconfuzedsourcecode.wordpress.com/2020/02/26/i-built-an-interactive-color-picker-control-for-xamarin-forms/

Since then I had been adding a whole bunch of extra feature to this Color Picker Control I built, so I thought it was a good idea to publish it as a Nuget Package and share with everyone! 😀

So this time, let me share my journey of implementing more advanced features and publishing the Nuget Package of my Color Picker Control for Xamarin.Forms! 😉

Some thought…

So before I isolated my Color Picker Control into a stand alone reusable package, I wanted to make sure that I maintain my philosophy of building Plugins. This would definitely have a big impact on your Users who will will be using these Plugins to build their apps, therefore I’ll share the tick list that I consider as important as follows…

Plug and Play: The plugin should easy to set up with. Do not force Devs to set up any dependencies or property values by themselves. The properties and behaviors of the Plugin should have default values assigned to them.

Customization: It should be easy and straight forward for the Devs to customize the appearance or the behaviors of the Plugin. In some case this might be limited, but you must build the Plugin in a way it make it easy as much as possible.

Embedded: In the case of UI Element Plugins, you should make it easy to be embedded into any Layout structure, being able to inherit the Parent Layout’s behaviors and values, without overriding or disrupting them.

Keep it Light: Make the Plugin as lightweight as possible, give the Dev the chance to choose which assemblies to be included in the plugin. Remove unnecessary references or dependencies from your Plugin core, so it’s light weight as possible.

Performance First: It shouldn’t cause any performance bottleneck, therefore from scratch you must build the Plugin with performance in mind. Constantly check for performance improvements during the development of your Plugin.

So may be go over this list before you build or release a Plugin for the public! 😉 Alright, with all those principles in mind, let’s move ahead…

The Features!

So here are the features that are already available in the Color Picker Control that I built which I had shared from my previous blog post…

  • Picked Color: The Property that allows Users to retrieve the Color values that’s selected from the Color Picker. This value is only a Get Property.
  • Picked Color Changed Event: The Event that fires up every time the PickedColor Value is changed during Color selection. You can subscribe to this event and observe the behavior.

Since my venture into this Color Picker Plugin I had a few ideas in mind as improvements or rather add as extra features, rather than just being a UI Element which allows you to pick a color on a beautiful spectrum! 😉 So here are the extra features that I’ll be building up into it..

  • Change the Available Base Colors List: You can set the primary list of Colors where the gradient spectrum will be rendered from. So choose the base colors you want to be populated as you wish and it will be rendered on the Color Picker.
  • Change the Color List Flow Direction: You will be able to change the direction of the flow of the colors on the canvas, where it be Horizontal flow or a Vertical flow of the color spectrum. Further more Horizontally being starting off the flow from left to right, and Vertically being top to bottom.
  • Change the Color Spectrum Style: You will be able to change the style of the Color Spectrum gradient, the rendering combination of base colors (Hue), or lighter colors (Tint) or darker colors (Shade). You’ll be able to set it with different order as well, ex: Hue Colors, Shade Colors, Tint Colors or Tint Colors, Hue Colors, Shade Colors, etc..
  • Change the Appearance of the Pointer: The white color circle that is used as the Picker Pointer on the Canvas, should be able to customized based on its Diameter or Thickness of the Circle border. Another nice addition would be to allow user to set the position of the Pointer as they wish.

Alright, now that we listed down the new intended feature set that I’m planning to ship out with my Color Picker Control, let’s get down to building it… 😀

Sneak Peek!

Just to give a little glimpse of the awesomeness I ended up building and publishing… 😀 behold the Color Picker Control for Xamarin.Forms!

Pretty awesome eh! 😉 I have moved out of my previous repo to a new standalone repo in github, since I’m publishing this as a package. Therefore all the new development will be done in this repository.

Project hosted on github:
https://github.com/UdaraAlwis/XFColorPickerControl

So feel free to take a look in there before we continue… 😉

Time to Build!

Since I already explained in my previous blog post how I built my Color Picker Control from scratch step by step, I won’t be repeatedly going through same code bits in this post, but rather focus on the new changes and features only.
If you haven’t read that one yet, then I would recommend you take a peek there first, I built an Interactive Color Picker Control for Xamarin.Forms! And continue here…

I named the Solution as Udara.Plugin.XFColorPickerControl, and in return I intend to keep the Package reference with the same naming. I am using Visual Studio 2019 on Windows 10 here as my development environment.

I have created a VS Solution with a .NET Standard 2.0 Library which will hold the UI Control in place, with the naming ColorPicker. You can see I have added the dependencies of the Plugin, with Xamarin.Forms and SkiaSharp.Views.Forms packages. 😉

Notice the pure Xamarin.Forms DemoApp project inside the Demo folder that I have added to the same solution? That is for testing and showcasing the Plugin’s use, also as a reference point for anyone who wants to learn how to use the Plugin in many different ways, this attached DemoApp could come handy. 😀

The ColorPicker.xaml is the UI Element that users will be using under the namespace Udara.Plugin.XFColorPickerControl.ColorPicker in their XAML or C# code for building the UI. Here’s base skeleton implementation of the ColorPicker.xaml.cs, which all the core implementation will be taking place…

namespace Udara.Plugin.XFColorPickerControl
{
    [XamlCompilation(XamlCompilationOptions.Compile)]
    public partial class ColorPicker : ContentView
    {
        public ColorPicker()
        {
            InitializeComponent();
        }

        // Implementation goes here
    }
}

Next let’s get into the implementation of Features one by one as I discussed before…

Building the Features!

So I’m going to use the same code for the two features that I already implemented in my previous blog post, Picked Color and Picked Color Changed Event feature that’s represented by PickedColor Property and PickedColorChanged Event Handler.

[XamlCompilation(XamlCompilationOptions.Compile)]
public partial class ColorPicker : ContentView
{
	/// <summary>
	/// Occurs when the Picked Color changes
	/// </summary>
	public event EventHandler<Color> PickedColorChanged;

	public static readonly BindableProperty PickedColorProperty
		= BindableProperty.Create(
			nameof(PickedColor),
			typeof(Color),
			typeof(ColorPicker));

	/// <summary>
	/// Get the current Picked Color
	/// </summary>
	public Color PickedColor
	{
		get { return (Color)GetValue(PickedColorProperty); }
		private set { SetValue(PickedColorProperty, value); }
	}
	
	...
}

Now considering the rest of the features that I discussed in the beginning, all those features can be implemented and exposed via Bendable Properties, and handling the Property Changed events internally to react for any changes requested during run time.

[XamlCompilation(XamlCompilationOptions.Compile)]
public partial class ColorPicker : ContentView
{
    ...
 
    public static readonly BindableProperty PropertyNameProperty
        = BindableProperty.Create( 
        ... 
        
            validateValue: (bindable, value) =>
            {
                // validate value
                return (..);
            },
            
            propertyChanged: (bindable, value, newValue) =>
            {
                if (newValue != null)
                    // action on value change
                else
                    // handling null values
                    ((ColorPicker)bindable).PropertyNameProperty = default;
            });
        );
 
    public type PropertyName
    { ... }
 
    ...
}

All the Bindable Properties are safeguarded with validations as you see above. I have added an extra layer of protection against unnecessary null values being set up, by defaulting the property value to default of itself. You can check the full implementation of each of these Properties on the github repo itself. github.com/UdaraAlwis/XFColorPickerControl Let’s begin..

Feature: BaseColorList

Bindable Property, BaseColorList: Change the available base Colors on the Color Spectrum, of the Color Picker. This will take a List of strings of Color names or Hex values, which is held in an IEnumerable as show here, also I have set up the fallback default values with the rainbow color spectrum.

[XamlCompilation(XamlCompilationOptions.Compile)]
public partial class ColorPicker : ContentView
{
    ...

    public static readonly BindableProperty BaseColorListProperty
        = BindableProperty.Create( ... );

    public IEnumerable BaseColorList
    { ... }

    ...
}

This Property is then consumed during the SkiaSharp rendering cycle as follows, where as we’re using the Xamarin.Forms built in ColorTypeConverter to parse the string color values to actual Color objects and then to SKColor objects, which is then used to render the render the color spectrum on the Color Picker Control. 😀

...
    private void SkCanvasView_OnPaintSurface
                   (object sender, SKPaintSurfaceEventArgs  e)
    {
        ...
         
        // Draw gradient rainbow Color spectrum
        using (var paint = new SKPaint())
        {
            paint.IsAntialias = true;
 
            // Initiate the base Color list
            ColorTypeConverter converter = new ColorTypeConverter();
            System.Collections.Generic.List<SKColor> colors = 
                new System.Collections.Generic.List<SKColor>();
            foreach (var color in BaseColorList)
                colors.Add(((Color)converter.
		          ConvertFromInvariantString(color.ToString())).ToSKColor());
				
            ...
        }
    }
...

Pretty straight forward eh! Let’s see how you could use this as a developer.

How to use?

You can easily use this feature in XAML as follows, by accessing ColorPicker.BaseColorList property and setting up the list of color values you prefer as hex values or with pre-defined color value names.

<xfColorPickerControl:ColorPicker
	x:Name="ColorPicker"
	...	>
	<xfColorPickerControl:ColorPicker.BaseColorList>
		<x:Array Type="{x:Type x:String}">
			<!--  Yellow  -->
			<x:String>#ffff00</x:String>
			<!--  Aqua  -->
			<x:String>#00ffff</x:String>
			<!--  Fuchsia  -->
			<x:String>#ff00ff</x:String>
			<!--  Yellow  -->
			<x:String>#ffff00</x:String>
		</x:Array>
	</xfColorPickerControl:ColorPicker.BaseColorList>
</xfColorPickerControl:ColorPicker>

If you prefer in C# code, you can easily do as as well, a list of string values of the colors…

ColorPicker.BaseColorList = new List<string>()
{
	"#00bfff",
	"#0040ff",
	"#8000ff",
	"#ff00ff",
	"#ff0000",
};

Here’s some action…

Feature: ColorFlowDirection

The Bindable Property, ColorFlowDirection: Change the direction in which the Colors are flowing through on the Color Spectrum, of the Color Picker. This will allow you to set whether the Colors are flowing through from left to right, Horizontally or top to bottom, Vertically. I have defined an Enum type which will represent this type of course.

namespace Udara.Plugin.XFColorPickerControl
{
    public enum ColorFlowDirection
    {
        Horizontal,
        Vertical
    }
}

Let’s create our ColorFlowDirection Bindable Property based on that,

[XamlCompilation(XamlCompilationOptions.Compile)]
public partial class ColorPicker : ContentView
{
    ...

    public static readonly BindableProperty ColorFlowDirectionProperty
        = BindableProperty.Create( ... );

    public ColorFlowDirection ColorFlowDirection
    { ... }

    ...
}

The default value will be set as ColorFlowDirection.Horizontal, and if the User changes value during run time, it will fire up a new SkiaSharp rendering cycle of the Canvas, effectively rendering the spectrum accordingly to the new color value, which is handled in the rendering logic as below…

...
    private void SkCanvasView_OnPaintSurface
                   (object sender, SKPaintSurfaceEventArgs  e)
    {
        ...
        
            // create the gradient shader between base Colors
            using (var shader = SKShader.CreateLinearGradient(
                new SKPoint(0, 0),
                ColorFlowDirection == ColorFlowDirection.Horizontal ?
                    new SKPoint(skCanvasWidth, 0) : 
                    new SKPoint(0, skCanvasHeight),
                colors.ToArray(),
                null,
                SKShaderTileMode.Clamp))
            {
                paint.Shader = shader;
                skCanvas.DrawPaint(paint);
            }
            
        ...
    }
...

The trick here is to configure the SKShader.CreateLinearGradient() method’s start and end coordinate parameters, which governs the direction in which the gradient effect will be drawn with the list of colors, thus rendering the color list from left to right or top to bottom. As you can see for Horizontal effect, we use SKPoint (0,0) to SKPoint(<canvasWidth>, 0) by using the corner most value on the X axis for the end coordinates, the same pattern is used for Vertical effect with bottom most value on the Y axis.

Here how to consume this feature as a developer…

How to use?

You can easily use this feature in XAML, by accessing ColorPicker.ColorFlowDirection property and setting Horizontal or Vertical option as you prefer…

<xfColorPickerControl:ColorPicker
	x:Name="ColorPicker"
	ColorFlowDirection="Horizontal"
	...	>
</xfColorPickerControl:ColorPicker>

If you prefer in C# code, use the ColorFlowDirection.Horizontal or Vertical option…

ColorPicker.ColorFlowDirection =
	Udara.Plugin.XFColorPickerControl.ColorFlowDirection.Horizontal;

Here’s some action…

Feature: ColorSpectrumStyle

The Bindable Property, ColorSpectrumStyle: Change the Color Spectrum gradient style, with the rendering combination of base colors (Hue), or lighter colors (Tint) or darker colors (Shade). If you’re not familiar with these technical terms, here’s a clear illustration of comparison of Hue, Shade, and Tint of Colors.

We need to make sure our Color Picker is able to deliver to this kind of requirement, having darker or lighter colors of the given base colors on the Color Picker Spectrum. So I’ve created an Enum type which will consist of all the possible combinations of Hue, Shade and Tint colors based on the available Base Colors, that would facilitate this feature.

namespace Udara.Plugin.XFColorPickerControl
{
    public enum ColorSpectrumStyle
    {
        HueOnlyStyle,
        HueToShadeStyle,
        ShadeToHueStyle,
        HueToTintStyle,
        TintToHueStyle,
        TintToHueToShadeStyle,
        ShadeToHueToTintStyle
    }
}

Let’s create our ColorSpectrumStyle Bindable Property based on that,

[XamlCompilation(XamlCompilationOptions.Compile)]
public partial class ColorPicker : ContentView
{
    ...

    public static readonly BindableProperty ColorSpectrumStyleProperty
        = BindableProperty.Create( ... );

    public ColorSpectrumStyle ColorSpectrumStyle
    { ... }

    ...
}

I will be setting ColorSpectrumStyle.HueToShadeStyle as the default value for this property, any changes to this value during run time will kick start a new refresh draw on the Color Spectrum, which is handled in the rendering logic as below…

...
    private void SkCanvasView_OnPaintSurface
                   (object sender, SKPaintSurfaceEventArgs  e)
    {
        ...
         
        // Draw secondary gradient color spectrum
        using (var paint = new SKPaint())
        {
            paint.IsAntialias = true;
 
            // Initiate gradient color spectrum style layer
            var colors = GetSecondaryLayerColors(ColorSpectrumStyle);
			
            ...
        }
    }
...

Over here, we’re retrieving the list of colors based on the ColorSpectrumStyle value, which is a combination of Transparent, Black and White colors, which will be used to draw the secondary gradient layer. GetSecondaryLayerColors() will be returning the appropriate list of secondary colors that matches the ColorSpectrumStyle requested as follows.

...
    private SKColor[] GetSecondaryLayerColors(ColorSpectrumStyle colorSpectrumStyle)
    {
        ...
        
        if (colorSpectrumStyle == GradientColorStyle.DarkToColorsToLightStyle)
        {
            return new SKColor[]
            {
                SKColors.Black,
                SKColors.Transparent,
                SKColors.White
            };
        }
        
        ...
    }
...

I’m maintaining a simple If-else block chain which will check for the ColorSpectrumStyle value available and return the appropriate list of colors back. Quite straight forward! 😉

Now here’s how you use this awesome feature…

How to use?

You can easily use this feature in XAML, by accessing ColorPicker.ColorSpectrumStyle property and setting the appropriate Style option as you prefer…

<xfColorPickerControl:ColorPicker
	x:Name="ColorPicker"
	ColorSpectrumStyle="TintToHueToShadeStyle"
	...	>
</xfColorPickerControl:ColorPicker>

If you prefer in C# code…

ColorPicker.ColorSpectrumStyle =
	Udara.Plugin.XFColorPickerControl.ColorSpectrumStyle.TintToHueToShadeStyle;

Here’s some action…

Feature: PointerRing Styling

As you can see there’s a pretty neat Pointer Ring that’s pointing the picked color position on the Color Picker, it would be nice to be able to customized this too eh! 😉

Therefore I have introduced four features for this,

  • PointerRingDiameterUnits
  • PointerRingBorderUnits
  • PointerRingPositionXUnits
  • PointerRingPositionYUnits

Alright, let’s walk through them one by one..

Feature: PointerRingDiameterUnits

The Bindable Property, PointerRingDiameter: Changes the Diameter size of the Pointer Ring on the Color Picker. It accepts values between 0 and 1, as a representation of numerical units which is compared to the 1/10th of the longest length of the Color Picker Canvas. By default this value is set to 0.6 units.

[XamlCompilation(XamlCompilationOptions.Compile)]
public partial class ColorPicker : ContentView
{
    ...
 
    public static readonly BindableProperty PointerRingDiameterUnitsProperty
        = BindableProperty.Create( ... );
 
    public double PointerRingDiameterUnits
    { ... }
    
    ...
}

This will be calculated against the longest length of Color Picker’s Canvas, whether it be Width or Height. The reason for adding another 1/10th of the value is to maintain the maximum size of the Pointer Ring, avoiding ridiculous sizing of the element. lol So the Precise calculation is as, Canvas Size (Height or Width) x PointerRingDiameterUnits x (1/10)
This value will render exactly to the same proportion against different screen sizes and DPs.

...
    private void SkCanvasView_OnPaintSurface
                   (object sender, SKPaintSurfaceEventArgs  e)
    {
        ...
         
        // Painting the Touch point
        using (var paint = new SKPaint())
        {
            ...
 
            var canvasLongestLength = (skCanvasWidth > skCanvasHeight) 
                    ? skCanvasWidth : skCanvasHeight;

            // Calculate 1/10th of the units value for scaling
            var pointerRingDiameterUnitsScaled = (float)PointerRingDiameterUnits / 10f;
            // Calculate against Longest Length of Canvas 
            var pointerRingDiameter = (float)canvasLongestLength 
                                                    * pointerRingDiameterUnitsScaled;

            // Outer circle of the Pointer (Ring)
            skCanvas.DrawCircle(
                _lastTouchPoint.X,
                _lastTouchPoint.Y,
                (pointerRingDiameter / 2), paintTouchPoint);

            ...
        }
    }
...

I’ve set up the skCanvas.DrawCircle() with the (pointerRingDiameter / 2) since it accepts radius value only for drawing the circle.

How to use?

You can easily use this feature in XAML, by accessing ColorPicker.PointerRingDiameterUnits property and setting the value against your Color Picker’s Width and Height.

<xfColorPickerControl:ColorPicker
    x:Name="ColorPicker"
    PointerRingDiameterUnits="0.6"
    ...    >
</xfColorPickerControl:ColorPicker>

If you prefer in C# code…

ColorPicker.PointerRingDiameterUnits = 0.6;

Here’s some action…

Feature: PointerRingBorderUnits

The Bindable Property, PointerRingBorderUnits: Changes the Border Thickness size of the Pointer Ring on the Color Picker. It accepts values between 0 and 1, as a representation of numerical units which is calculated against the diameter of the Pointer Ring. By default this value is set to 0.3 units.

[XamlCompilation(XamlCompilationOptions.Compile)]
public partial class ColorPicker : ContentView
{
    ...
 
    public static readonly BindableProperty PointerRingBorderUnitsProperty
        = BindableProperty.Create( ... );
 
    public double PointerRingBorderUnits
    { ... }
    
    ...
}

This calculation executes against the Pointer Ring’s pixel diameter value as, (Pointer Ring Diameter in Pixels) x PointerRingBorderUnits, since this is dependent on the Pointer Ring’s diameter, we thickens the border inside that circle only. Basic technique here is to draw a Circle inside the Parent Circle, with the picked pixel point’s color, emulating the visual of a Ring.

...
    private void SkCanvasView_OnPaintSurface
                   (object sender, SKPaintSurfaceEventArgs  e)
    {
        ...
         
        // Painting the Touch point
        using (var paint = new SKPaint())
        {
            ...
 
            // Draw inner circle with picked color
            paintTouchPoint.Color = touchPointColor;

            // Calculate against Pointer Circle
            var pointerRingInnerCircleDiameter 
                          = (float)pointerRingDiameter 
                              * (float)PointerRingBorderUnits; 

            // Inner circle of the Pointer (Ring)
            skCanvas.DrawCircle(
                _lastTouchPoint.X,
                _lastTouchPoint.Y,
                ((pointerRingDiameter 
                        - pointerRingInnerCircleDiameter) / 2), paintTouchPoint);
            ...
        }
    }
...

I’ve set up the skCanvas.DrawCircle() with the calculation, ((pointerRingDiameter – pointerRingInnerCircleDiameter) / 2) since it accepts radius value only for drawing the circle.

How to use?

You can easily use this feature in XAML, by accessing ColorPicker.PointerRingBorderUnits property and setting the value against PointerRingDiameterUnits you have used.

<xfColorPickerControl:ColorPicker
    x:Name="ColorPicker"
    PointerRingBorderUnits="0.3"
    ...    >
</xfColorPickerControl:ColorPicker>

If you prefer in C# code…

ColorPicker.PointerRingBorderUnits = 0.3;

Here’s some action…

Feature: PointerRingPosition<X,Y>Units

The Bindable Property, PointerRingPosition<X,Y>Units: Changes the Pointer Ring’s position on the Color Picker Canvas programmatically. There are of two bindable properties PointerRingPositionXUnits and PointerRingPositionYUnits, which represents X and Y coordinates on the Color Picker Canvas. It accepts values between 0 and 1, as a presentation of numerical units which is calculated against the Color Picker Canvas’s actual pixel Width and Height. By default both the values are set to 0.5 units, which positions the Pointer Ring in the center of the Color Picker.

[XamlCompilation(XamlCompilationOptions.Compile)]
public partial class ColorPicker : ContentView
{
    ...
 
    public static readonly BindableProperty PointerRingPositionXUnitsProperty
        = BindableProperty.Create( ... );
 
    public double PointerRingPositionXUnits
    { ... }
	
    public static readonly BindableProperty PointerRingPositionYUnitsProperty
        = BindableProperty.Create( ... );
 
    public double PointerRingPositionYUnits
    { ... }
 
    ...
}

This calculation executes against the Color Picker Canvas’s actual pixel Width and Height as, (Color Picker Canvas Width in Pixels) x PointerRingPositionXUnits and (Color Picker Canvas Height in Pixels) x PointerRingPositionYUnits
Up on invoke of the PropertyChanged on those Properties, we make a call to the following SetPointerRingPosition() with the new X and Y position units requested from User.

...
    private void SetPointerRingPosition
                      (double xPositionUnits, double yPositionUnits)
    {
        // Calculate actual X Position
        var xPosition = SkCanvasView.CanvasSize.Width
                                 * xPositionUnits; 
        // Calculate actual Y Position
        var yPosition = SkCanvasView.CanvasSize.Height
                                 * yPositionUnits; 

        // Update as last touch Position on Canvas
        _lastTouchPoint = new SKPoint(Convert.ToSingle(xPosition), Convert.ToSingle(yPosition));
        SkCanvasView.InvalidateSurface();
    }
...

We’re calculating the actual X and Y coordinates against the Canvas pixel size and setting up the _lastTouchPoint with those values, for keeping the Pointer Ring position on canvas in sync with touch inputs positioning and programmatical positioning, then at the end we fire up the SkiaSharp rendering cycle with SkCanvasView.InvalidateSurface();

Handling Pointer Ring Position on Initialization!

We need to handle the positioning of the Pointer Ring on the initialisation or on the rendering of the element during run time. We can achieve this by a one-time execution with a boolean flag, that executes this logic. So upon the first SkiaSharp canvas rendering cycle, we hook up to the PointerRingPositionXUnits and PointerRingPositionYUnits properties and render the Pointer Ring Position to the set value.

...    
    private bool _checkPointerInitPositionDone = false;

...
    private void SkCanvasView_OnPaintSurface
                   (object sender, SKPaintSurfaceEventArgs  e)
    {
        ...
          
        if (!_checkPointerInitPositionDone)
        {
            var x = ((float)skCanvasWidth * (float)PointerRingPositionXUnits);
            var y = ((float)skCanvasHeight * (float)PointerRingPositionYUnits);

            _lastTouchPoint = new SKPoint(x, y);

            _checkPointerInitPositionDone = true;
        }
    }
...

We use _lastTouchPoint variable which is used by the drawing functions for rendering the Pointer Ring on Color Picker’s Canvas.

How to use?

You can easily use this feature in XAML, by accessing ColorPicker.PointerRingPositionXUnits property and ColorPicker.PointerRingPositionYUnits setting the values against your Color Picker’s Width and Height.

<xfColorPickerControl:ColorPicker
    x:Name="ColorPicker"
    PointerRingPositionXUnits="0.3"
    PointerRingPositionYUnits="0.7"
    ...    >
</xfColorPickerControl:ColorPicker>

If you prefer in C# code…

ColorPicker.PointerRingPositionXUnits = 0.3;
ColorPicker.PointerRingPositionYUnits = 0.7;

Here’s some action…

UWP Bug Fix!

One issue I noticed was on UWP run time, where the SkiaSharp’s Canvas touch event behaves differently than iOS and Android. The touch event would get activated even if you hover over the canvas using your mouse pointer, and this was causing the PickedColor property to fire up.
The Touch event should occur only if you actually click on the canvas and drag and drop on the Canvas, so in order to fix this I used the InContact property SKTouchEventArgs inside the touch event to validate on UWP run time.

...
    private void SkCanvasView_OnTouch
                (object sender, SKTouchEventArgs e)
    {
        // to fix the UWP touch behavior
        if (Device.RuntimePlatform == Device.UWP)
        {
            // avoid mouse over touch events
            if (!e.InContact)
                return;
        }

        _lastTouchPoint = e.Location;
        
        ...
    }
...

This fixed the bug on UWP, making sure the touch event is validated before executing the rest of the logic.

Nugetizing!

Alright then, its time to set up our beautiful Color Picker Control for Xamarin.Forms as a Nuget Package using Visual Studio. I’m going first set the Nuget package properties first, then build the package, and finally publish it to Nuget, allowing it to be shared with everyone out there! 😀

Set up package properties…

You could do this straight from Visual Studio Project Properties, or directly from a Nuspec file added to the project itself. For now I would prefer setting up properties in VS Project -> Properties – Package tab, making sure to add all the necessary properties and information about the package as shown below…

Make sure to click on “Generate Nuget package on build” tick, which will enable all the property fields. You could also do this by editing .csproj file of the package project as well, if you require any fine tuned editing…

Now we’re ready to build the package of our Udara.Plugin.XFColorPicker library.

Building the Package…

We need to create the Publish Profile for the package.
Right click on Library project node -> Publish

If this was your first time, it will navigate you to create new Publish Profile tab as shown below…

It is easier to set up a Publish Profile, since you don’t have to manually change your build configuration to Release and then launch a build. Therefore I have set it up now, and next time I publish it will straightaway handle all the configuration for you! 😀

Click Publish, and it nicely builds…

Once we navigate to the folder location mentioned in the above build output…

There we have our nupkg package file, which we can then use to directly upload to Nuget!

Upload to Nuget…

Grab that nupkg file and drag and drop into the upload page of nuget.org and you’re done!

Here you’ll be able to add a short marked down documentation for the users, I would highly recommend you do that since it will increase the support and visibility.

Well that’s all it takes, and the package will be available in a few hours on Nuget!

Updating Package…

Now how do we update our package? if you have noticed around nuget, there’s no update option in in the page where you manage the package. You can update your package by using the NuGet command-line utility or directly uploading an increment build, in which I have opted for the end option to keep it easy.

So when you want to push an update to your package, make sure to update the package properties in Visual Studio to reflect the next immediate version, as shown below where I’m updating from version 1.0.2 to version 1.0.3…

Also do no forget the assembly versioning as well…

Now build your package and directly go to nuget upload page, drag and drop the file…

Make sure to add the nuget documentation and Submit!

Done and dusted, just like that, the updating is done! 😀

Published on nuget:
nuget.org/Udara.Plugin.XFColorPickerControl/

Now anyone can use my Color Picker Control for Xamarin.Forms by setting up this nuget package in their project…

Demoing it up!

As you saw at the beginning I have attached a Demo project into the same parent Solution of Udara.Plugin.XFColorPickerControl, which I have used for testing during development, and to maintain as a demonstration of all the awesome features this plugin provides! 😉

Since this plugin is meant to be compatible on a cross platform environment its impeccable do continuous testing on all the platforms. Anyhow here’s a sneak peek of the demo app…

I have created separate pages to demonstrate awesomeness of each special feature…

BaseColorList Demo:

Android, UWP and iOS…

ColorFlowDirection Demo:

Android, UWP and iOS…

ColorSpectrumStyle Demo:

Android, UWP and iOS…

PointerRingStyling Demo:

Android, UWP and iOS…

Since it’s a pure Xamarin.Forms and can be deployed directly to all three platforms, Android, iOS and Windows UWP, you can do the same with my plugin. Feel free to take a look at the demo app in case if you need trouble shooting.

Conclusion!

There you have it my Color Picker Control for Xamarin.Forms, now published to nuget as a package, with a whole bunch of awesome features, and anyone can easily use it in their own Xamarin.Forms projects! 😀 Pheww… What a joy! Sharing something you’ve been working so hard for a long time. So feel free to give a try, contribute, and any feedback is always welcome…

hosted on github:
github.com/UdaraAlwis/XFColorPickerControl

published on nuget:
nuget.org/Udara.Plugin.XFColorPickerControl/

Well that was fun! So keep in mind I’m going to be implementing more and more features for this plugin in future, and might end up changing some of those features or implementations as well. This blog post will not be constantly updated against them, so many sure to keep in touch with the docs in the github repo itself for future references.

Imagination is the limit yol! 😉

Share the love! 😀 Cheers!

UPDATE: Guess what yol? My little Color Picker Control got featured at the .NET Conf: Focus on Xamarin event by Microsoft!

WOOT! WOOT! Thanks @James Montemagno!

I built an Interactive Color Picker Control for Xamarin.Forms!

Let me share my adventure of building an awesome interactive and responsive Color Picker UI Control for Xamarin.Forms with the help of a little SkiaSharp magic! 😉

To blow your mind, imagine something similar to the Color Picker your have in Ms Paint, HTML Web Color Picker or Google Search Web Color Picker…

Think of how interactive and fun to use those UI Elements are, with their drag and drop pointers on the color spectrum which picks up the color from wherever you drop it.

Why can’t we have the same easy to use fun interactive experience in our Xamarin.Forms apps?

Color Picker control is something that’s missing out of the box in Xamarin.Forms, even when it comes to 3rd party controls out there, neither of them are interactive or responsive, let along any fun to use all. lol 😀

Backstory…

Some time back, I ventured in a project where it required me to build a Color Picking UI element, where it would be easy to use for the user to have a similar experience to what we have with Ms Paint, or Web Color Picker UI elements. So I started off by looking at existing 3rd party library controls out there, which ended up me being disappointed seeing all the controls are just static boring color selection lists of grid style elements.

So I started building my own interactive fun-to-use Color Picker from scratch modeled after the Color Picker UI controls we have in Ms Paint, HTML Web Color Picker, etc… The awesomeness of this would allow you to touch, swipe and pan across a beautiful spectrum of color scheme and pick the color you desire! 😀

So… What?

So what we really need to build in this case is, create a Canvas with a full Color spectrum similar to a rainbow gradient effect spreading across, while allowing the User to touch at any given pixel point, up on which an event will trigger capturing the Color value of that pixel point. Also we should be able to highlight that touch triggered pixel point, giving the feedback to the User.

How? in a Gist…

Frankly this is not possible at all, out of the box in Xamarin.Forms, but with the help of a little SkiaSharp magic, this would be possible! SkiaSharp is the awesome 2D graphics rendering library that let’s you do all kinds of cool stuff on top of Xamarin.Forms. So basically we’re going to draw the full Color spectrum with a rainbow-gradient style spreading across a 2D canvas with the help of SkiaSharp.

We will define the list of main colors we need to include across the Canvas, while defining the Gradient fading effect between them. Then with regards to Touch, we need to enable this on the SkiaSharp canvas, and subscribe to the touch handling events.

Then given the User triggers a touch even on the Canvas, we will pick up those coordinate values on the canvas, and pick the Color values of the Pixel at that point on the Canvas. Voiala! We got the Color value picked by the User! 😉 Then as a responsive feedback we will draw highlighting circle around that pixel point coordinates on the Canvas. 😀

Well there you have it, quite straight forward eh! 😉

Sneak Peak!

Just to give a little sneak peak, here’s what I build… 😀 Behold the Interactive Color Picker Control for Xamarin.Forms!

Pretty awesome eh! Xamarin.Forms + SkiaSharp magic! 😉

Project hosted on github:  
https://github.com/UdaraAlwis/XFColorPickerControl 

Alright then let me show you how I built it…

Let’s start building!

Let’s begin by adding SkiaSharp to our Xamarin.Forms project. Open up Nuget Package Manager on your Xamarin.Forms solution node and add SkiaSharp.View.Forms Nuget to your .NET Standard project node and platform nodes as shown below…

That’s it, no extra set up is needed… 😉

Next we need to create our Custom Control, which I’m going to name as ColorPickerControl!

The ColorPickerControl!

It’s better to keep this in a dedicated folder in the .NET Standard project, inside a “Controls” folder, for the sake of clarity! 😉 So let’s create our ColorPickerControl as a type ContentView XAML element in the Controls folder…

<?xml version="1.0" encoding="utf-8" ?>
<ContentView
    x:Class="XFColorPickerControl.Controls.ColorPickerControl"
    xmlns="http://xamarin.com/schemas/2014/forms"
    xmlns:x="http://schemas.microsoft.com/winfx/2009/xaml"
    xmlns:d="http://xamarin.com/schemas/2014/forms/design"
    xmlns:mc="http://schemas.openxmlformats.org/markup-compatibility/2006"
    mc:Ignorable="d">

    <!-- Content of the Control -->

</ContentView>

Then as of the code behind, let’s set up a PickedColor Property that holds the value of the Color that User picks during the run time, and an event that fires itself up on that action, PickedColorChanged event!

[XamlCompilation(XamlCompilationOptions.Compile)]
public partial class ColorPickerControl : ContentView
{
	public event EventHandler<Color> PickedColorChanged;

	public static readonly BindableProperty PickedColorProperty
		= BindableProperty.Create(
			nameof(PickedColor),
			typeof(Color),
			typeof(ColorPickerControl));

	public Color PickedColor
	{
		get { return (Color)GetValue(PickedColorProperty); }
		set { SetValue(PickedColorProperty, value); }
	}

	public ColorPickerControl()
	{
		InitializeComponent();
	}
}

Alright next on to setting up the SkiaSharp bits in our Control…

The SkiaSharp magic!

SkiaSharp’s magical Canvas called SKCanvasView is what we’re going to use to Draw our Rainbow Color Spectrum and handle all the Touch event bits… So let’s begin by adding the SKCanvasView to our ColorPickerControl XAML and also the SkiaSharp.Views.Forms reference in the XAML itself..

<ContentView
    ...
    xmlns:skia="clr-namespace:SkiaSharp.Views.Forms;assembly=SkiaSharp.Views.Forms"
	...
	>

    <skia:SKCanvasView
        x:Name="SkCanvasView"
        EnableTouchEvents="True"
        PaintSurface="SkCanvasView_OnPaintSurface"
        Touch="SkCanvasView_OnTouch" />

</ContentView>

Code on Github: /XFColorPickerControl/Controls/ColorPickerControl.xaml

As you can see on my SKCanvasView element, I have enabled touch events with EnableTouchEvents property and subscribed to Touch event with SkCanvasView_OnTouch. Subscribing to PaintSurface allows us to draw full blown 2D graphics on the Canvas, which is why we have created the event SkCanvasView_OnPaintSurface event.

So let’s handle all those events in the code behind of our ColorPickerControl…

[XamlCompilation(XamlCompilationOptions.Compile)]
public partial class ColorPickerControl : ContentView
{
	...
	
	private void SkCanvasView_OnPaintSurface
                      (object sender, SKPaintSurfaceEventArgs e)
	{
		var skImageInfo = e.Info;
		var skSurface = e.Surface;
		var skCanvas = skSurface.Canvas;

		var skCanvasWidth = skImageInfo.Width;
		var skCanvasHeight = skImageInfo.Height;

		skCanvas.Clear(SKColors.White);

		...
	}
	
	private void SkCanvasView_OnTouch
                      (object sender, SKTouchEventArgs e)
	{
		...
	}
}

Code on Github: /XFColorPickerControl/Controls/ColorPickerControl.xaml.cs

So we’re setting up the basic values we need to use inside SkCanvasView_OnPaintSurface with the skImageInfo, skSurface, skCanvas, which will be very useful in our next set of code snippets!

This is where our core implementation is going to be taking place, let me get into details of each code snippet one by one, but you can always go back to the full code on github and take a look by yourself… 😉 Let’s continue…

The Touch!

Let me begin diving in with the SkCanvasView_OnTouch event method implementation, which handles the touch events occurs on the SkiaSharp Canvas we added into our Control.

We need to keep a track on each Touch event that occurs, so we will store that in a local variable _lastTouchPoint which is of type SKPoint. Since we need to only consider the touch events that occur inside the canvas region, we’re validating each touch coordinate (X,Y) that comes into the event.

...
	private void SkCanvasView_OnTouch
	               (object sender, SKTouchEventArgs e)
	{
		_lastTouchPoint = e.Location;

		var canvasSize = SkCanvasView.CanvasSize;

		// Check for each touch point XY position to be inside Canvas
		// Ignore any Touch event ocurred outside the Canvas region 
		if ((e.Location.X > 0 && e.Location.X < canvasSize.Width) &&
			(e.Location.Y > 0 && e.Location.Y < canvasSize.Height))
		{
			e.Handled = true;

			// update the Canvas as you wish
			SkCanvasView.InvalidateSurface();
		}
	}
...

Based on the validated touch event coordinate, we’re firing up the SkiaSharp Canvas drawing cycle, SkCanvasView.InvalidateSurface(), where we will handle, picking up the color on the touch point and redrawing the canvas to highlight the touch point coordinates on the Canvas.

The Rainbow Color Spectrum!

So this right here is the most critical functionality that we need to implement, drawing the beautiful rainbow gradient color spectrum on our SkiaSharp Canvas. We’re going to draw the following list of colors across the spectrum, which values I picked up with the help of Google Web Color Picker..

Red | Yellow | Green (Lime) | Aqua | Blue | Fuchsia | Red
undefined

This will take place in our SkCanvasView_OnPaintSurface event method that we created in the previous step, where we create the Paint object that’s going to draw the color spectrum on the Canvas, along with the gradient fading effect between all the colors using SKShader object.

...
	private void SkCanvasView_OnPaintSurface
	               (object sender, SKPaintSurfaceEventArgs  e)
	{
		// Draw gradient rainbow Color spectrum
		using (var paint = new SKPaint())
		{
			paint.IsAntialias = true;

			// Initiate the primary Color list
			// picked up from Google Web Color Picker
			var colors = new SKColor[]
			{
				new SKColor(255, 0, 0), // Red
				new SKColor(255, 255, 0), // Yellow
				new SKColor(0, 255, 0), // Green (Lime)
				new SKColor(0, 255, 255), // Aqua
				new SKColor(0, 0, 255), // Blue
				new SKColor(255, 0, 255), // Fuchsia
				new SKColor(255, 0, 0), // Red
			};

			// create the gradient shader between Colors
			using (var shader = SKShader.CreateLinearGradient(
				new SKPoint(0, 0),
				new SKPoint(skCanvasWidth, 0),
				colors,
				null,
				SKShaderTileMode.Clamp))
			{
				paint.Shader = shader;
				skCanvas.DrawPaint(paint);
			}
		}
	}
...

As you can see we are defining the list of Colors with SKColor objects, that’ll populate the rainbow color spectrum on our Canvas. Then we use SKShader.CreateLinearGradient() method to build the gradient shader using the list of colors, and then we draw it on the Canvas using skCanvas.DrawPaint().

Keep a note how SKPoint() objects define the starting and ending coordinates on the Canvas which the shader will spread through, thus we’re taking skCanvasWidth picking the corner most value on the X axis. 😉

The Darker Gradient Strip!

Next we need to draw the darker shadow gradient strip on the Canvas allowing Users to pick the Darker Colors of the primary colors we defined.

We’re going to paint the darker color regions by drawing another layer on top of the previous drawn layer creating the illusion of darker regions of each color.

This will take place in our SkCanvasView_OnPaintSurface but below the code snippet that I showed before. Very much similar to the previous snippet, we’re doing almost the same thing but adding a darker gradient region at the bottom of the Canvas.

...
	private void SkCanvasView_OnPaintSurface
	               (object sender, SKPaintSurfaceEventArgs  e)
	{
		...
		
		// Draw darker gradient spectrum
		using (var paint = new SKPaint())
		{
			paint.IsAntialias = true;

			// Initiate the darkened primary color list
			var colors = new SKColor[]
			{
				SKColors.Transparent,
				SKColors.Black
			};

			// create the gradient shader 
			using (var shader = SKShader.CreateLinearGradient(
				new SKPoint(0, 0),
				new SKPoint(0, skCanvasHeight),
				colors,
				null,
				SKShaderTileMode.Clamp))
			{
				paint.Shader = shader;
				skCanvas.DrawPaint(paint);
			}
		}
	}
...

Here we’re drawing the darkening gradient layer starting from Transparent color to Black color across the Y axis, thus we’re taking skCanvasHeight picking the corner most value on the Y axis similar to what we did before. 😉

Here they are side by side, before and after drawing darker gradient strip… 😀

The Lighter Gradient Strip!?

This this is bit of an extra cherry on top, as you may have seen some of those Color Pickers include picking Lighter versions of the Colors. We can easily do this by adding a White color object to the list of colors in the code snippet I shared above.

...         
	...
		 ...
			// Initiate the darkened primary color list
			var colors = new SKColor[]
			{
				SKColors.White,
				SKColors.Transparent,
				SKColors.Black
			};  
		 ...
	...
...	

This will draw the secondary layer with White | Transparent | Black gradient effects on top of the full color spectrum layer.

There you go, with the Lighter color gradient strip. Although I wouldn’t include this in my demo app code 😛 Just coz I don’t like it! lol

Picking the Color on Touch!

This is the most crucial bit of this Control, also the most time consuming implementation I had to go through during my trial and error experimentation to get this working! 😮

We are going to be using the _lastTouchPoint SKPoint object, that we created before, in order to access the coordinate data of the touch point on Canvas. Then we look for extract the pixel color values on that coordinate on the Canvas, given that the Canvas is already rendered with the Color spectrum.

This will take place in our SkCanvasView_OnPaintSurface event method, below the color spectrum drawing code snippet.

Experimentation Phase…

Picking a pixel on the rendered Canvas layer is not a straight forward task, the idea here is to capture a quick snapshot of the Canvas graphic layer and convert that into a bitmap image, and use that image to pick the pixels from using the touch coordinates.

As you can see from below, the first implementation I put together which captures a snapshot of the Canvas surface layer and load it into a SKBitmap image, then I retrieve the Pixel data on that image using bitmap.GetPixel() by passing in the touch point values.

...
	private void SkCanvasView_OnPaintSurface
				   (object sender, SKPaintSurfaceEventArgs  e)
	{
		...
		
		// Picking the Pixel Color values on the Touch Point

		// Represent the color of the current Touch point
		SKColor touchPointColor;

		//// Inefficient: causes memory overload errors
		//using (var skImage = skSurface.Snapshot())
		//{
		//	using (var skData = skImage.Encode(SKEncodedImageFormat.Webp, 100))
		//	{
		//		if (skData != null)
		//		{
		//			using (SKBitmap bitmap = SKBitmap.Decode(skData))
		//			{
		//				touchPointColor = bitmap.GetPixel(
		//									(int)_lastTouchPoint.X, (int)_lastTouchPoint.Y);
		//			}
		//		}
		//	}
		//}
		
		...
	}
...

Later it started causing performance issues due to calling Snapshot() method during each rendering cycle, which is a very heavy process, and even sometimes overloads the memory.

Better Solution…

So after a bit more exploration with trial and error, I managed to build a solution based on a Xamarin Forum response that I found to a similar requirement I had…
https://forums.xamarin.com/discussion/92899/read-a-pixel-info-from-a-canvas

What if instead of taking a snapshot, we use SKImageInfo object of the Canvas instance and extract a SKBitmap image and read the pixel color data of the touch point coordinates. This is way more efficient and consumes much less memory for execution… 😉

...
	private void SkCanvasView_OnPaintSurface
				   (object sender, SKPaintSurfaceEventArgs  e)
	{
		...
		
		// Picking the Pixel Color values on the Touch Point

		// Represent the color of the current Touch point
		SKColor touchPointColor;

		// Efficient and fast
		// https://forums.xamarin.com/discussion/92899/read-a-pixel-info-from-a-canvas
		// create the 1x1 bitmap (auto allocates the pixel buffer)
		using (SKBitmap bitmap = new SKBitmap(skImageInfo))
		{
			// get the pixel buffer for the bitmap
			IntPtr dstpixels = bitmap.GetPixels();

			// read the surface into the bitmap
			skSurface.ReadPixels(skImageInfo,
				dstpixels,
				skImageInfo.RowBytes,
				(int)_lastTouchPoint.X, (int)_lastTouchPoint.Y);

			// access the color
			touchPointColor = bitmap.GetPixel(0, 0);
		}
		
		...
	}
...

As you can see we’re using skSurface.ReadPixels() to load the pixel data on the coordinates, and finally loading the exact pixel data into touchPointColor as a SKColor object type. 😀

So now we picked the Color from a given touch point on the Canvas, let’s move to the next bit…

The Touch Feedback!

This is the part where we provide on touch feedback for the User by highlighting the touch point on the Canvas up on each touch event. As you noticed we’re firing up the OnPaintSurface event upon each touch event of the Canvas, hence we can draw the highlighting region on the Canvas right here as a feedback loop.

We’re simply going to create a SKPaint object, with White color and use skCanvas.DrawCircle() to draw a circle around the touch point coordinates on the Canvas. Then as an added extra, I’m drawing another circle on top of it with the picked color, so that we can emphasize on the pixel color of the touch point. 😉

...
	private void SkCanvasView_OnPaintSurface
				   (object sender, SKPaintSurfaceEventArgs  e)
	{
		...
		
		// Painting the Touch point
		using (SKPaint paintTouchPoint = new SKPaint())
		{
			paintTouchPoint.Style = SKPaintStyle.Fill;
			paintTouchPoint.Color = SKColors.White;
			paintTouchPoint.IsAntialias = true;

			// Outer circle (Ring)
			var outerRingRadius = 
				((float)skCanvasWidth/
                    (float)skCanvasHeight) * (float)18;
			skCanvas.DrawCircle(
				_lastTouchPoint.X,
				_lastTouchPoint.Y,
				outerRingRadius, paintTouchPoint);

			// Draw another circle with picked color
			paintTouchPoint.Color = touchPointColor;

			// Outer circle (Ring)
			var innerRingRadius = 
				((float)skCanvasWidth/
                    (float)skCanvasHeight) * (float)12;
			skCanvas.DrawCircle(
				_lastTouchPoint.X,
				_lastTouchPoint.Y,
				innerRingRadius, paintTouchPoint);
		}
		
		...
	}
...

As you can see _lastTouchPoint X and Y coordinates to draw the circle, and we’re calculating the radius value for both circles by adjacent to Canvas width and height, so it renders nicely on any device scale.

And then to the final step, returning back the Color that we Picked from our ColorPickerControl!

Return the Picked Color!

Now we need to return back the Color value that the User picked, to the subscribers or whoever’s listening to the PickedColor property and PickedColorChanged event.

...
	private void SkCanvasView_OnPaintSurface
				   (object sender, SKPaintSurfaceEventArgs  e)
	{
		...
		
		// Set selected color
		PickedColor = touchPointColor.ToFormsColor();
		PickedColorChanged?.Invoke(this, PickedColor);
		
		...
	}
...

It’s as simple as setting the Value and firing up the Event with the new Color value parameter…

Alright, that’s it! We’ve finished building our awesome ColorPickerControl! 😀

Let’s try it out!

Since we created it as a standalone UI Control you can use this little awesomeness anywhere in your Xamarin.Forms project as you would with any UI element as easy as below…

<controls:ColorPickerControl 
	x:Name="ColorPicker"
	PickedColorChanged="ColorPicker_PickedColorChanged" />

So let’s try adding this to a ContentPage with a nice little Frame element around it with a fixed Height and Width…

<Frame
	x:Name="ColorPickerFrame"
	CornerRadius="8"
	HeightRequest="200"
	HorizontalOptions="Center"
	WidthRequest="350">
	<controls:ColorPickerControl 
		x:Name="ColorPicker"
		PickedColorChanged="ColorPicker_PickedColorChanged" />
</Frame>

This will give a nice little frame around the Color picker control, then on to the code behind…

private void ColorPicker_PickedColorChanged
			(object sender, Color colorPicked)
{
	ColorPickerHolderFrame.BackgroundColor = colorPicked;
}

PickedColorChanged provide you the picked Color value, so you can do what you wish with it!

Fire it up!

Time to fire it up yo! 😀 I’ve prepared a little demo app with my awesome ColorPickerControl for Xamarin.Forms, deployed for Android, iOS and UWP…

Android, iOS and UWP side by side working like a charm! 😀

Project hosted on github:  
https://github.com/UdaraAlwis/XFColorPickerControl 

The possibilities are endless, just a matter of your own creativity! 😉

Conclusion…

An interactive and responsive Color Picker is something that’s missing from Xamarin.Forms out of the box, even when it comes existing to 3rd party controls, there’s no such that fills the requirement, similar to MS Paint Color Picker, or HTML Web Color Pickers.

You can do all kinds of cool interactive 2D graphics rendering stuff with SkiaSharp on Xamarin.Forms, and thanks this, I managed to build a full fledged interactive and fun-to-use Color Picker UI Control, which is lacking in Xamarin.Forms ecosystem right now.

I’m planning to release a nuget package with this control quite soon, with a whole bunch of extra cool features embedded in 😉 So keep in touch!

Imagination is the limit yol! 😉

Share the love! 😀 Cheers!

Pushing the limits of Hybrid WebView in Xamarin.Forms!

Let’s push the possible limits of Hybrid WebView and build something awesome in Xamarin.Forms! 😀

Remember my last blog post, Building a bi-directional interop bridge with WebView in Xamarin.Forms! which is where I shared about building a bi-directional invoke bridge between Javascript and C# dotnet run time using Hybrid WebView.

So based on that I went on a little journey to push the limits of this Hybrid WebView and built some cool demos with it. So here I am sharing it all with yol! 😉

Pushing the limits!

BTW: This is going to be a continuation of my previous blog post, so better take a look at it first if you haven’t: Building a bi-directional interop bridge with WebView in Xamarin.Forms!

To put it into fancy words,

We built a bi-directional communication bridge, between completely different run times, with possibility of two way execution invoke on demand! Hybrid WebView…

So now, the question is, what can we do to push the limits of our Hybrid WebView? Sounds like something for the imagination to limit!

Behold the awesomeness!

Imagine, being able to load a Web page into you Xamarin.Forms WebView, and being able to access Device features such as Camera, GPS Location, Accelerometer, etc..

Basically we’re going access Device Native features through the WebView and retrieve data directly from C# .NET run time in our Xamarin.Forms app! You will be able to load any HTML content, either from a Web Hosted source or locally generated HTML source, it would work like a charm thanks to the Hybrid WebView!

In order to demonstrate this awesomeness, let’s try out the following feature for the demo implementation…

  • Capture Photos using Device Camera
  • Pick Photos from Device Gallery
  • Get Device Native information
  • Get Device GPS Location data

All those device features and data will be accessed from the Javascript running inside the Hybrid WebView! 😉

Like I mentioned before, we will have two HTML sources for this demo, a web hosted HTML source and a locally generated HTML source to make sure it works for either cases! 😀

Now here’s a bit about what will help us build this awesome demo..

– Bi directional bridge!
Being able to invoke executions directly between the Javascript environment and C# .NET Xamarin.Forms run time, is what is going to help us build this awesomeness!

Javascript <~> Xamarin.Forms (C# .NET)

So you can pass data from the Javascript that’s running inside the Hybrid WebView out into the C# .NET run time, as well as you can pass data directly into the Javascript that’s running inside the Hybrid WebView.

– Multiple parameters…
In my previous blog post I mentioned this at the end where you can extend the same implementation we did for our Hybrid WebView, into supporting multiple parameters, so here I will use this to demonstrate what we’re going to build!

Sneak Peak!

Now here’s some action on the go with this awesomeness… 😉

As usual I’ve hosted this whole demo project up on my github repo:

Code on github: https://github.com/UdaraAlwis/XFHybridWebViewAdvDemo

This is how we do it!

So let’s get right into it, but first let’s make sure some prerequisites.

– Basic Hybrid WebView implementation
Refer to my previous post and check out the implementation of the Hybrid WebView. Building a bi-directional interop bridge with WebView in Xamarin.Forms!

– Xamarin.Essentials set up to access the device native feature
You need to implement Xamarin.Essentials and set up all the device native features and their configuration for the features you wish to use. https://docs.microsoft.com/en-us/xamarin/essentials/

Multiple Parameters support!

Let’s begin with adding support for multiple parameters in our Hybrid WebView as follows…

public class HybridWebView : WebView
{
	private Action<string, string> _action;

	public void RegisterAction(Action<string, string> callback)
	{
		_action = callback;
	}

	public void Cleanup()
	{
		_action = null;
	}

	public void InvokeAction(string param1, string param2)
	{
		if (_action == null || (param1 == null && param2 == null))
		{
			return;
		}

		if (MainThread.IsMainThread)
			_action.Invoke(param1, param2);
		else
			MainThread.BeginInvokeOnMainThread(() => _action.Invoke(param1, param2));
	}
}

Code on github: /XFHybridWebViewAdvDemo/Controls/HybridWebView.cs

As you can see, I have defined Action property with two parameters, along side the setter method of it, RegisterAction() accepts Action instances with two parameters.

InvokeAction() which gets called from each native renderer level now accepts two parameters accordingly. As an addition I have added an enforced UI Thread execution using Xamarin.Essentials.MainThread feature, since we’re going to access IO heavy device features.

Following the same pattern you can add as many number of parameters as you wish! 😉

We need to add support for this in our Javascript implementation as well, so we create a pre defined separator (a pipe separator preferably “|”) that separates parameters in the data object we’re sending from javascript to Hybrid WebView’s Renderer’s script handler.

..
invokexamarinforms('PHOTO|CAMERA')
..

When our Hybrid WebView renderers receive the invoke from Javascript, we need to handle the incoming data object as follows by splitting it up using the separator we defined…

var dataBody = data;
if (dataBody.Contains("|"))
{
	var paramArray = dataBody.Split("|");
	var param1 = paramArray[0];
	var param2 = paramArray[1];
	((HybridWebView)hybridRenderer.Element).InvokeAction(param1, param2);
}
else
{
	((HybridWebView)hybridRenderer.Element).InvokeAction(dataBody, null);
}

Then we pass it on to the InvokeAction() event, for Xamarin.Forms level to handle whichever the Action has subscribed to it. This way you can handle as many parameters as you wish!

Launch invoke from HTML Javascript to C# .NET!

So here’s how we set up the simple implementation to call up the invokeXamarinFormsAction() method that we have defined in our Hybrid WebView platform Renderers. Well there’s not much different from what we implemented in my previous demo, but here we are passing multiple parameters into the javascript method upon the button click.

...

<script>
...
function invokexamarinforms(param){
    try{
        invokeXamarinFormsAction(param);
    }
    catch(err){
        alert(err);
    }
}
</script>

...

<button type="button" 
	onclick="invokexamarinforms('PHOTO|CAMERA')">
	Get from Xamarin.Forms</button>

...

This is something I’ve explained step by step in my previous blog post so I wouldn’t go into details in here. You can define as many onclick actions as you wish with the set of predefined parameters like “PHOTO|CAMERA” and “PHOTO|GALLERY”, even single parameters, “GPS” and “DEVICEINFO”, etc…

Next you need to handle those parameters in C# code to execute the specific action we’re targeting, as simple as a if-else block as follows, or even a switch statement would suffice.

...

private async void ExecuteActionFromJavascript(string param1, string param2)
{
	...	
	if (param1 != null && param1.Equals("PHOTO") && param2.Equals("CAMERA"))
	{
		var result = await _deviceFeaturesHelper.TakePhoto(this);
		if (result != null)
		{
			...
		}
	}
        ...
	else if (param1 != null && param1.Equals("DEVICEINFO"))
	{
		var result = await _deviceFeaturesHelper.GetDeviceData();
		if (result != null)
		{
			...
		}
	}	
	...
}

Based on the requested action we execute it in C#, in this case accessing Camera and Capturing a photo _deviceFeaturesHelper.TakePhoto() or even getting Device Native information _deviceFeaturesHelper.GetDeviceData() as shown above.

Let’s move to the next step of this chain…

Ping back from C# .NET to HTML Javascript!?

Now that we established pathway to call the C# .NET run time from Javascript, we’re able to invoke any action, but how do we get back the result data into the Javascript?

So in my previous blog article Talking to your WebView in Xamarin.Forms! which explains how easy it is to pass data into the Javascript rendered inside the WebView at run time, since our Hybrid WebView is an extension of the default WebView, we can use the same method here…

...
        var result = await _deviceFeaturesHelper.GetDeviceData();
        if (result != null)
        {
             await webViewElement
                   .EvaluateJavaScriptAsync($"setresult('{result}')");
        }
...

So we’re calling up on EvaluateJavaScriptAsync() with the Javascript function name that’s accepting to the results for this specific action. This function needs to be created inside the Javascript before hand, that is rendered inside the Hybrid WebView as follows…

...
<script>
...
	function setresult(value) {
		// - display the value in HTML
		// - send the data to server
	}
</script>
...

Once the data is passed into your Javascript function, You can do whaever you want with the data, be it display in the HTML, or send it up to a web server, your choice! 😉

Calling the Device Native!

Well this is quite simple if you know how to use Xamarin.Essentials to access device native features and other 3rd party plugins to access various features from Xamarin.Forms! But I’ll quickly walk through the code that I’m using in this demo.

I’ve basically created like a little Facade layer which handles all the device native features required as follows, and each method handles a given specific feature such as Camera and GPS features using their respective services of plugin calls…

public class DeviceFeaturesHelper
{
	public async Task<string> TakePhoto(ContentPage pageContext)
	{
		// launch Media Plugin to capture photos from camera
	
		...

		return imageAsBase64String;
	}
	
	public async Task<string> GetDeviceData() 
	{
		// launch Xamarin.Essentials to load device info

		return $"{nameof(DeviceInfo.Model)}: {device}<br />" +
			$"{nameof(DeviceInfo.Manufacturer)}: {manufacturer}<br />" + 
			$"{nameof(DeviceInfo.Name)}: {deviceName}<br />";
	}
}

Code on github: /XFHybridWebViewAdvDemo/DeviceFeaturesHelper.cs

So what you need to keep in mind is that we need to return a value that’s compatible to be displayed inside our WebView, based on HTML, that’s why you see I have modified some of those returned values accordingly, such as Image objects are returned as base64 strings and device information formatted as a text block with <br /> inline.

These methods are called from the Hybrid WebView’s Invoke action that we created before and results are returned to be pushed back into Javascript.

Handling Media Image objects…

Using Media Plugin for Xamarin.Forms, provides you with a MediaFile object which contains the Image object that you acquired either from Camera or Gallery, but how do we convert that into something that’s compatible to be pushed into Javascript-HTML environment?

The solution is,

MediaFile -> byte[] array -> Base64 string

We’re going to convert our MediaFile object into a byte[] array, then convert again into a base64 string, which makes it so much easier to transfer the data into the javascript run time and use that object for any purposes inside javascript itself. Here’s my code snippet for this…

public async Task<string> TakePhoto(ContentPage pageContext)
{
        ...
	var file = await CrossMedia.Current.TakePhotoAsync(...);

	// Convert bytes to base64 content
	var imageAsBase64String = Convert.ToBase64String(ConvertFileToByteArray(file));

	return imageAsBase64String;
}

private byte[] ConvertFileToByteArray(MediaFile imageFile)
{
	// Convert Image to bytes
	byte[] imageAsBytes;
	using (var memoryStream = new MemoryStream())
	{
		imageFile.GetStream().CopyTo(memoryStream);
		imageFile.Dispose();
		imageAsBytes = memoryStream.ToArray();
	}

	return imageAsBytes;
}

This is what you saw in the previous section which I have used in my /DeviceFeaturesHelper.cs
You can use this in the javascript functions as easy as below,

function setresult_takephoto(value) 
{
	document.getElementById("photoCamera_ResultElement").src 
                                             = "data:image/png;base64," + value;
}

Well that’s the entire set up of this awesome demo, so then let’s see it in action…

Fire it up!

Here’s the web page we’re loading: https://testwebpage.htmlsave.com/

Look at em on fire, Android, UWP and iOS side by side…

Code on github: https://github.com/UdaraAlwis/XFHybridWebViewAdvDemo

Conclusion…

This was just me pushing the limits of the Hybrid WebView to build awesome stuff with Xamarin.Forms! This will definitely come in handy whenever you get a scenario you need to implement an existing Web App into a Xamarin.Forms app, and you need to let the user use it as a Mobile App, with being able to access device native features.

Well that concludes it. Hope you find it useful!

Share the love! 😀 Cheers!

The step by step set up of Media Plugin for Xamarin.Forms!

Let’s properly set up Media Plugin (Xam.Plugin.Media) for Xamarin.Forms, harnessing the full capabilities with an optimized implementation! 😀

This is a continuation from my previous blog post, Behold the check-list of Media Plugin set up for Xamarin.Forms! where I shared the list of important bits you need to focus on when setting up the Media Plugin.

So here I’m building up on that and compiling a step by step guide implementation of the Xam.Plugin.Media for Xamarin.Forms, with the latest updates!

Backstory…

During my recent implementation with the Media Plugin for Xamarin.Forms, I realize that there are some new updates to this Plugin and its dependent Permission plugin that are not documented properly out there!

So I thought of writing up a new article with those updated bits and a better implementation with this library in a proper manner to harness the best of its performance and features without running into accidental bugs! 😉

Media Plugin – Xam.Plugin.Media!

Xam.Plugin.Media is the free Plugin Library by James Montemagno, that allows us to easily interact with Capturing Photos and Video and accessing them from the device Galley using Xamarin.Forms! So this library provides two main functionalities,

  • Capture Photos/Videos from Camera
  • Pick Photos/Videos from Gallery

Apart from that it allows you to Crop, Compress Photos, Set Custom Sizing and Quality, Save to Albums, and etc. It fully supports Android, iOS, UWP (Windows), and even Tizen device platforms. Quite an awesome library for sure!

Github: https://github.com/jamesmontemagno/MediaPlugin
Nuget: http://www.nuget.org/packages/Xam.Plugin.Media

This library internally depends itself on Permissions Plugin (Plugin.Permissions) for taking care of the Permissions that are required to handle in each Native platform to access Camera features and device Gallery features.

Step by Step!

Alright then let’s take a step by step walk through of setting up Media Plugin in your Xamarin.Forms project from scratch!

1. Let the set up begin!

Assuming you have already created your Xamarin.Forms project, let’s begin by adding the Xam.Plugin.Media into your Project from Nuget Package Manager.

Lets search for “Xam.Plugin.Media” in Nuget and install the library for all the project nodes in your solution, Xamarin.Forms Host project, Android, iOS, and UWP (Windows) platform nodes.

2. Initialize()!

Then you need to set up the Initialization of the Media Plugin in the Xamarin.Forms layer, by calling up the Initialize() method preferably at the start up of the App.

If you’re using a Service instance to be used with Media Plugin, then you should set this is up in the Constructor of it.

Now let’s set up the configuration for all the platform projects one by one…

Let’s set up Android!

Let’s begin with the Android bits, which is the longest set of configuration.

1. Permissions in AndroidManifest!

by adding the Permission bits that are required for the Media Plugin. Simply go to Android Project -> Properties -> Click on “Android Manifest” tab -> scroll down to “Required Permissions” section…

Simply select those two Permissions, for Reading and Writing data to the device storage, in terms of Capturing Photos and Videos and saving them during run time.

You could even add them manually in the AndroidManifest.xml file.

<?xml version="1.0" encoding="utf-8"?>
<manifest ... >
    <uses-sdk ... />
    <application ... >
    ...
	<uses-permission android:name="android.permission.WRITE_EXTERNAL_STORAGE" />
	<uses-permission android:name="android.permission.READ_EXTERNAL_STORAGE" />
    ...
  </application>
    ...
</manifest>

Then again, unless you’re going to saving your captured Photos or Videos then no need to add the “WRITE” permission. So make sure to decide on your requirement.

2. Permission Plugin – OnRequestPermissionsResult()

Next we need to set up the call back for the Permission Plugin on the OnRequestPermissionsResult() method in your MainActivity.cs class.

on github: /XFMediaPluginDemo.Android/MainActivity.cs

Visual Studio 2019 adds the override of this method automatically to your MainActivity class, but if its not there you need to set up as shown above.

3. FileProviderfile_paths.xml

We need to set up the FileProvider path values in the file_paths.xml, so go ahead create a new folder called “xml” in your “Resources” folder, and add a new XML file called “file_paths.xml” with the following content.

on github: /XFMediaPluginDemo.Android/Resources/xml/file_paths.xml

Oh, and make sure the Build Action of that file is set to “AndroidResource” in Properties.

4. FileProvider in AndroidManifest!

Then let’s add the FileProvider definition in the AndroidManifest.xml

on github: /XFMediaPluginDemo.Android/Properties/AndroidManifest.xml

This should be added inside the <application> node.

5. Plugin.CurrentActity set up…

We need to set up the Plugin.CurrentActivity plugin for Media Plugin to attach itself to the active Activity during the run time. Nuget Package Manager -> install Plugin.CurrentActivity, only into your Android project node.

Now that’s installed we need to set it up in the code as well.

6. Plugin.CurrentActity Initialization!

First we need to create the MainApplication.cs class set up that inherits from Android.App.Application base for initializing the CrossCurrentActivity Instance up on the Activity change at run time.

on github: /XFMediaPluginDemo.Android/MainApplication.cs

Next we need to set up the init() call on MainActivity.cs class as well.

on github: /XFMediaPluginDemo.Android/MainActivity.cs

Here also we’re calling the Init() method of CurrentActivity plugin but this time we’re forwarding the Bundle parameter that’s passed into the OnCreate() method.

7. Hardware Requirement filter!?!

Now this is an optional step, once your app is published, and you want to Google Play store to make your app available only for devices that has the following features, “Camera”, “Camera with Auto Focus”, etc, then you need to add the following “UsesFeatures” attributes to your AssemblyInfo.cs file.

That concludes the Android project set up.

Let’s set up iOS!

The iOS set up is much easier actually where we only have to set up the permissions.

1. Permissions in Info.plist!

On your iOS project, right click on the Info.plist file -> Open With -> select XML (Text) Editor option, which will open up in the XML editor window as follows.

on github: /XFMediaPluginDemo.iOS/Info.plist

You need to add Permissions as shown here, with an appropriate description, which will be used to show to the User when the Permissions are being requested at run time. You need to explain what those Permissions are used for in your app.

<plist version="1.0">
<dict>
    ...
    ...
    <key>NSCameraUsageDescription</key>
    <string>This app needs access to the camera to take photos.</string>
    <key>NSPhotoLibraryUsageDescription</key>
    <string>This app needs access to photos.</string>
    <key>NSMicrophoneUsageDescription</key>
    <string>This app needs access to microphone.</string>
    <key>NSPhotoLibraryAddUsageDescription</key>
    <string>This app needs access to the photo gallery.</string>
</dict>
</plist>

But here also I’m reminding, set up only the Permissions that are absolutely required by your app’s functionality.

That concludes the iOS project set up.

Let’s set up UWP!

Well in UWP (Windows) project is even more easier to set up

1. Permissions in Package.appxmanifest!

Simply open up the Package.appxmanifest file in your UWP project -> Go to “Capabilities” tab -> Tick on “Webcam” option from the Capabilities list.

on github: /XFMediaPluginDemo.UWP/Package.appxmanifest

That concludes the UWP project set up.

Let the Xamarin.Forms, coding begin!

Now this is where we’re going to set up our implementation to use the Media Plugin in our Xamarin.Forms project host.

Doesn’t matter whether you’re going to implement in Page code behind or MVVM heavy ViewModel, we should maintain a clean decoupled structure as much as possible.

Pre-requisites!

So each feature we access we need to perform the following,

  • Check for the availability of the feature (ex: Camera, Gallery)

    Media Plugin provides these bool properties which allows you to check for the availability of the features you want to access, such as Camera, and Gallery. If they return true then it is safe to proceed with the call.
...
if (!CrossMedia.Current.IsCameraAvailable ||
		!CrossMedia.Current.IsTakePhotoSupported)
{
	await DisplayAlert("No Camera", 
              "Sorry! No camera available.", "OK");
	return null;
}
...
  • Check for the status of the Permission required (ex: Camera, Storage)

    This is another safety layer that is also recommended, checking the Status of the Permission before you access those features from Media Plugin. Based on it you can perform requesting Permission from the User during run time using the Permission Plugin that’s already set up in your project.
...
var cameraStatus = await CrossPermissions.Current.
			CheckPermissionStatusAsync(Permission.Camera);
var storageStatus = await CrossPermissions.Current.
			CheckPermissionStatusAsync(Permission.Storage);
var photosStatus = await CrossPermissions.Current.
			CheckPermissionStatusAsync(Permission.Photos);
...

Those two check ups are recommended as safety layers for smooth experience for the user and to avoid running into unexpected issues. Once those two calls are satisfied, then we can access the feature we need. 😉

It is best to have separate methods for each specific action, such as Capture new Photo or Select a new Photo from Gallery and those methods should return the resulting ImageSource object or default failure value.

Camera Feature – TakePhoto()

Here’s the method implementation that you can use to Capture Photo using the device Camera and return an ImageSource upon success.

public async Task<ImageSource> TakePhoto()
{
	if (!CrossMedia.Current.IsCameraAvailable ||
			!CrossMedia.Current.IsTakePhotoSupported)
	{
		await DisplayAlert("No Camera", 
                    "Sorry! No camera available.", "OK");
		return null;
	}

	var isPermissionGranted = await RequestCameraAndGalleryPermissions();
	if (!isPermissionGranted)
		return null;

	var file = await CrossMedia.Current.TakePhotoAsync(new 
        Plugin.Media.Abstractions.StoreCameraMediaOptions
	{
		Directory = "TestPhotoFolder",
		SaveToAlbum = true,
                PhotoSize = PhotoSize.Medium,
	});

	if (file == null)
		return null;

	var imageSource = ImageSource.FromStream(() =>
	{
		var stream = file.GetStream();
		return stream;
	});

	return imageSource;
}

You can easily use this for a Page behind code implementation or a Service layer implementation for Capturing Photos.

StoreCameraMediaOptions provides you with a whole bunch of features you can easily use to customize and resize the captured Photo within the library itself. 😀

Gallery Feature – SelectPhoto()

Here’s the method implementation that you can use to Select Photo using the device Gallery and return an ImageSource upon success.

public async Task<ImageSource> SelectPhoto()
{
	if (!CrossMedia.Current.IsPickPhotoSupported)
	{
		await DisplayAlert("Photos Not Supported", 
                   "Sorry! Permission not granted to photos.", "OK");
		return null;
	}

	var isPermissionGranted = await RequestCameraAndGalleryPermissions();
	if (!isPermissionGranted)
		return null;

	var file = await Plugin.Media.CrossMedia.Current.PickPhotoAsync(new 
        Plugin.Media.Abstractions.PickMediaOptions
	{
		PhotoSize = Plugin.Media.Abstractions.PhotoSize.Medium,
	});

	if (file == null)
		return null;

	var imageSource = ImageSource.FromStream(() =>
	{
		var stream = file.GetStream();
		return stream;
	});

	return imageSource;
}

In both above methods we are first checking the availability of the feature, and then the status of the permission, before we make the call to Media Plugin.

You can see that upon successful execution completion we’re returning the retrieved ImageSource, otherwise in any case of failure we return null. Also you can remove DisplayAlert() set up, if you’re using a Service layer, instead just throw an Exception which you can handle at the point of execution. 😉

Permission Checkup!

As you can see we have a method call to RequestCameraAndGalleryPermissions() which checks for the Permission status for the features we need to access, which implements as follows.

private async Task<bool> RequestCameraAndGalleryPermissions() 
{
	var cameraStatus = await CrossPermissions.Current.
	CheckPermissionStatusAsync(Permission.Camera);
	var storageStatus = await CrossPermissions.Current.
	CheckPermissionStatusAsync(Permission.Storage);
	var photosStatus = await CrossPermissions.Current.
	CheckPermissionStatusAsync(Permission.Photos);

	if (
	cameraStatus != PermissionStatus.Granted || 
	storageStatus != PermissionStatus.Granted || 
	photosStatus != PermissionStatus.Granted)
	{
		var permissionRequestResult = await CrossPermissions.Current.
		RequestPermissionsAsync(
			new Permission[] 
			{ 
				Permission.Camera, 
				Permission.Storage, 
				Permission.Photos 
			});

		var cameraResult = permissionRequestResult[Permission.Camera];
		var storageResult = permissionRequestResult[Permission.Storage];
		var photosResults = permissionRequestResult[Permission.Photos];

		return (
			cameraResult != PermissionStatus.Denied &&
			storageResult != PermissionStatus.Denied &&
			photosResults != PermissionStatus.Denied);
	}

	return true;
}

We’re check for Camera, Storage, Photos access permission status, which are required for Camera and Gallery access from the User in all the platforms. As you can see based on the existing status we request the Permission from user, and return the results. This will prompt the user with the popups asking for Permission to access. 😀

A better, Permission Checkup!

Just to make it more cleaner and decoupled, here’s an improved Permission check up method where you can pass in the exact Permission you need to check and it will take care of it. Oh and this is very much reusable for any kind! 😉

private async Task<bool> RequestPermissions(List<Permission> permissionList)
{
	List<PermissionStatus> permissionStatuses = new List<PermissionStatus>();
	foreach (var permission in permissionList)
	{
		var status = await CrossPermissions.Current.
		CheckPermissionStatusAsync(permission);
		permissionStatuses.Add(status);
	}

	var requiresRequesst = permissionStatuses
                                 .Any(x => x != PermissionStatus.Granted);

	if (requiresRequesst)
	{
		var permissionRequestResult = await CrossPermissions.Current.
		RequestPermissionsAsync(permissionList.ToArray());
		
		return permissionRequestResult
			.All(x => x.Value != PermissionStatus.Denied);
	}

	return true;
}

You simply have to pass in the Permission you want to check for as follows,

public async Task<ImageSource> TakePhoto()
{
	...
	var isPermissionGranted = await RequestPermissions
	(new List<Permission>(){ Permission.Camera, Permission.Storage }); 
	if (!isPermissionGranted)
		return null;
	...
}

public async Task<ImageSource> SelectPhoto()
{
	...
	var isPermissionGranted = await RequestPermissions
	(new List<Permission>(){ Permission.Photos }); 
	if (!isPermissionGranted)
		return null;
	...
}

You can pass in any kind of Permission type for check and request for Granted status.

Exception Handle!

You can see I’m not handling exceptions in here, that I would leave to the execution point of these methods calls.

try
{
	var result = await SelectPhoto();
	if (result != null)
		viewPhotoImage.Source = result;
}
catch (Exception ex)
{
	// handle your exception
}

This I believe the best way to handle any exceptions that could occur, could be in your ContentPage code behind or ViewModel. 😀

Main Thread!

Unless you’re calling these features of Media Plugin from a code behind Event handler, then you need to make sure this is executed on the app’s Main Thread.

https://theconfuzedsourcecode.wordpress.com/2020/01/27/behold-the-check-list-of-media-plugin-set-up-for-xamarin-forms/#Run-on-UI-Thread

If you ever run into any issues, make sure you have gone through my previous blog post: Behold the check-list of Media Plugin set up for Xamarin.Forms! which will definitely help you tackle any issues easily!

Well that sums it up the whole set up and a bit of under the hood check up!

Fire up the Demo!

So just for this article I created a simple demo that reflects all of this recipe of better implementation of Media Plugin for Xamarin.Forms!

Check it on my github: github.com/XFMediaPluginDemo

Side by side on Android, iOS, and UWP!

Conclusion

Following this guide you can easily implement the Media Plugin for Xamarin.Forms with a proper maintainable architecture! Although setting up might seem a bit tedious, its actually quite straight forward. Like I’ve shown in the code you need to handle Async Await calls properly and up to the UI Thread and exception handling.

Some of those bits that I have shared here aren’t mentioned in the plugin docs yet, since they’re out of date. So I really hope this helps you fellow devs!

Share the love! 😀 Cheers!

Behold the check-list of Media Plugin set up for Xamarin.Forms!

Let me share a check list for easily implementing the Media Plugin (Xam.Plugin.Media) for Xamarin.Forms with a peace of mind! 😉

Here I’m sharing some important bits that you need to focus on to avoid running into any obnoxious issues during run time of your Xamarin.Forms app!

Backstory…

Recently I was implementing Media Plugin library (Xam.Plugin.Media) in one of my Xamarin.Forms projects, even though I had implemented this before, I ran into some missing bits that caused some problems, so I had to Google them out.

So after resolving my implementation I thought of writing up this article to sum up a check list that you need to go through to make sure you’ve set up your project properly for the Media Plugin to work, hassle free, giving you a peace of mind! 😉

Media Plugin – Xam.Plugin.Media!

Xam.Plugin.Media is the free Plugin Library by James Montemagno, that allows us to easily interact with Capturing Photos and Video and accessing them from the device Galley using Xamarin.Forms!

Github: https://github.com/jamesmontemagno/MediaPlugin
Nuget: http://www.nuget.org/packages/Xam.Plugin.Media

There’s a little intro to the Media Plugin, then let’s jump right in!

Behold the check list!

It is quite straight forward how to set up Media Plugin with the guidelines of the official docs in github repo, but there are a few bits that you need to focus on as follows…

1. On Android: CurrentActivity Plugin!

You need to install Android CurrentActivity Plugin using the Nuget package manager, and properly set up the MainApplication Class set up. This used to be automatically set up during the installation from nuget but it doesn’t seem to be doing that so far, so you need to manually set it up yourself.

#if DEBUG
[Application(Debuggable = true)]
#else
[Application(Debuggable = false)]
#endif
public class MainApplication : Application
{
    public MainApplication
      (IntPtr handle, JniHandleOwnership transer)
      : base(handle, transer)
    {
    }

    public override void OnCreate()
    {
        base.OnCreate();
        CrossCurrentActivity.Current.Init(this);
    }
}

Also you need to initialize CrossCurrentActivity.Current instance in MainActivity.OnCreate() method.

public class MainActivity : global::Xamarin.Forms.Platform.Android.FormsAppCompatActivity
{
    protected override void OnCreate(Bundle savedInstanceState)
    {
        ...
        
        base.OnCreate(savedInstanceState);

        CrossCurrentActivity.Current.Init(this, savedInstanceState);

        Xamarin.Essentials.Platform.Init(this, savedInstanceState);
        global::Xamarin.Forms.Forms.Init(this, savedInstanceState);
        LoadApplication(new App());
    }
    
    ..
}

2. On Android: Permission Plugin set up!

When you install the Xam.Plugin.Media it will come with the Plugin.Permissions library references inside it. For this to work properly on Android you need to make sure to set up its native handlers on Android in the MainActivity.OnRequestPermissionsResult() method override.

public override void OnRequestPermissionsResult(int requestCode, string[] permissions, [GeneratedEnum] Android.Content.PM.Permission[] grantResults)
{
    Xamarin.Essentials.Platform.
       OnRequestPermissionsResult
       (requestCode, permissions, grantResults);

    Plugin.Permissions.PermissionsImplementation.
       Current.OnRequestPermissionsResult
       (requestCode, permissions, grantResults);

    base.OnRequestPermissionsResult
       (requestCode, permissions, grantResults);
}

If you’re using Xamarin.Essentials already in your app or you’ve created your Xamarin.Forms Project recently with an update Visual Studio 2019, then OnRequestPermissionsResult() override should already exist in your MainActivity class. In that case just add the PermissionsImplementation.Current.OnRequestPermissionsResult(..) snippet to the method. Well I actually missed out on on this and I ran into some weird issues on Android.

3. On Android: FileProvider set up!

Make sure to set up the FileProvider in AndroidManifest along side the xml/file_paths.xml file in the Resources directory. One crucial point to keep in mind is that there are two ways you can set up the android:authorities value in the FileProvider.

  • android:authorities=”${applicationId}.fileprovider”
  • android:authorities=”com.example.android.fileprovider”

Sometimes it can be confusing when you are setting up this value, as shown above, either keep it as the first option as it is or the second option, with your app package name “<your app package name>.fileprovider” minted. For the clarity of it though I would suggest sticking to the first option as shown in the docs as well.

<?xml version="1.0" encoding="utf-8"?>
<manifest ... >
    <uses-sdk ... />
    <application ... >
    ...
    <provider android:name="android.support.v4.content.FileProvider"
                android:authorities="${applicationId}.fileprovider"
                android:exported="false"
                android:grantUriPermissions="true">
      <meta-data android:name="android.support.FILE_PROVIDER_PATHS"
                android:resource="@xml/file_paths"></meta-data>
    </provider>
    ...
  </application>
    ...
</manifest>

4. CrossMedia.Current.Initialize();

You need to make sure to initialize the Media Plugin before calling up any of its method functions. You can do this on Xamarin.Forms layer, or even in Platform Nodes, but preferably on the Page that you’re intending to use the plugin.

You should set it up on App.xaml.cs start up methods if you’re intending to use Media Plugin on multiple pages in your App.

public partial class App : Application
{
    public App()
    {
        InitializeComponent();

        Plugin.Media.CrossMedia.Current.Initialize();

        MainPage = new NavigationPage(new MainPage());
    }
}

If you’re abstracting it out to a Service instance, then you can call this up in the Constructor during instantiation as well.

5. Run on UI Thread!

Unless you’re calling up the Media Plugin’s functions in an Event Handler directly invoked by a UI Element, you need to make sure you’re running on UI Thread during the run time. Otherwise you could run into various kinds of issues since, since accessing Camera or Gallery relies heavily on Native IO operations.

Therefore make sure to run it on UI Thread, by either using default Xamarin.Forms UI Thread force invoke method, Device.BeginInvokeOnMainThread() as below,

Device.BeginInvokeOnMainThread(async () =>
{
	await Plugin.Media.CrossMedia.Current.TakePhotoAsync(...);
});

...

Or if you’ve got Xamarin.Essentials installed in your project, then you can use MainThread Helper it provides a neat way to check for the execution thread, and based on that force the execution on UI Thread,

if (!MainThread.IsMainThread)
{
    await Plugin.Media.CrossMedia.Current.TakePhotoAsync(...);
}
else 
{
    MainThread.BeginInvokeOnMainThread(() =>
    {
        await Plugin.Media.CrossMedia.Current.TakePhotoAsync(...);
    }); 
}

...

6. Perform Permission check up!

It is best perform a Permission availability check up for the features that you’re accessing from Media Plugin using the Permission Plugin, that’s referenced along with it. This is something that’s recommended in the Media Plugin’s docs as well, which you will find at the end though. But in my experience this is a crucial set up to have an extra assurance of the features you’re trying to access from Media Plugin.

Basically before each call to Capture or Pick any Photo/Video from the Media Plugin, you need to check for the availability of the Permission for Camera, Storage, and Photos. Initially as shown below…

private async Task<ImageSource> TakePhoto()
{
    ...
    
    var isAccessGranted = await RequestCameraAndGalleryPermissions();
    
    ...
}

private async Task<bool> RequestCameraAndGalleryPermissions() 
{
    var cameraStatus = await CrossPermissions.Current.
                CheckPermissionStatusAsync(Permission.Camera);
    var storageStatus = await CrossPermissions.Current.
                CheckPermissionStatusAsync(Permission.Storage);
    var photosStatus = await CrossPermissions.Current.
                CheckPermissionStatusAsync(Permission.Photos);
    ...

    // request access permissions

    ...
}

If they’re not Granted yet or denied you need to launch a request for them from the User during the run time. I must note that the github docs of the Permission plugin are outdated and doesn’t reflect the latest changes of the library. I will be sharing the full implementation of this code snippet later in this article.

7. Set up Required Permissions!

Some of those permission requirements you need to define in the device native configuration in Android -> AndroidManifest.xml, iOS -> Info.plist, and UWP -> Package.appxmanifest. This is well documented in the Media Plugin’s docs.

https://github.com/jamesmontemagno/MediaPlugin#important-permission-information

8. Set up Required Permissions! only!

Yes it’s better not to set up Permissions unless you absolutely need them, according to your requirement. Let’s say you’re only using the Media Plugin to access Gallery, then you don’t need to set up required Permissions for Camera, and data Write Access. This will also give an extra peace of mind for your Users as well. 😉

9. Re-usable code!

If your apps is going to be using Camera and Gallery usage all over the in multiple pages, then it’s better to implement a separate Service layer for it using the Media Plugin.

This will definitely come in handy when you’re dealing with a good MVVM architecture in your project solution. You can abstract out the required features into a Service instance, that’s best registered as a Singleton object in your IoC Container.

public MediaService : IMediaService
{
	public MediaService()
	{
		...
	}
	
	public async Task<ImageSource> CapturePhoto()
	{
		...
	}
	
	public async Task<ImageSource> SelectPhoto()
	{
		...
	}
	
	...
}

As an added extra you could have a Permission check up method, where you pass in the type of permissions you want to request from User unless already granted.

...
private async Task<bool> RequestPermissions(List<Permission> permissionList)
{
    ...
}
...

Well.. that’s basically the check list you need to go through when setting up Media Plugin in your Xamarin.Forms! 😉

Conclusion…

Even though its straight forward to set up the Media Plugin (Xam.Plugin.Media) for Xamarin.Forms, there’s a high chance you might miss something during the process and run into all kinds of weird issues during the run time, specially since there’s some platform specific bits to set up as well!

I’ve also shared some tips at the end for setting up the usage of it to cater for a better implementation. I might write up another post sharing a step by step guide for setting up all these bits in my next article! Until then, hope this helps!

Share the love! 😀 Cheers!

Building a bi-directional interop bridge with WebView in Xamarin.Forms!

Let’s build an advanced communication bridge into your Xamarin.Forms WebView, talk to it, and let it talk back to us at will!? 😉 lol Yes let me show you how to pass data from Javascript environment to C# .NET run time in the Web page rendered inside your Xamarin.Forms WebView!

I’m talking about building a bi-directional communication tunnel with HTML/Javascript inside your WebView in Xamarin.Forms yo! 😀 buckle up your seatbelts!

So in my previous article, Talking to your WebView in Xamarin.Forms! I talked about, how to build a uni-directional C# .NET to Javascript environment in Xamarin.Forms WebView.

WebView in Xamarin.Forms..

In this article I’m going to take another step forward and allow the same functionality to occur the other way around as well… We’re talking about a two-way invoking between .NET run time and javascript run time in a Xamarin.Forms WebView!

Unfortunately this cannot be done by default in WebView.

Behold, Hybrid WebView!

This right here is a bit more advanced extension of the WebView with a bit of Xamarin Native magic! 😉 In order to establish an invoke bridge directly from HTML Javascript sandbox that its running inside the WebView, out to the .NET runtime, we need something more natively handled in Xamarin!

Basically we’re going to implement a device native script handler for the WebView which is going to handle the bridging between the Javascript and the .NET runtime handshake, in return giving us the opportunity to invoke calls from javascript into the .NET run time the Xamarin.Forms is execution on! 😉

Well that’s a very simplistic explanation, but there’s a whole article about it on Microsoft Xamarin Docs, Customizing a WebView if you’re interested! Since its already there, I wouldn’t be going into complete details of it, rather I would be explaining the improved implementation I have done on top of it for the Hybrid WebView.

Over there it focuses on loading Embedded HTML content, but I will extend my implementation to support for dynamic HTML content, allowing you to handle javascript loaded from a Web Source and support even run time generated javascript.

Invoking C# from Javascript in the WebView!

In order to do this, in par with Xamarin.Forms WebView, we need to implement a Custom Renderer for WebView, which we will refer to as HybridWebView.

HybridWebViewRenderer will be created across all the native platforms we intend to use our HybridWebView, in Android, iOS and Windows native environments each equipped with its own javascript handler to build a bridge on to our .NET run-time. 😉

We access the native WebViewRenderer properties and basically implement a special handler to listen to a certain pre-defined Javascript method execution. In this method which we add into the javascript that is rendered inside the WebView, we will define the parameters we need to use, in that way we can pass any number of parameters and data types as we want.

We’re going to intercept the execution of this javascript method inside our Hybrid WebViewRender, and then redirect it on to the .NET method we’ve subscribed to. So in the Hybrid WebView definition we will have an Action method that we bind to in our Xamarin.Forms level which we will subscribe to wherever we’re using this magical bits! 😉

Let the coding begin!

Let’s begin with HybridWebView Control in Xamarin.Forms! Here we;re adding an Action that we will subscribe to in order to receive data from Javascript invokes inside the WebView rendered content.

HybridWebView

namespace XFWebViewInteropDemo.Controls
{
    public class HybridWebView : WebView
    {
        private Action<string> _action;

        public void RegisterAction(Action<string> callback)
        {
            _action = callback;
        }

        public void Cleanup()
        {
            _action = null;
        }

        public void InvokeAction(string data)
        {
            if (_action == null || data == null)
            {
                return;
            }
            _action.Invoke(data);
        }
    }
}


InvokeAction is the method that will be used by the Native Renderer object to direct the invokes from javascript executions. Using the RegisterAction we can dynamically register the Action we need to subscribe to.  You can add any number of parameters as you wish in here, but you need to make sure to handle them in the native renderer as well.

Native Renderers…

We’re going to build native renderers for each platform we’re targeting, Android, iOS, and UWP (Windows). Basically all the renderers follow the same basic concept as we discussed before, but each of their implementation is going to be different based on the platform.

We need to make sure to handle the subscribe and unsubscribe of the Element Native properties and events properly in the renderer’s OnElementChanged() event.

We’re going to inject the javascript method that we’re going to listen to in the renderers as following.

private const string JavaScriptFunction = "function invokeCSharpAction(data){....}";


We will be defining this in each renderer, according to the native platform. Every time a invokeCSharpAction() javascript method executes inside the WebView, it will get fetched by the Renderer and the following method call will occur.

((HybridWebView)Element).InvokeAction(value);


Up to the HybridWebView’s Action subscription on Xamarin.Froms run time, allowing our Action to fire up and retrieve the data coming in from javascript.

Alright now let’s get into details of each native renderer.

Android Renderer!

We’re going to use the Android’s WebViewRenderer to subclass our HyrbidWebViewRenderer.

github: /XFWebViewInteropDemo.Android/Renderers/HybridWebViewRenderer.cs

Like we discussed before for Android, we have the following script injection defined,

private const string JavascriptFunction = "function invokeCSharpAction(data){jsBridge.invokeAction(data);}";


For Android we need some extra bits of implementation, by creating a JavascriptWebViewClient that will set up listening to the execution of javascripts inside the WebView.

Then we have to create a JsBridge, which handles the interfacing with Javascripts, and fires up InvokeAction() method to redirect the execution flow up to the Xamarin.Forms level handlers.

Both those custom objects need to be set up in the HybridWebView in the renderer Element upon instantiation.

Control.SetWebViewClient
(new JavascriptWebViewClient($"javascript: {JavascriptFunction}"));
Control.AddJavascriptInterface
(new JsBridge(this), "jsBridge");


Once all that set up, and you build the Android project straight away, you might be getting a build error as following. (unless you’ve set this fix up before in your project)

Its caused by the JsBridge class we implemented with an Export attribute for the invokeAction method for our renderer, to export this into a native java method. So we need to add the Mono Android Export library.

You can fix this by going to Android Project -> References -> Add References -> Select Assemblies tab on the left panel -> tick on Mono.Android.Export Reference from the list of References.

Click Ok and rebuild, you’re all set! 😉

That’s pretty much it for the Android Renderer. Next on to iOS…

iOS Renderer!

For iOS we are going to use WkWebViewRenderer as the base renderer for our HybridWebView and in addition we have to implement IWKScriptMessageHandlder interface to handle the custom javascript execution monitoring that we target to handle.

github: /XFWebViewInteropDemo.iOS/Renderers/HybridWebViewRenderer.cs

We set up a WKWebViewConfiguration object in the constructor and we get access to the property WKWebViewConfiguration.UserContentController which allows us to set up our native bridge to Javascript execution firing up inside the WebView.

public HybridWebViewRenderer(WKWebViewConfiguration config) : base(config)
{
    _userController = config.UserContentController;
    var script = new WKUserScript(new NSString(JavaScriptFunction),
                   WKUserScriptInjectionTime.AtDocumentEnd, false);
    _userController.AddUserScript(script);
    _userController.AddScriptMessageHandler(this, "invokeAction");
}


Then for iOS, we have the following script injection defined using webkit API, accessing the invokeAction script that we attached and finally calling on the postMessage() method with the data parameter.

private const string JavaScriptFunction = "function invokeCSharpAction(data){window.webkit.messageHandlers.invokeAction.postMessage(data);}";


IWKScriptMessageHandler provides us with DidReceiveScriptMessage() method which we use to transfer the data up to the Xamarin.Forms level handler using, HybridWebView.InvokeAction(data).

Quite simple ans straight forward eh! next to Windows, or UWP as you might prefer.. 😉

UWP Renderer!

We use the Xamarin native WebViewRenderer for UWP or Windows platform.

github: /XFWebViewInteropDemo.UWP/Renderers/HybridWebViewRenderer.cs

The native default renderer grants us access to these two events NavigationCompleted and ScriptNotify. We need to make sure to subscribe to those events in our HybridWebViewRenderer in Windows as follows.

Control.NavigationCompleted += OnWebViewNavigationCompleted;
Control.ScriptNotify += OnWebViewScriptNotify;


NavigationCompleted, allows is to easily inject our javascript handler function, which is defined as follows for UWP or Windows,

private const string JavaScriptFunction = "function invokeCSharpAction(data){window.external.notify(data);}";


And then ScriptNotify, provides us the chance to redirect back the execution to Xamarin.Forms level handler using HybridWebView.InvokeAction(data).

Bingo, that completes the UWP or Windows Renderer!

Now that we’ve finished the setting up of our HybridWebView and its Native Renderer for Android, iOS and Windows, its time to consume it and taste it out! 😉

Let’s try it out!

Here’s we shall begin by consuming it in a XAML page in Xamarin.Forms!

<controls:HybridWebView
	x:Name="webViewElement"
	HorizontalOptions="FillAndExpand"
	VerticalOptions="FillAndExpand" />

github: /XFWebViewInteropDemo/HybridWebViewDemoPage.xaml

And then don’t forget to Subscribe to retrieve the data coming in from javascript inside our WebView using RegisterAction() method we created!

...
    // Subscribe for the data coming in from Javascript
    webViewElement.RegisterAction(DisplayDataFromJavascript);
}

private void DisplayDataFromJavascript(string data)
{
    Device.InvokeOnMainThreadAsync(() =>
    {
        ...
        // Do whatever you want with the data
        ...
    });
}
...

github: /XFWebViewInteropDemo/HybridWebViewDemoPage.xaml.cs

I’m just going to use the Main UI Thread’s help to execute any UI related stuff. And here’s a little demo HTML that I’m setting up in our Hyrbid WebView.

webViewElement.Source = new HtmlWebViewSource()
{
    Html =
        $@"<html>" +
        "<head>" +
            ...
            "<script type=\"text/javascript\">" +
                "function invokexamarinforms(){" +
                "    try{" +
                "        var inputvalue = 
document.getElementById(\"textInputElement\").value;" +
                "        invokeCSharpAction(inputvalue + '. This is from Javascript in the WebView!');" +
                "    }" +
                "    catch(err){" +
                "        alert(err);" +
                "    }" +
                "}" +
            "</script>" +
            ...
        "</head>" +

        "<body>" +
            "<div>" +
                "<input type=\"text\" id=\"textInputElement\" placeholder=\"type something here...\">" +
                "<button type=\"button\" onclick=\"invokexamarinforms()\">Send to Xamarin.Forms</button>" +
            "</div>" +
        "</body>" +

        "</html>"
};

github: /XFWebViewInteropDemo/HybridWebViewDemoPage.xaml.cs

As you can see I have a javascript function, invokexamarinforms() that will get invoked from a button call in the body. Once this method executes, it calls on the invokeCSharpAction() method that we defined in our Hybrid WebViews Native renderers.

In my javascript snippet I’m surrounding this call with a try catch in order to make sure the Native Renderer is properly implemented or not. Making sure this method is properly executes is a crucial step during debug if you run into any issues.

So let’s try out that sample code bits in action!

Time for some action! 😉

Hit that F5 yo! (well.. if you’re in Visual Studio! lol)

Side by side iOS, Android and UWP working like charm! 😉

As you can see in my simple Xamarin.Forms demo, I am demonstrating a simple C# .NET to Javascript call with data and Javascript to C# .NET call with data, a true bi-directional communication bridge!

Here we are typing some text in the Xamarin.Forms Entry element and sending it into the HTML inside the WebView. And then typing some text in the HTML Text Input element inside the WebView and click on HTML Button, and sending it to the Xamarin.Forms Label to be displayed, works like a charm!

I have shared the demo app code in my github as usual: github.com/XFWebViewInteropDemo

A little chat conversation between Javascript to C# and vise-versa! 😉

Yeah just a fun little demo I have added to the same repo in github! 😀

Extra tips!

Yep it’s that time, for some extra tips based on my experience with Xamarin.Forms Hybrid WebView! Although the extra tips that I already discussed in my previous article Talking to your WebView in Xamarin.Forms! still applies for this as well since we’re still extending from default Xamarin.Forms WebView, but apart from that…

Web Source, Embedded, Code HTML!? all same!

Doesn’t matter whatever the source of the HTML you’re setting in the Hybrid WebView, be it a web source directly from a URL, or loading an embedded HTML File, or even a code generated dynamic HTML content, it doesn’t make a difference.

The only thing that matters is the invokeCSharpAction() in your rendered HTML, so that the native renderers can pick it up and forward the execution to Xamarin.Forms .NET handlers!

Yes! extra parameters!

Even though I’m showcasing only a single parameter during this demo article, from javascript to C# .NET run time, you can easily extend this same implementation to pass any number of parameters as you wish! As I explained in the article make sure to define it in the following bits,

HybridWebView.InvokeAction(string data1, string data2)

Something to keep in mind is that you can only pass a single parameter into the invokeCSharpAction(data).  So in your javascript make sure to merge all the parameters into a single value and have a pipe delimiter (ex: |) like separator for them (ex: data1|data2) that you’re before to the invokeCSharpAction(data) method, which you will break it up on arrival in the native renderer and pass them up to the InvokeAction(data1, data2).

var dataBody = data;
var dataArray = dataBody.Split("|");
var data1 = dataArray[0];
var data2 = dataArray[1];

((HybridWebView)Element).InvokeAction(data1, data2);

Finally wire it all up, you’re good to go! 😉 I might share another article with some cool implementation with this in near future! 😀

Conclusion

You can easily build a communication bridge from C# .NET to javascript environment in Xamarin.Forms WebView! but the other way is not really possible out of the box!

That’s why we’re implementing this Hybrid WebView Control which allows us build a communication bridge from javascript to C# .NET environment directly during run time! 😉

So this concludes my bi-directional communication tunnel with HTML/Javascript inside your WebView in Xamarin.Forms yo!

Well that’s pretty much it!

Share the love! Cheers! 😀

Talking to your WebView in Xamarin.Forms!

Let’s build a communication bridge into your Xamarin.Forms WebView, and talk to it!? 😉 lol Yes let me show you how to pass data into the Web page rendered inside your Xamarin.Forms WebView!

I’m talking about building a uni-directional communication with Javascript inside your WebView in Xamarin.Forms yo! 😀 get your game face on!

WebView in Xamarin.Forms..

Xamarin.Forms provides a neat WebView that could render any Web HTML content efficiently similar to a browser inside your own Xamarin.Forms App.

Earlier there used to be a lots of issues that needed to be dealt with when to comes to rendering HTML content alongside Javascript inside the WebView, but with the recent update it has gotten far better with lots of features and facilities straight out of the box to be used! 😀

Invoking Javascript in the WebView!

Using the WebView straight out of the box, we can execute Javascript methods rendered inside the HTML content. Now I know this used to require a lot hacks and tricks, along side dealing with lot of run time exceptions.

But in the most recent updates of Xamarin.Forms, the WebView has gotten rock solid, and now even provides a dedicated method, EvaluateJavaScriptAsync() to invoking Javascript methods straight out of the box.

WebView.EvaluateJavaScriptAsync(String)


So now you can execute Javascript methods along with data parameters from you C# code in Xamarin.Forms using the default WebView control. EvaluateJavaScriptAsync() is an async method that lets you execute javascript and even await the call to response from the invoke as well.

var result = await webView
        .EvaluateJavaScriptAsync
            ("javascriptmethod('Hello world!')");


All you need to do is call the javascript method you’re targeting to invoke with or without the parameters you prefer using EvaluateJavaScriptAsync() in an asynchronous manner allowing you to await for a result back from the javascript into the .NET environment itself! Yep its that simple to talk to the HTML content in your WebView now! 😀

Let’s give it a try and establish a uni-directional communication with our WebView! 😉

Let the coding begin!

Here I have prepared a small demo where I’m loading some HTML content, along with a nice little javascript bits, into my WebView using HtmlWebViewSource as follows…

webViewElement.Source = new HtmlWebViewSource()
{
    Html =
        $@"<html>" +
        "<head>" +
            ...
            "<script type=\"text/javascript\">" +
                "function updatetextonwebview(text) {" +
                "    document.getElementById
                     (\"textElement\").innerHTML = text;" +
                "}" +
            "</script>" +
            ...
        "</head>" +

        "<body>" +
        ...
        ...
        "</body>" +

        "</html>"
};

Full code on github: /XFWebViewInteropDemo/DefaultWebViewDemoPage.xaml.cs

So here in my HTML content, I have a simple Javascript method, updatetextonwebview(text) where it takes in a value and set it to an HTML text element in the body. Pretty simple and straight forward.

string result = await webViewElement
        .EvaluateJavaScriptAsync
           ($"updatetextonwebview('{textEntryElement.Text}')");


And then I take a Text value from an Entry Element and pass it into the updatetextonwebview() javascript method using EvaluateJavaScriptAsync() of WebView.

Alright, let’s try it out!

Hit F5!

Well if you’re on Visual Studio, just hit F5 and watch the magic!

Side by side iOS, Android and UWP with Xamarin.Forms right out of the box! 😉

As you can see in my simple Xamarin.Forms demo, I have an Entry element which I type some text into and then I click on the Button which then going to pass that text data into the WebView’s javascript method. Then inside the javascript, it takes in the data and set it to a text label in the HTML body.

I have shared the demo app code in my github as usual: github.com/XFWebViewInteropDemo

No hacks, no work arounds, no custom renders, just straight out of the box in Xamarin.Forms! Works like a charm! 😉

Extra tips!

Yep it’s that time, for some extra tips based on my experience with Xamarin.Forms WebView!

-Track invoking of Javascript

Using WebView.EvaluateJavaScriptRequested event you can track the javascript invoke calls injecting into the WebView from your .NET code, basically an monitoring mechanism of all your javascript invokes from C# which will allow you to validate them or add extra details as you prefer on demand.

-Track Navigation inside the WebView

WebView provides a whole list of events to track the navigation now, along side back and forward navigation, redirects, and even refresh events.

WebView.Navigating

This event Triggers upon the beginning of the Navigation, allowing you to cancel it on demand. This event provides a WebNavigatingEventArgs object which provides you all the details about the navigation that is about to occur, direction, url endpoint and so on.

This also provides WebNavigatingEventArgs.Cancel property which allows you to cancel that navigation on demand. So yeah a lot of cool bits you can do with it!

WebView.Navigated

This event Triggers after a Navigation completes, providing you with the same details similar to Navigating event. In addition it gives WebNavigatedEventArgs.Result property which tells you whether the navigation was success or failure.

WebView.GoBackRequested | GoForwardRequested | ReloadRequested

Now these are some simplified events thats provided by WebView, allowing you to directly hook into GoBack, GoForward and Reload events when they occur. Although they do not provide facility to cancel those events like how we get in Navigating event. Just a quick easy way to monitor those events as they occur.

-Think Creative!

Most developers miss this point, if you can send a simple text string, then you can pass anything into the WebView’s javascript. Well… in disguise of a string of course!

  • Get device native data
  • Location GPS data
  • Proximity data
  • Internet Connectivity data
  • Captured File/Image data

Those are few examples, yes even an Image captured from the device camera can easily be sent as a byte array converted into a base64 string!  Imagination is the limit yo! 😉

Conclusion

Xamarin.Forms WebView has come a long way since the early days, into a complete mature sandbox environment to render any HTML Web Content inside your Xamarin.Forms app. And it provides lots of features to communicate, pass data back and forth, and even monitor and control the navigation happens inside itself.

This article basically focuses on uni-directional execution from C# .NET code to Javascript environment, while you can still await for the results from the javascript.

But there is no direct execution from Javascript environment to C# .NET yeah? So in my next article I’ll share how to build a bi-directional execution from C# .NET code to Javascript environment with Xamarin.Forms WebView. 😉

Well that’s pretty much it!

Share the love! Cheers! 😀