Tag Archives: Navigation

Overriding Back Button in Xamarin.Forms Shell…

Let me share all about overriding the Back Button navigation in Xamarin.Forms Shell applications, oh and yes! it includes handling the Android on-screen back button as well! 😉

This topic has been quite a confusing and wobbly area in Xamarin.Forms for the longest time, even I remember having to write numerous customer renderers, and hacks to just to get this simple handle done, overriding the back button…

Yes, we got hope!

But with shiny new Xamarin.Forms Shell seems to have provided quite a promising solution for this, out of the box framework itself, without us having to do much work.

I’ve been working on trying to override the back button behavior on Xamairn.Forms Shell recently, both with Navigation bar button and Android hardware back button. So I decided to share my experience with yol and provide a proper solid solution for your worries.

Ways of the Backwards…

Fundamentally there are two ways how a backward navigation could occur, although there could be other ways depending on the flow of our app…

  • Navigation bar Back button (iOS and Android)
  • Android on-screen Back Button

So when we need to consider both those scenarios when taking control of backward navigation.

Investigation…

Since overriding the Backwards Navigation in Xamarin.Forms has always been quite confusing and difficult to handle, when I started off of Xamarin.Forms Shell, I thought of giving it a clean slate and a fresh try from scratch.

Based on that here are the findings I came up with…

Case 1: OnBackButtonPressed()

OnBackButtonPressed() This method has been there for quite a long time in Xamarin.Forms framework right out of the box, I remember using this long time back, but they kept on breaking its behavior during many releases, which was quite troublesome.

This is suppose to let you override the Android on-screen (hardware) back button action, where a developer can override this method and it would intercept that action giving the developer the option whether to allow it or cancel it.

protected override bool OnBackButtonPressed()
{ ... }

You can override this in a ContentPage but surprisingly, it DOES NOT WORK! Now I would argue it makes total sense for it to be used in such context, and if it worked, it would have made things so much easier, but no, unfortunately not. 😦

But in Xamarin.Forms Shell, if you override this in the AppShell class, it does seem to work. It will intercept every time you click the Android Back button in any page.

public partial class AppShell : Xamarin.Forms.Shell
{
	public AppShell() { ... }

	protected override bool OnBackButtonPressed()
	{
		// true or false to disable or enable the action
		return base.OnBackButtonPressed();
	}
}

But the only problem is you need to have it implemented in AppShell class, which calls for some complicated implementation in the code,

  • We have to handle each individual Page behavior in a global context
  • No async context available to perform some awaitable async operation

So that’s double the trouble I wouldn’t want to go down that mess! trust me, I’ve tried lol.

They have several bug tickets open for this issue from “time to time”, here’s one of them: https://github.com/xamarin/Xamarin.Forms/issues/7072

Just an extra, if you need to handle an awaitable operation in a non-async context, here’s a sytarting point: https://forums.xamarin.com/discussion/27752/how-to-await-a-displayalert-from-a-page-without-async-button-event

Case 2: Shell.BackButtonBehavior

Shell.BackButton Now this is something new that was shipped with Xamarin.Forms Shell, which lets you override the Navigation Bar Back button, even allowing you to customize the button appearance with an icon or text.

It allows you to cancel the user invoked backward navigation from the Navigation Bar Back button. You could also subscribe a command that will fire up and let you proceed as you wish.

<Shell.BackButtonBehavior>
    <BackButtonBehavior
        Command="{Binding GoBackCommand}"
        IsEnabled="True"
        TextOverride="Back" />
</Shell.BackButtonBehavior>

Microsoft Docs: https://docs.microsoft.com/en-us/xamarin/xamarin-forms/app-fundamentals/shell/navigation#navigation-events

Do not get this confused with the Android on-screen back button, this does not work for that.

But there’s a small bug in it right now, where as in iOS run time it wouldn’t fire the Command as expected unless you set the TextOverride or IconOverride property. But it works perfectly fine on Android. There’s an active bug on it: https://github.com/xamarin/Xamarin.Forms/issues/8546

Nonetheless this is a good option to keep in mind.

Case 3: Shell.OnNavigating()

Shell.OnNavigating event is also a nifty little feature shipped out with Xamarin.Forms Shell, which allows you to intercept any kind of navigation and override it.

Yes it works on both Android and iOS! allowing you to override any navigation, either forwards or backwards direction. This goes by saying that it supports handling Android on-screen back button navigation as well.

It passes in a parameter, ShellNavigatingEventArgs provides with the following,

  • ShellNavigatingEventArgs.Cancel() allows you to cancel the navigation.
  • ShellNavigatingEventArgs.Source property provides enum ShellNavigationSource, determines the type of navigation.
  • ShellNavigatingEventArgs.Current and ShellNavigatingEventArgs.Target provides the navigation path details, kind of like, from and to path.

Microsoft Docs: https://docs.microsoft.com/en-us/xamarin/xamarin-forms/app-fundamentals/shell/navigation#navigation-events

There are two ways to implement this, you can override OnNavigating() in the AppShell class

public partial class AppShell : Xamarin.Forms.Shell
{
    public AppShell() { ... }
 
    protected override void OnNavigating
                           (ShellNavigatingEventArgs args)
    {
        // implement your logic
        base.OnNavigating(args);
    }
}

or you can subscribe to the Shell.Current.Navigating event of it as follows…

protected override void OnAppearing()
{
	Shell.Current.Navigating += Current_Navigating;
}

private async void Current_Navigating(object sender, 
                           ShellNavigatingEventArgs e)
{
	// implement your logic
}

Also here you need to make sure to unsubscribe from those even handlers once you’re done with the override action, otherwise they will retain in memory and cause all kinds of weird issues in your app.

Given both solutions, I would say the most productive option is to use the event subscription, instead of overriding in a global context. But then again it should depend mostly on your requirement. You need to keep in mind, “With great power comes great responsibility” when implementing this method, you have to make sure you’re properly handling the resources here.

Case 4: Shell.GoToAsync() for backwards!

Shell.GoToAsync() is the method that is provided by Xamarin.Forms Shell for programmatically navigating forward in pages. Until very recently Shell didn’t provide any way to Navigate backwards, but with one of the latest update they now allow it as follows,

await Shell.Current.GoToAsync("..");

Microsoft Docs: https://docs.microsoft.com/en-us/xamarin/xamarin-forms/app-fundamentals/shell/navigation#backwards-navigation

This is quite important hence this fills an important part of the puzzle, where we need to override the backward navigation event, but also forward that action programmatically once we confirm it from our logic.

Alternatively you could also use the synchronous method call, which seem to be an Xamarin.Forms internal method,

Shell.Current.SendBackButtonPressed();
...
// or on Page level
page.SendBackButtonPressed();

https://docs.microsoft.com/en-us/dotnet/api/Xamarin.Forms.Page.OnBackButtonPressed?view=xamarin-forms

But I would not recommend this to be used since its synchrony and its meant for Xamarin.Forms internal framework calls.

Investigation Conclusion:

We need both Navigation Bar back button and Android on-screen Back Button to be handled for a complete solution in this case. Now given all 3 cases, we could derive a solution by using Case 2, Case 3, and Case 4 for a full fledge overriding of the Back Button behavior in Xamarin.Forms Shell. So that’s what we’re going to explore next..

Sneak Peek!

Before I get into the actual solution that I built up, let more share a little magic here!

So that’s the awesomeness I’m going to share with you guys! Let me explain…

The Solution…

Just like I explained in my little investigation conclusion, we’re going to make use of both Shell.BackButtonBehavior and Shell.OnNavigating counterparts to implement our overriding of the Back button in Xamarin.Forms Shell. This will take care of both App Navigation Bar back button and Android on-screen back button events.

Navigation bar Back Button: We shall implement the Shell.BackButtonBehavior in the Page with a Command handler attached to it, which will override the Navigation bar back button event, and hold that flow asynchronously until we get a confirmation from an Alert dialog. Once we got the confirmation, we will forward that backward navigation event using GoToAsync(“..”) execution.

Android on-screen Back Button: We could implement the Shell.OnNavigating event subscription to handle the Android back button navigation. This implementation will need a bit of work, hence we’re going to subscribe to the Shell.OnNavigating event upon the Page OnAppearing event and unsubscribe from it upon OnDisappearing event for cleaning up the event handlers. Once we get a hold of the back button event, we will asynchronously await for the Alert dialog confirmation and forward the navigation using GoToAsync(“..”), same as the previous execution.

Keep in mind that I will be showcasing how to handle both these scenarios at once, in perfect synchronous harmony with a beautiful non-conflict implementation. 😉

Additionally I will include them separately as well in my demo project for you to explore them separately as well just in case if you had such requirement. I have published this up in my Github repo, if you’re interested in taking a peak,

hosted on github:
github.com/UdaraAlwis/XFShellBackButtonOverride

Alright then, on ahead…

Before I begin, make sure to update the installed Xamarin.Forms version in your project, whereas for this demo I’m using version 4.6.0.847, so I would recommend using the same or newer version.

Let the coding begin!

Given that you have prepared your Xamarin.Forms Shell project solution, and ready to go, let me recap some basics I’ve set up this project with. I’m using pure out of the box Xamarin.Forms Shell project, with no additional libraries or dependencies. I have set it up accordingly to MVVM architecture with appropriate BindingContext set up for each XAML Page.

Let’s begin with our Navigation bar Back button override implementation, by adding Shell.BackButtonBehavior set up in our XAML Page.

<ContentPage
    ... >
 
    <Shell.BackButtonBehavior>
        <BackButtonBehavior Command="{Binding GoBackCommand}">
            <BackButtonBehavior.TextOverride>
                <OnPlatform x:TypeArguments="x:String">
                    <OnPlatform.Platforms>
                        <On Platform="iOS" Value="Go Back" />
                    </OnPlatform.Platforms>
                </OnPlatform>
            </BackButtonBehavior.TextOverride>
        </BackButtonBehavior>
    </Shell.BackButtonBehavior>
 
    <ContentPage.Content>
        ...
    </ContentPage.Content>
</ContentPage>

Remember the Xamarin.Forms Shell bug I mentioned earlier regarding the iOS run time? So here I’ve come up with a workaround for it by setting TextOverride property for iOS platform. You could even use the IconOverride property as well if it fits your requirement.

Now let’s wire up that Command, GoBackCommand in our ViewModel…

public class TestPageViewModel : BaseViewModel
{
	public Command GoBackCommand { get; set; }

	public TestPageViewModel()
	{
		...
		GoBackCommand = new Command(async () => await GoBack());
	}

	private async Task GoBack()
	{
		var result = await Shell.Current.DisplayAlert(
			"Going Back?",
			"Are you sure you want to go back?",
			"Yes, Please!", "Nope!");

		if (result)
		{
			await Shell.Current.GoToAsync("..", true);
		}
	}
}

As you can see I’ve wired up the Command to the GoBack() async method, where I’ve fired up an Alert dialog for the user awaiting confirmation asynchronously. Then once we get the go ahead confirmation we perform the backward navigation programmatically using GoToAsync(“..”) method.

Now that bit is completed, it should let you handle the Navigation Bar back button event as you wish! 😉

Next let’s take care of the Android on-screen Back button override implementation, by making sure we have hooked into the OnAppearing and OnDisappearing events in our Page, which could differ based on the MVVM library you use. But if you’re using pure Xamarin.Forms here like me, then you can hook up to them as follows…

public partial class TestPage : ContentPage
{
	public TestPage(){ ... } 

	protected override void OnAppearing()
	{
		base.OnAppearing();

		// execute OnAppearingCommand
		// informing ViewModel
		((TestPageViewModel)this.BindingContext)
				.OnAppearingCommand.Execute(null);
	}

	protected override void OnDisappearing()
	{
		base.OnDisappearing();

		// execute OnDisappearingCommand		
		// informing ViewModel
	}
}

The idea here is to inform our ViewModel that the Page is Appearing or Disappearing and based on that we subscribe or unsubscribe from Shell.OnNavigating event as follows…

public class TestPageViewModel : BaseViewModel
{
    ...
    public Command OnAppearingCommand { get; set; }
    ...
  
    public TestPageViewModel()
    {
        ... 
        OnAppearingCommand 
                = new Command(() => OnAppearing());
        ...
    }
 
    private void OnAppearing()
    {
        Shell.Current.Navigating += Current_Navigating;
    }
 
    private void OnDisappearing()
    {
        Shell.Current.Navigating -= Current_Navigating;
    }
 
    private async void Current_Navigating(object sender, 
                                ShellNavigatingEventArgs e)
    {
        if (e.CanCancel)
        {
            e.Cancel();
            await GoBack();
        }
    }
 
    private async Task GoBack()
    {
        // display Alert for confirmation
        ...
 
        if (result)
        {
            Shell.Current.Navigating -= Current_Navigating;
            await Shell.Current.GoToAsync("..", true);
        }
    }
}

As you can see we’re subscribing to Shell.Current.Navigating event based on Appearing and Disappearing events of the page, making sure that we’re cleaning up the event handlers as I explained before.

Here we’re intercepting the Navigation in the Current_Navigating() method, and we immediately cancel it and call up on awaitable GoBack() method, where we do the Alert confirmation for the user. Then from there, based on the confirmation, we perform go back or cancellation, and additionally we’re unsubscribing from the Shell.Current.Navigating event there itself, for preventing circular event.

Here I am unsubscribing from Shell.Current.Navigating in both GoBack() and OnDisappearing() is for safety, but you could handle this according to your own requirement as well.

Afterthought…

You can only keep the 2nd implementation and still have the Navigation Bar back button overridden, this is due to Shell.OnNavigating firing up for any kind of navigation happening in Shell. So you don’t really need to have the Shell.BackButtonBehavior implementation, but you could keep both in case if you need to implement any extra features, or for safe keeping of the navigation state. 😉 Your choice!

Also since the Android on-screen Back Button handling is only required on Android, you could restrict that code logic to be registered only for Android run time using Device.RuntimePlatform == Device.Android flag of Xamarin.Forms framework.

No! I don’t want both!?

Now having both the above implementation will let you override Navigation Bar and Android on-screen back button actions. But what if I only want to override one of them? Good question!

In that case you could only have one of the above implementation up on your choice, but if you want to keep both and dynamically switch between the options, you could easily do that by introducing a simple flag property in your ViewModel such as follows,

public class TestPageViewModel : BaseViewModel
{
    public bool IsBackwardNavAllowed { get; set; } = false;
 
    public TestPageViewModel()
    {
        ...
        NavBarBackButtonCommand = new Command(async () => 
        {
            IsBackwardNavAllowed = true;
            await Shell.Current.GoToAsync("..", true);
        });
        ...
    }
 
    ...
 
    private async void Current_Navigating(object sender, ShellNavigatingEventArgs e)
    {
        if (e.CanCancel && !IsBackwardNavAllowed)
        {
            e.Cancel();
            await GoBack();
        }
    }

    ...
}

Here I have the IsBackwardNavAllowed flag, where I use to allow backward navigation originated from NavBarBackButtonCommand which is bound to Shell.BackButtonBehavior, but I still override the Android on-screen back button navigation event. 😉

Little demo awesomeness!

So in my little demo app, I have implemented 3 separate scenarios of overriding the Back Button Navigation in Xamarin.Forms Shell!

You can take a look at each XAML Page and their ViewModel counter parts to see how I have implemented this awesomeness. Alright then without further a due, let’s see it in action!

Fire it up!

Here in our 1st Page we have Android and iOS side by side both with Navigation Bar Back Button overridden successfully… 😀

You can see here on Android we have the default Back button in the Navigation bar, but on iOS we have the Text overridden back button due workaround I used for fixing the iOS bug I mentioned earlier.

Then in our 2nd Page we have Android on-screen Back button overridden successfully, in which case there wouldn’t be any response to show on iOS obviously…

As you can see I’ve deliberately disabled the overriding of the Navigation Bar Back button action using the implementation that I discussed earlier, hence we’re nicely overriding only the Android on-screen Back Button action.

Finally in our 3rd Page we have Android and iOS side by side with both Navigation Bar Back Button and Android on-screen Back Button overridden successfully…

There you go, Navigation bar back button events are overridden in both Android and iOS, while also overriding the Android on-screen back button event as well! 😉 This this implementation you don’t have to deal with the iOS bug of Shell.BackButtonBehavior…

Oh look at that beauty eh! 😉

hosted on github:
github.com/UdaraAlwis/XFShellBackButtonOverride

Once again feel free to check out the code on github! 😀

Conclusion…

The whole idea of overriding backward navigation in classic Xamarin.Forms was quite tedious, having to implement custom renderers and all kinds of platform specific hacks. But with Xamarin.Forms Shell it seems to be made easier, but still need a bit of work, and few pending bugs needs fixing from Microsofts.

So using the awesomeness of Xamarin.Forms Shell we explored how to override the Navigation Bar Back Button and Android on-screen Back Button events, with multiple customization possibilities for catering to your specific requirements.

Hope this was helpful for any of my fellow devs out there!

Share the love! 😀 Cheers yol!

Pushing the limits of Hybrid WebView in Xamarin.Forms!

Let’s push the possible limits of Hybrid WebView and build something awesome in Xamarin.Forms! 😀

Remember my last blog post, Building a bi-directional interop bridge with WebView in Xamarin.Forms! which is where I shared about building a bi-directional invoke bridge between Javascript and C# dotnet run time using Hybrid WebView.

So based on that I went on a little journey to push the limits of this Hybrid WebView and built some cool demos with it. So here I am sharing it all with yol! 😉

Pushing the limits!

BTW: This is going to be a continuation of my previous blog post, so better take a look at it first if you haven’t: Building a bi-directional interop bridge with WebView in Xamarin.Forms!

To put it into fancy words,

We built a bi-directional communication bridge, between completely different run times, with possibility of two way execution invoke on demand! Hybrid WebView…

So now, the question is, what can we do to push the limits of our Hybrid WebView? Sounds like something for the imagination to limit!

Behold the awesomeness!

Imagine, being able to load a Web page into you Xamarin.Forms WebView, and being able to access Device features such as Camera, GPS Location, Accelerometer, etc..

Basically we’re going access Device Native features through the WebView and retrieve data directly from C# .NET run time in our Xamarin.Forms app! You will be able to load any HTML content, either from a Web Hosted source or locally generated HTML source, it would work like a charm thanks to the Hybrid WebView!

In order to demonstrate this awesomeness, let’s try out the following feature for the demo implementation…

  • Capture Photos using Device Camera
  • Pick Photos from Device Gallery
  • Get Device Native information
  • Get Device GPS Location data

All those device features and data will be accessed from the Javascript running inside the Hybrid WebView! 😉

Like I mentioned before, we will have two HTML sources for this demo, a web hosted HTML source and a locally generated HTML source to make sure it works for either cases! 😀

Now here’s a bit about what will help us build this awesome demo..

– Bi directional bridge!
Being able to invoke executions directly between the Javascript environment and C# .NET Xamarin.Forms run time, is what is going to help us build this awesomeness!

Javascript <~> Xamarin.Forms (C# .NET)

So you can pass data from the Javascript that’s running inside the Hybrid WebView out into the C# .NET run time, as well as you can pass data directly into the Javascript that’s running inside the Hybrid WebView.

– Multiple parameters…
In my previous blog post I mentioned this at the end where you can extend the same implementation we did for our Hybrid WebView, into supporting multiple parameters, so here I will use this to demonstrate what we’re going to build!

Sneak Peak!

Now here’s some action on the go with this awesomeness… 😉

As usual I’ve hosted this whole demo project up on my github repo:

Code on github: https://github.com/UdaraAlwis/XFHybridWebViewAdvDemo

This is how we do it!

So let’s get right into it, but first let’s make sure some prerequisites.

– Basic Hybrid WebView implementation
Refer to my previous post and check out the implementation of the Hybrid WebView. Building a bi-directional interop bridge with WebView in Xamarin.Forms!

– Xamarin.Essentials set up to access the device native feature
You need to implement Xamarin.Essentials and set up all the device native features and their configuration for the features you wish to use. https://docs.microsoft.com/en-us/xamarin/essentials/

Multiple Parameters support!

Let’s begin with adding support for multiple parameters in our Hybrid WebView as follows…

public class HybridWebView : WebView
{
	private Action<string, string> _action;

	public void RegisterAction(Action<string, string> callback)
	{
		_action = callback;
	}

	public void Cleanup()
	{
		_action = null;
	}

	public void InvokeAction(string param1, string param2)
	{
		if (_action == null || (param1 == null && param2 == null))
		{
			return;
		}

		if (MainThread.IsMainThread)
			_action.Invoke(param1, param2);
		else
			MainThread.BeginInvokeOnMainThread(() => _action.Invoke(param1, param2));
	}
}

Code on github: /XFHybridWebViewAdvDemo/Controls/HybridWebView.cs

As you can see, I have defined Action property with two parameters, along side the setter method of it, RegisterAction() accepts Action instances with two parameters.

InvokeAction() which gets called from each native renderer level now accepts two parameters accordingly. As an addition I have added an enforced UI Thread execution using Xamarin.Essentials.MainThread feature, since we’re going to access IO heavy device features.

Following the same pattern you can add as many number of parameters as you wish! 😉

We need to add support for this in our Javascript implementation as well, so we create a pre defined separator (a pipe separator preferably “|”) that separates parameters in the data object we’re sending from javascript to Hybrid WebView’s Renderer’s script handler.

..
invokexamarinforms('PHOTO|CAMERA')
..

When our Hybrid WebView renderers receive the invoke from Javascript, we need to handle the incoming data object as follows by splitting it up using the separator we defined…

var dataBody = data;
if (dataBody.Contains("|"))
{
	var paramArray = dataBody.Split("|");
	var param1 = paramArray[0];
	var param2 = paramArray[1];
	((HybridWebView)hybridRenderer.Element).InvokeAction(param1, param2);
}
else
{
	((HybridWebView)hybridRenderer.Element).InvokeAction(dataBody, null);
}

Then we pass it on to the InvokeAction() event, for Xamarin.Forms level to handle whichever the Action has subscribed to it. This way you can handle as many parameters as you wish!

Launch invoke from HTML Javascript to C# .NET!

So here’s how we set up the simple implementation to call up the invokeXamarinFormsAction() method that we have defined in our Hybrid WebView platform Renderers. Well there’s not much different from what we implemented in my previous demo, but here we are passing multiple parameters into the javascript method upon the button click.

...

<script>
...
function invokexamarinforms(param){
    try{
        invokeXamarinFormsAction(param);
    }
    catch(err){
        alert(err);
    }
}
</script>

...

<button type="button" 
	onclick="invokexamarinforms('PHOTO|CAMERA')">
	Get from Xamarin.Forms</button>

...

This is something I’ve explained step by step in my previous blog post so I wouldn’t go into details in here. You can define as many onclick actions as you wish with the set of predefined parameters like “PHOTO|CAMERA” and “PHOTO|GALLERY”, even single parameters, “GPS” and “DEVICEINFO”, etc…

Next you need to handle those parameters in C# code to execute the specific action we’re targeting, as simple as a if-else block as follows, or even a switch statement would suffice.

...

private async void ExecuteActionFromJavascript(string param1, string param2)
{
	...	
	if (param1 != null && param1.Equals("PHOTO") && param2.Equals("CAMERA"))
	{
		var result = await _deviceFeaturesHelper.TakePhoto(this);
		if (result != null)
		{
			...
		}
	}
        ...
	else if (param1 != null && param1.Equals("DEVICEINFO"))
	{
		var result = await _deviceFeaturesHelper.GetDeviceData();
		if (result != null)
		{
			...
		}
	}	
	...
}

Based on the requested action we execute it in C#, in this case accessing Camera and Capturing a photo _deviceFeaturesHelper.TakePhoto() or even getting Device Native information _deviceFeaturesHelper.GetDeviceData() as shown above.

Let’s move to the next step of this chain…

Ping back from C# .NET to HTML Javascript!?

Now that we established pathway to call the C# .NET run time from Javascript, we’re able to invoke any action, but how do we get back the result data into the Javascript?

So in my previous blog article Talking to your WebView in Xamarin.Forms! which explains how easy it is to pass data into the Javascript rendered inside the WebView at run time, since our Hybrid WebView is an extension of the default WebView, we can use the same method here…

...
        var result = await _deviceFeaturesHelper.GetDeviceData();
        if (result != null)
        {
             await webViewElement
                   .EvaluateJavaScriptAsync($"setresult('{result}')");
        }
...

So we’re calling up on EvaluateJavaScriptAsync() with the Javascript function name that’s accepting to the results for this specific action. This function needs to be created inside the Javascript before hand, that is rendered inside the Hybrid WebView as follows…

...
<script>
...
	function setresult(value) {
		// - display the value in HTML
		// - send the data to server
	}
</script>
...

Once the data is passed into your Javascript function, You can do whaever you want with the data, be it display in the HTML, or send it up to a web server, your choice! 😉

Calling the Device Native!

Well this is quite simple if you know how to use Xamarin.Essentials to access device native features and other 3rd party plugins to access various features from Xamarin.Forms! But I’ll quickly walk through the code that I’m using in this demo.

I’ve basically created like a little Facade layer which handles all the device native features required as follows, and each method handles a given specific feature such as Camera and GPS features using their respective services of plugin calls…

public class DeviceFeaturesHelper
{
	public async Task<string> TakePhoto(ContentPage pageContext)
	{
		// launch Media Plugin to capture photos from camera
	
		...

		return imageAsBase64String;
	}
	
	public async Task<string> GetDeviceData() 
	{
		// launch Xamarin.Essentials to load device info

		return $"{nameof(DeviceInfo.Model)}: {device}<br />" +
			$"{nameof(DeviceInfo.Manufacturer)}: {manufacturer}<br />" + 
			$"{nameof(DeviceInfo.Name)}: {deviceName}<br />";
	}
}

Code on github: /XFHybridWebViewAdvDemo/DeviceFeaturesHelper.cs

So what you need to keep in mind is that we need to return a value that’s compatible to be displayed inside our WebView, based on HTML, that’s why you see I have modified some of those returned values accordingly, such as Image objects are returned as base64 strings and device information formatted as a text block with <br /> inline.

These methods are called from the Hybrid WebView’s Invoke action that we created before and results are returned to be pushed back into Javascript.

Handling Media Image objects…

Using Media Plugin for Xamarin.Forms, provides you with a MediaFile object which contains the Image object that you acquired either from Camera or Gallery, but how do we convert that into something that’s compatible to be pushed into Javascript-HTML environment?

The solution is,

MediaFile -> byte[] array -> Base64 string

We’re going to convert our MediaFile object into a byte[] array, then convert again into a base64 string, which makes it so much easier to transfer the data into the javascript run time and use that object for any purposes inside javascript itself. Here’s my code snippet for this…

public async Task<string> TakePhoto(ContentPage pageContext)
{
        ...
	var file = await CrossMedia.Current.TakePhotoAsync(...);

	// Convert bytes to base64 content
	var imageAsBase64String = Convert.ToBase64String(ConvertFileToByteArray(file));

	return imageAsBase64String;
}

private byte[] ConvertFileToByteArray(MediaFile imageFile)
{
	// Convert Image to bytes
	byte[] imageAsBytes;
	using (var memoryStream = new MemoryStream())
	{
		imageFile.GetStream().CopyTo(memoryStream);
		imageFile.Dispose();
		imageAsBytes = memoryStream.ToArray();
	}

	return imageAsBytes;
}

This is what you saw in the previous section which I have used in my /DeviceFeaturesHelper.cs
You can use this in the javascript functions as easy as below,

function setresult_takephoto(value) 
{
	document.getElementById("photoCamera_ResultElement").src 
                                             = "data:image/png;base64," + value;
}

Well that’s the entire set up of this awesome demo, so then let’s see it in action…

Fire it up!

Here’s the web page we’re loading: https://testwebpage.htmlsave.com/

Look at em on fire, Android, UWP and iOS side by side…

Code on github: https://github.com/UdaraAlwis/XFHybridWebViewAdvDemo

Conclusion…

This was just me pushing the limits of the Hybrid WebView to build awesome stuff with Xamarin.Forms! This will definitely come in handy whenever you get a scenario you need to implement an existing Web App into a Xamarin.Forms app, and you need to let the user use it as a Mobile App, with being able to access device native features.

Well that concludes it. Hope you find it useful!

Share the love! 😀 Cheers!

Building a bi-directional interop bridge with WebView in Xamarin.Forms!

Let’s build an advanced communication bridge into your Xamarin.Forms WebView, talk to it, and let it talk back to us at will!? 😉 lol Yes let me show you how to pass data from Javascript environment to C# .NET run time in the Web page rendered inside your Xamarin.Forms WebView!

I’m talking about building a bi-directional communication tunnel with HTML/Javascript inside your WebView in Xamarin.Forms yo! 😀 buckle up your seatbelts!

So in my previous article, Talking to your WebView in Xamarin.Forms! I talked about, how to build a uni-directional C# .NET to Javascript environment in Xamarin.Forms WebView.

WebView in Xamarin.Forms..

In this article I’m going to take another step forward and allow the same functionality to occur the other way around as well… We’re talking about a two-way invoking between .NET run time and javascript run time in a Xamarin.Forms WebView!

Unfortunately this cannot be done by default in WebView.

Behold, Hybrid WebView!

This right here is a bit more advanced extension of the WebView with a bit of Xamarin Native magic! 😉 In order to establish an invoke bridge directly from HTML Javascript sandbox that its running inside the WebView, out to the .NET runtime, we need something more natively handled in Xamarin!

Basically we’re going to implement a device native script handler for the WebView which is going to handle the bridging between the Javascript and the .NET runtime handshake, in return giving us the opportunity to invoke calls from javascript into the .NET run time the Xamarin.Forms is execution on! 😉

Well that’s a very simplistic explanation, but there’s a whole article about it on Microsoft Xamarin Docs, Customizing a WebView if you’re interested! Since its already there, I wouldn’t be going into complete details of it, rather I would be explaining the improved implementation I have done on top of it for the Hybrid WebView.

Over there it focuses on loading Embedded HTML content, but I will extend my implementation to support for dynamic HTML content, allowing you to handle javascript loaded from a Web Source and support even run time generated javascript.

Invoking C# from Javascript in the WebView!

In order to do this, in par with Xamarin.Forms WebView, we need to implement a Custom Renderer for WebView, which we will refer to as HybridWebView.

HybridWebViewRenderer will be created across all the native platforms we intend to use our HybridWebView, in Android, iOS and Windows native environments each equipped with its own javascript handler to build a bridge on to our .NET run-time. 😉

We access the native WebViewRenderer properties and basically implement a special handler to listen to a certain pre-defined Javascript method execution. In this method which we add into the javascript that is rendered inside the WebView, we will define the parameters we need to use, in that way we can pass any number of parameters and data types as we want.

We’re going to intercept the execution of this javascript method inside our Hybrid WebViewRender, and then redirect it on to the .NET method we’ve subscribed to. So in the Hybrid WebView definition we will have an Action method that we bind to in our Xamarin.Forms level which we will subscribe to wherever we’re using this magical bits! 😉

Let the coding begin!

Let’s begin with HybridWebView Control in Xamarin.Forms! Here we;re adding an Action that we will subscribe to in order to receive data from Javascript invokes inside the WebView rendered content.

HybridWebView

namespace XFWebViewInteropDemo.Controls
{
    public class HybridWebView : WebView
    {
        private Action<string> _action;

        public void RegisterAction(Action<string> callback)
        {
            _action = callback;
        }

        public void Cleanup()
        {
            _action = null;
        }

        public void InvokeAction(string data)
        {
            if (_action == null || data == null)
            {
                return;
            }
            _action.Invoke(data);
        }
    }
}


InvokeAction is the method that will be used by the Native Renderer object to direct the invokes from javascript executions. Using the RegisterAction we can dynamically register the Action we need to subscribe to.  You can add any number of parameters as you wish in here, but you need to make sure to handle them in the native renderer as well.

Native Renderers…

We’re going to build native renderers for each platform we’re targeting, Android, iOS, and UWP (Windows). Basically all the renderers follow the same basic concept as we discussed before, but each of their implementation is going to be different based on the platform.

We need to make sure to handle the subscribe and unsubscribe of the Element Native properties and events properly in the renderer’s OnElementChanged() event.

We’re going to inject the javascript method that we’re going to listen to in the renderers as following.

private const string JavaScriptFunction = "function invokeCSharpAction(data){....}";


We will be defining this in each renderer, according to the native platform. Every time a invokeCSharpAction() javascript method executes inside the WebView, it will get fetched by the Renderer and the following method call will occur.

((HybridWebView)Element).InvokeAction(value);


Up to the HybridWebView’s Action subscription on Xamarin.Froms run time, allowing our Action to fire up and retrieve the data coming in from javascript.

Alright now let’s get into details of each native renderer.

Android Renderer!

We’re going to use the Android’s WebViewRenderer to subclass our HyrbidWebViewRenderer.

github: /XFWebViewInteropDemo.Android/Renderers/HybridWebViewRenderer.cs

Like we discussed before for Android, we have the following script injection defined,

private const string JavascriptFunction = "function invokeCSharpAction(data){jsBridge.invokeAction(data);}";


For Android we need some extra bits of implementation, by creating a JavascriptWebViewClient that will set up listening to the execution of javascripts inside the WebView.

Then we have to create a JsBridge, which handles the interfacing with Javascripts, and fires up InvokeAction() method to redirect the execution flow up to the Xamarin.Forms level handlers.

Both those custom objects need to be set up in the HybridWebView in the renderer Element upon instantiation.

Control.SetWebViewClient
(new JavascriptWebViewClient($"javascript: {JavascriptFunction}"));
Control.AddJavascriptInterface
(new JsBridge(this), "jsBridge");


Once all that set up, and you build the Android project straight away, you might be getting a build error as following. (unless you’ve set this fix up before in your project)

Its caused by the JsBridge class we implemented with an Export attribute for the invokeAction method for our renderer, to export this into a native java method. So we need to add the Mono Android Export library.

You can fix this by going to Android Project -> References -> Add References -> Select Assemblies tab on the left panel -> tick on Mono.Android.Export Reference from the list of References.

Click Ok and rebuild, you’re all set! 😉

That’s pretty much it for the Android Renderer. Next on to iOS…

iOS Renderer!

For iOS we are going to use WkWebViewRenderer as the base renderer for our HybridWebView and in addition we have to implement IWKScriptMessageHandlder interface to handle the custom javascript execution monitoring that we target to handle.

github: /XFWebViewInteropDemo.iOS/Renderers/HybridWebViewRenderer.cs

We set up a WKWebViewConfiguration object in the constructor and we get access to the property WKWebViewConfiguration.UserContentController which allows us to set up our native bridge to Javascript execution firing up inside the WebView.

public HybridWebViewRenderer(WKWebViewConfiguration config) : base(config)
{
    _userController = config.UserContentController;
    var script = new WKUserScript(new NSString(JavaScriptFunction),
                   WKUserScriptInjectionTime.AtDocumentEnd, false);
    _userController.AddUserScript(script);
    _userController.AddScriptMessageHandler(this, "invokeAction");
}


Then for iOS, we have the following script injection defined using webkit API, accessing the invokeAction script that we attached and finally calling on the postMessage() method with the data parameter.

private const string JavaScriptFunction = "function invokeCSharpAction(data){window.webkit.messageHandlers.invokeAction.postMessage(data);}";


IWKScriptMessageHandler provides us with DidReceiveScriptMessage() method which we use to transfer the data up to the Xamarin.Forms level handler using, HybridWebView.InvokeAction(data).

Quite simple ans straight forward eh! next to Windows, or UWP as you might prefer.. 😉

UWP Renderer!

We use the Xamarin native WebViewRenderer for UWP or Windows platform.

github: /XFWebViewInteropDemo.UWP/Renderers/HybridWebViewRenderer.cs

The native default renderer grants us access to these two events NavigationCompleted and ScriptNotify. We need to make sure to subscribe to those events in our HybridWebViewRenderer in Windows as follows.

Control.NavigationCompleted += OnWebViewNavigationCompleted;
Control.ScriptNotify += OnWebViewScriptNotify;


NavigationCompleted, allows is to easily inject our javascript handler function, which is defined as follows for UWP or Windows,

private const string JavaScriptFunction = "function invokeCSharpAction(data){window.external.notify(data);}";


And then ScriptNotify, provides us the chance to redirect back the execution to Xamarin.Forms level handler using HybridWebView.InvokeAction(data).

Bingo, that completes the UWP or Windows Renderer!

Now that we’ve finished the setting up of our HybridWebView and its Native Renderer for Android, iOS and Windows, its time to consume it and taste it out! 😉

Let’s try it out!

Here’s we shall begin by consuming it in a XAML page in Xamarin.Forms!

<controls:HybridWebView
	x:Name="webViewElement"
	HorizontalOptions="FillAndExpand"
	VerticalOptions="FillAndExpand" />

github: /XFWebViewInteropDemo/HybridWebViewDemoPage.xaml

And then don’t forget to Subscribe to retrieve the data coming in from javascript inside our WebView using RegisterAction() method we created!

...
    // Subscribe for the data coming in from Javascript
    webViewElement.RegisterAction(DisplayDataFromJavascript);
}

private void DisplayDataFromJavascript(string data)
{
    Device.InvokeOnMainThreadAsync(() =>
    {
        ...
        // Do whatever you want with the data
        ...
    });
}
...

github: /XFWebViewInteropDemo/HybridWebViewDemoPage.xaml.cs

I’m just going to use the Main UI Thread’s help to execute any UI related stuff. And here’s a little demo HTML that I’m setting up in our Hyrbid WebView.

webViewElement.Source = new HtmlWebViewSource()
{
    Html =
        $@"<html>" +
        "<head>" +
            ...
            "<script type=\"text/javascript\">" +
                "function invokexamarinforms(){" +
                "    try{" +
                "        var inputvalue = 
document.getElementById(\"textInputElement\").value;" +
                "        invokeCSharpAction(inputvalue + '. This is from Javascript in the WebView!');" +
                "    }" +
                "    catch(err){" +
                "        alert(err);" +
                "    }" +
                "}" +
            "</script>" +
            ...
        "</head>" +

        "<body>" +
            "<div>" +
                "<input type=\"text\" id=\"textInputElement\" placeholder=\"type something here...\">" +
                "<button type=\"button\" onclick=\"invokexamarinforms()\">Send to Xamarin.Forms</button>" +
            "</div>" +
        "</body>" +

        "</html>"
};

github: /XFWebViewInteropDemo/HybridWebViewDemoPage.xaml.cs

As you can see I have a javascript function, invokexamarinforms() that will get invoked from a button call in the body. Once this method executes, it calls on the invokeCSharpAction() method that we defined in our Hybrid WebViews Native renderers.

In my javascript snippet I’m surrounding this call with a try catch in order to make sure the Native Renderer is properly implemented or not. Making sure this method is properly executes is a crucial step during debug if you run into any issues.

So let’s try out that sample code bits in action!

Time for some action! 😉

Hit that F5 yo! (well.. if you’re in Visual Studio! lol)

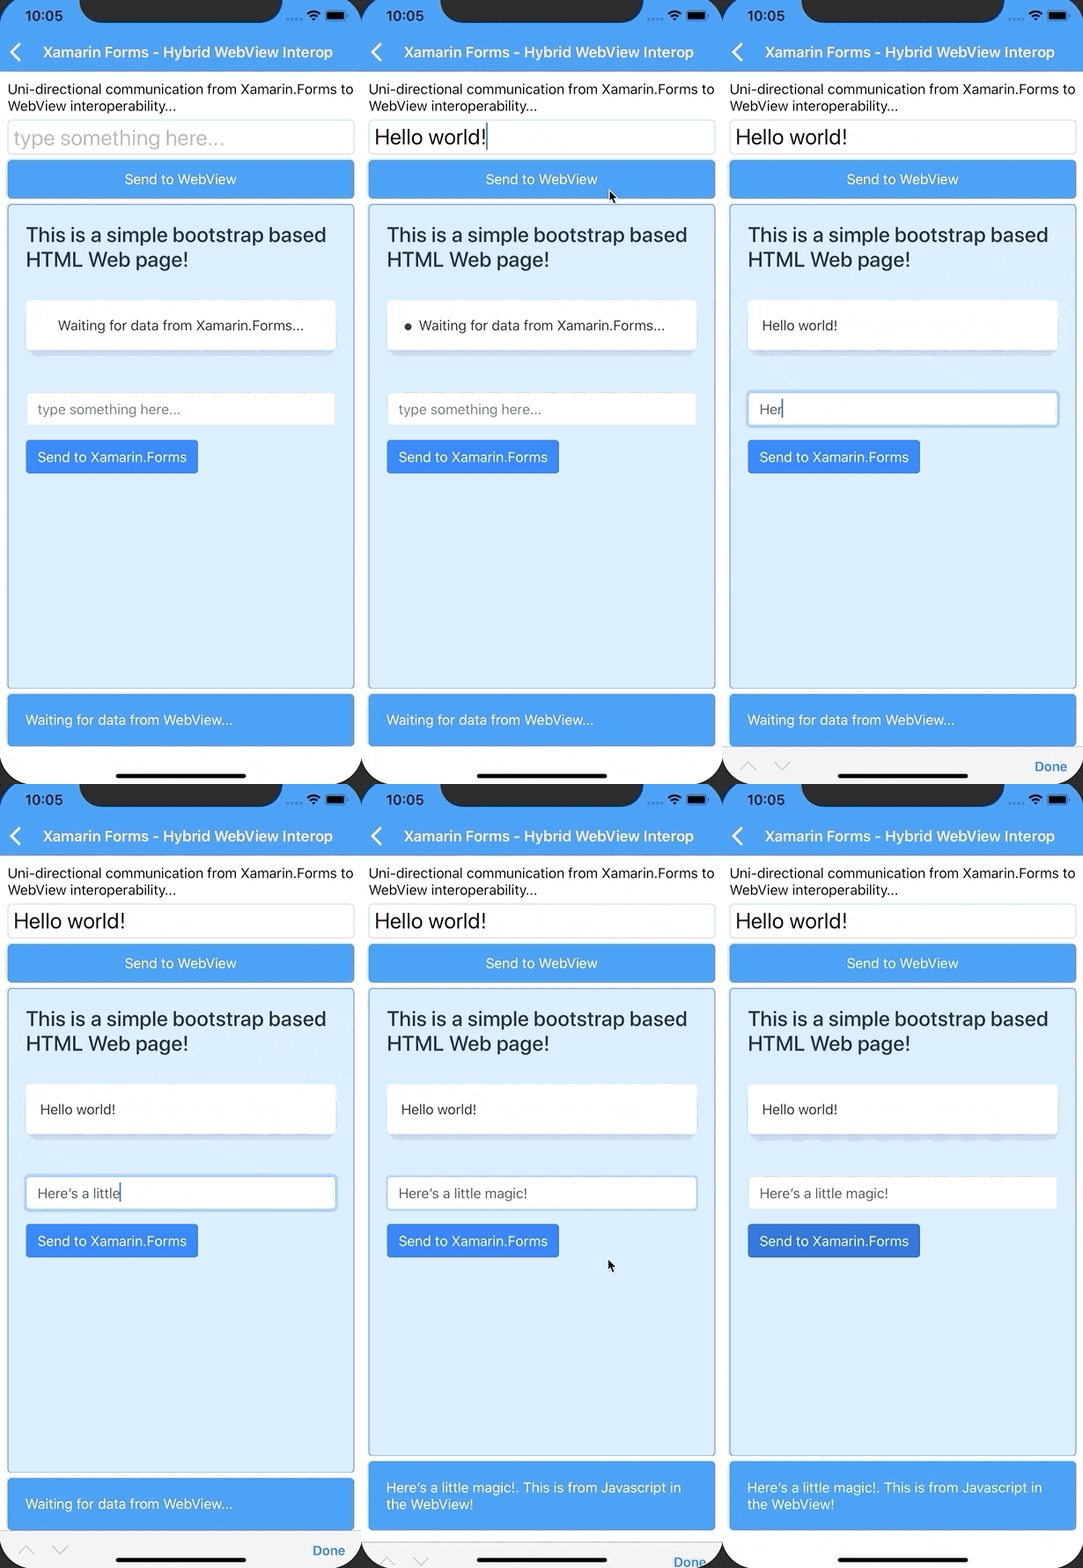
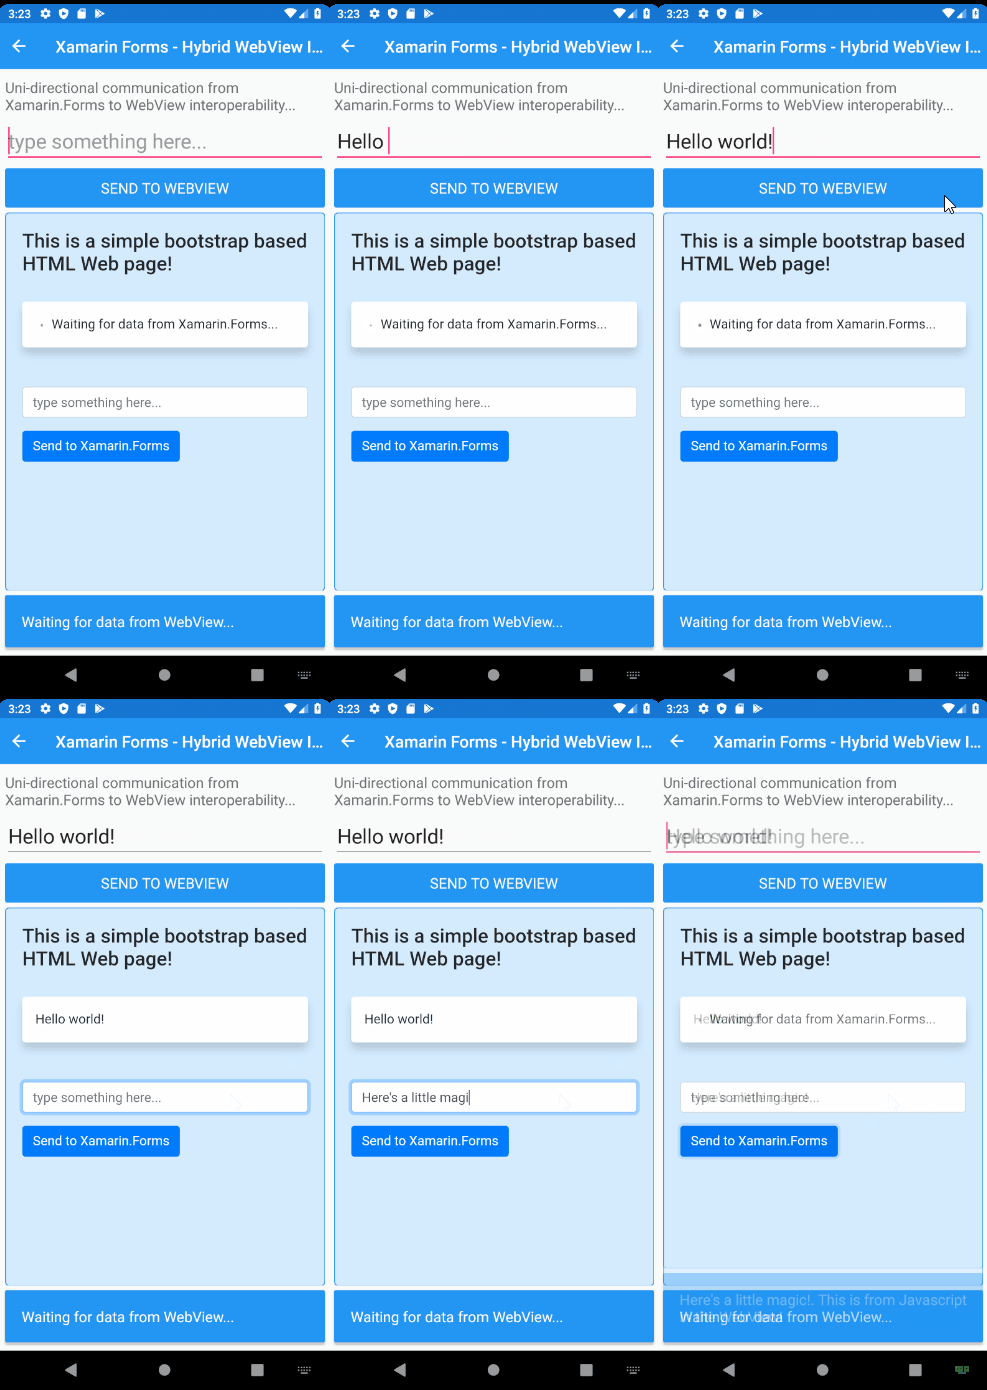
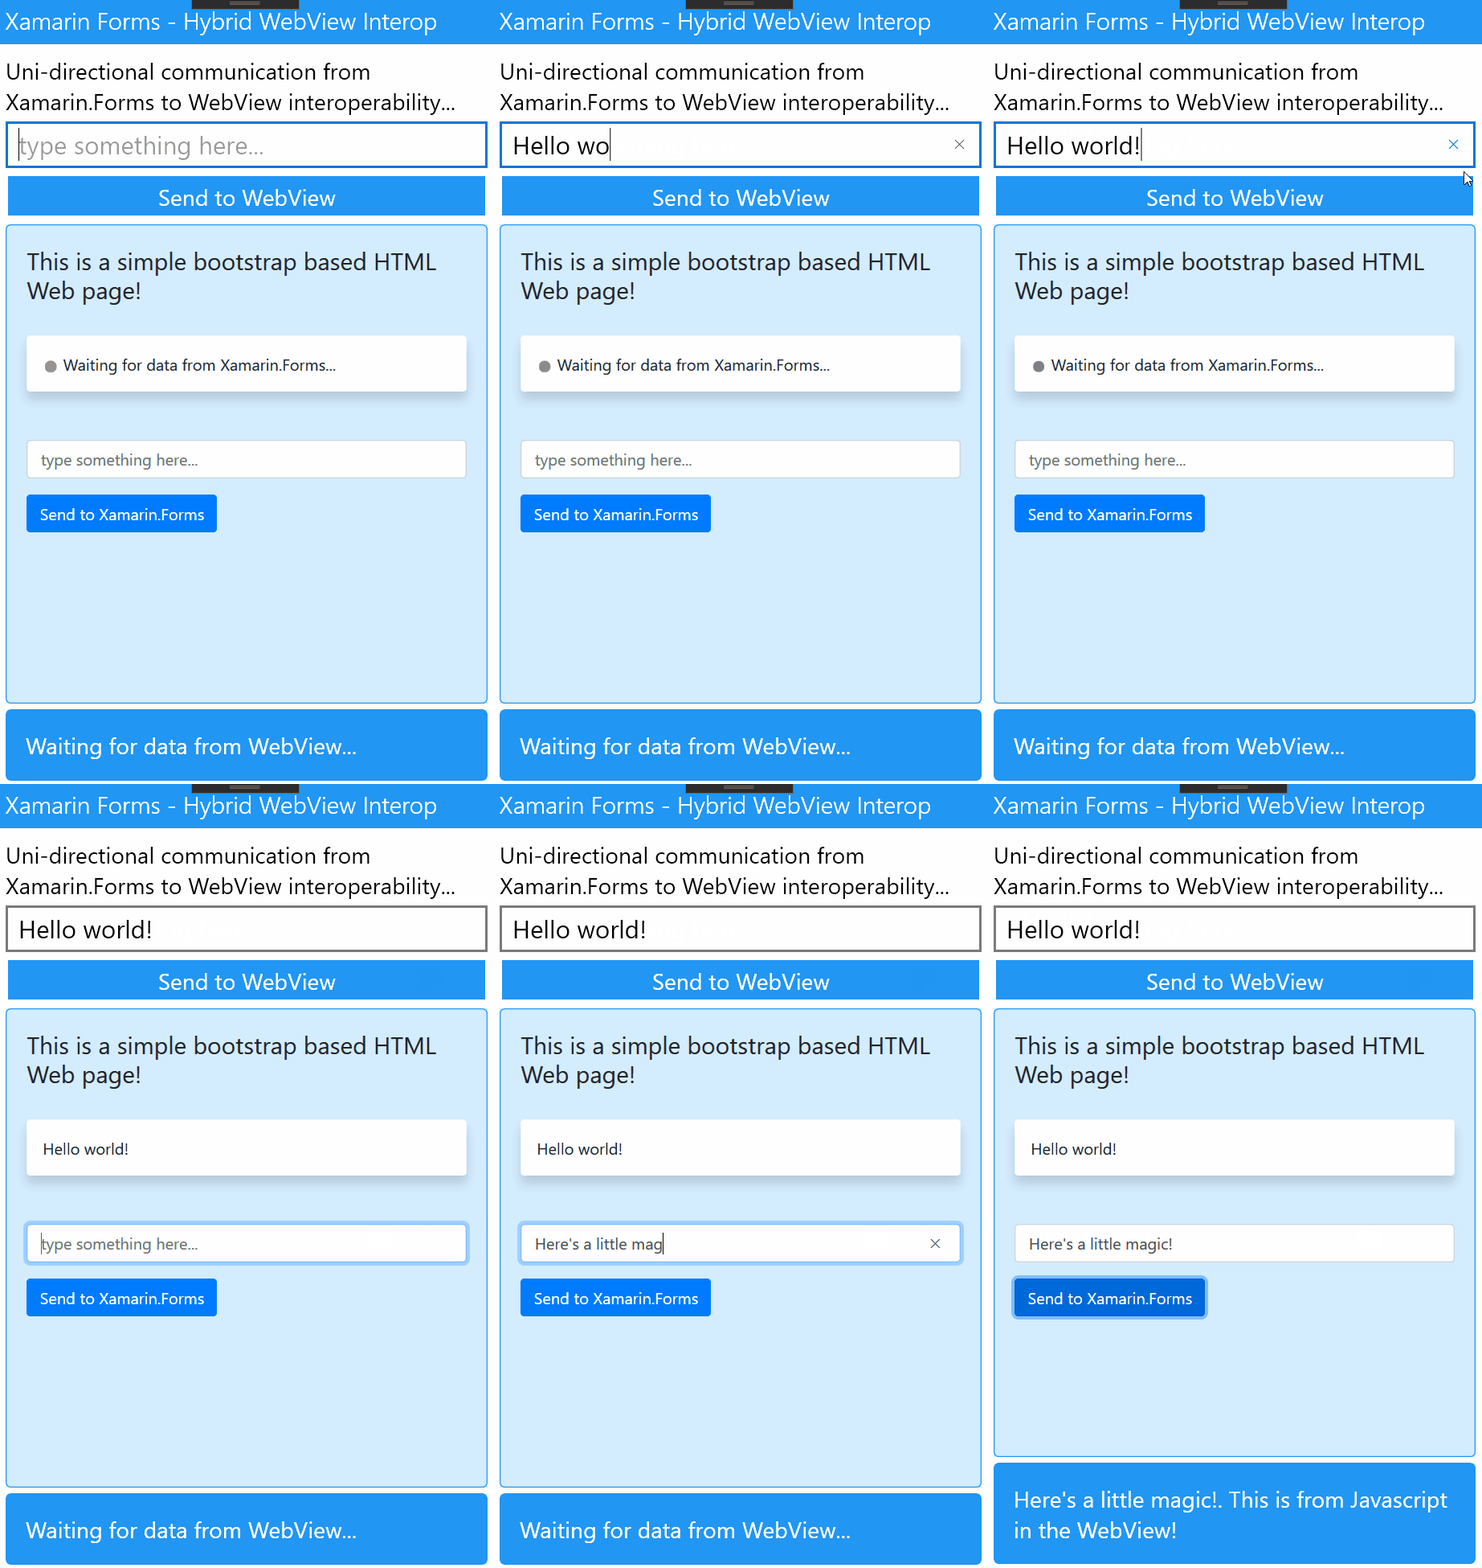
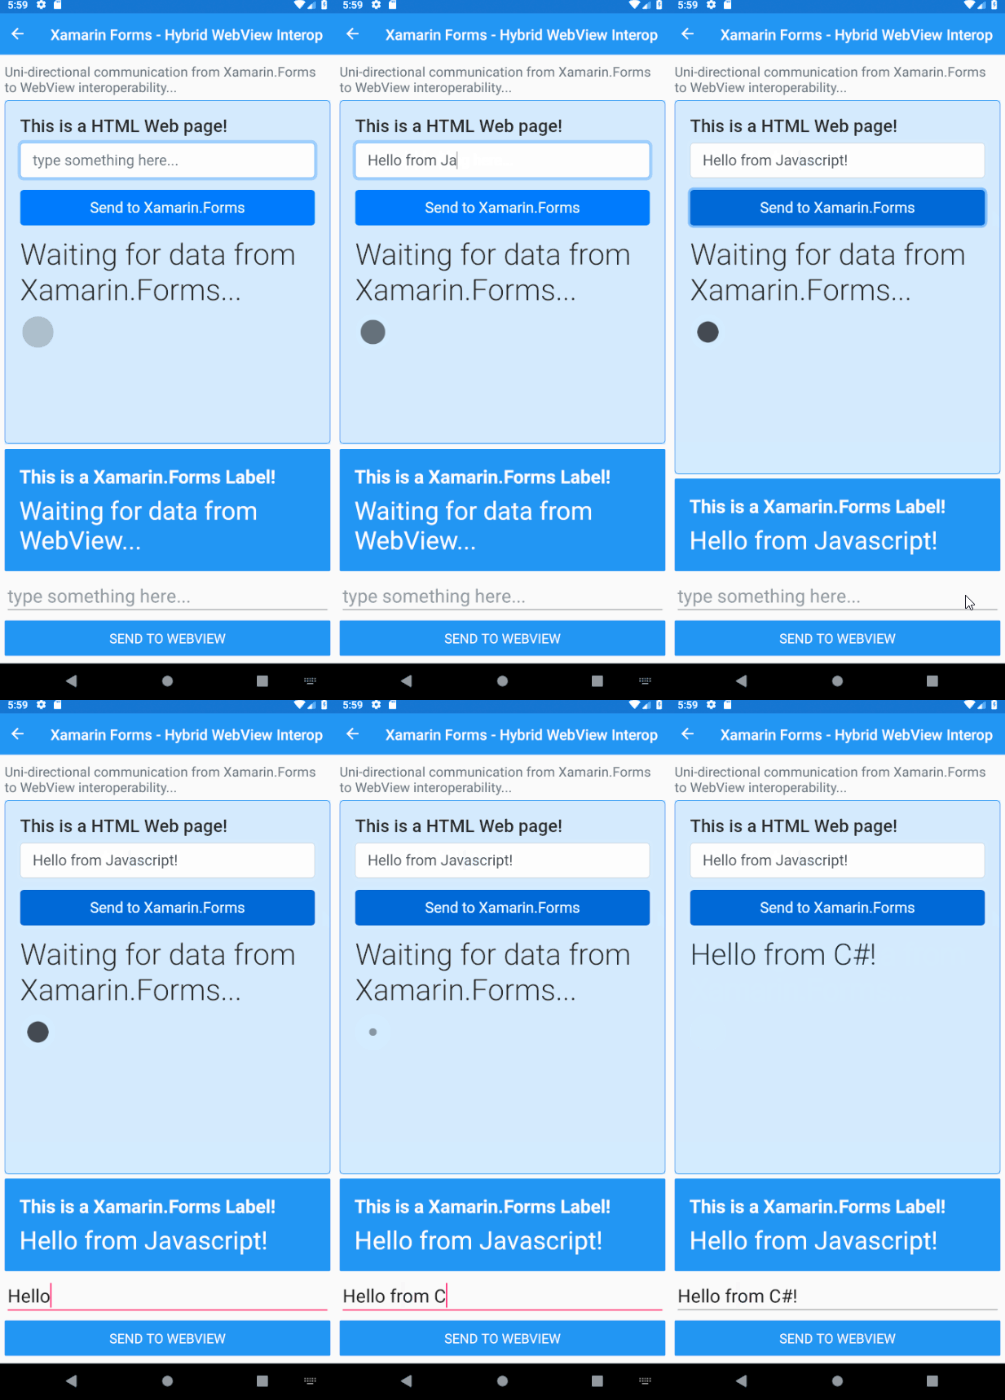
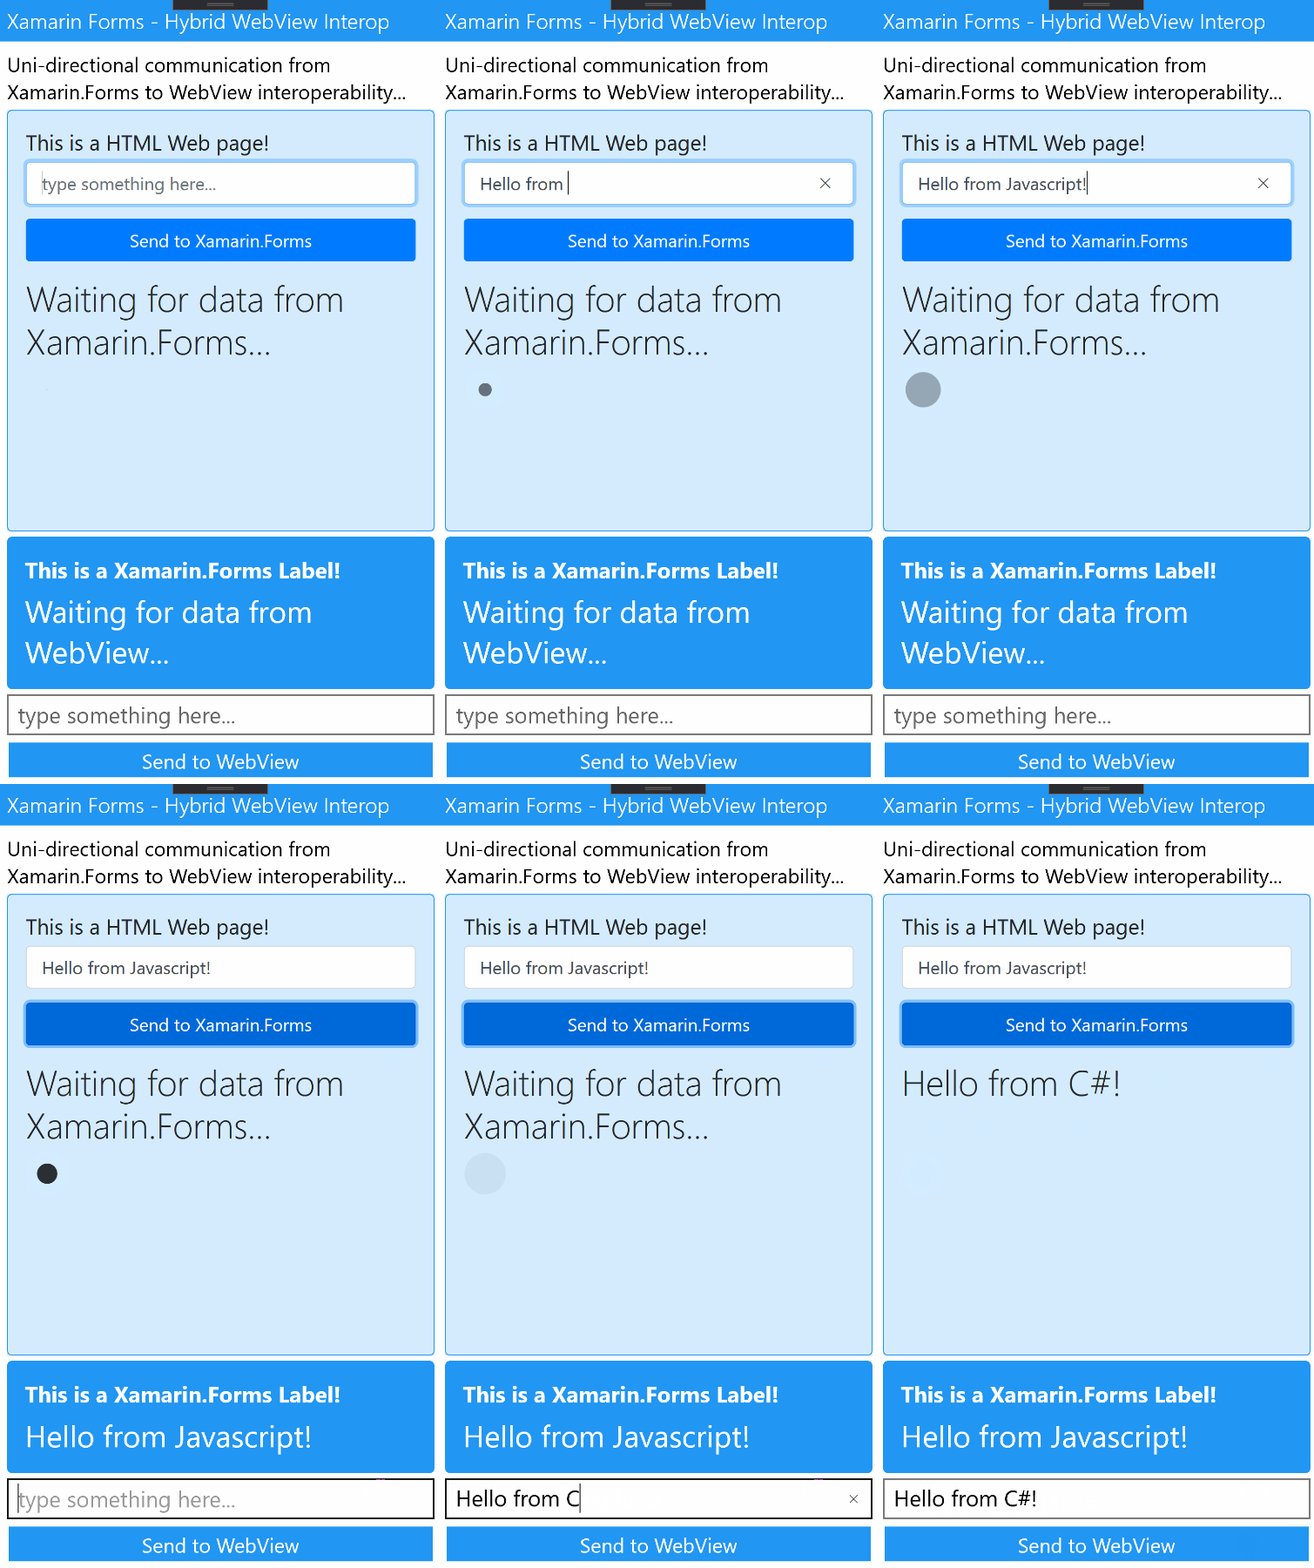
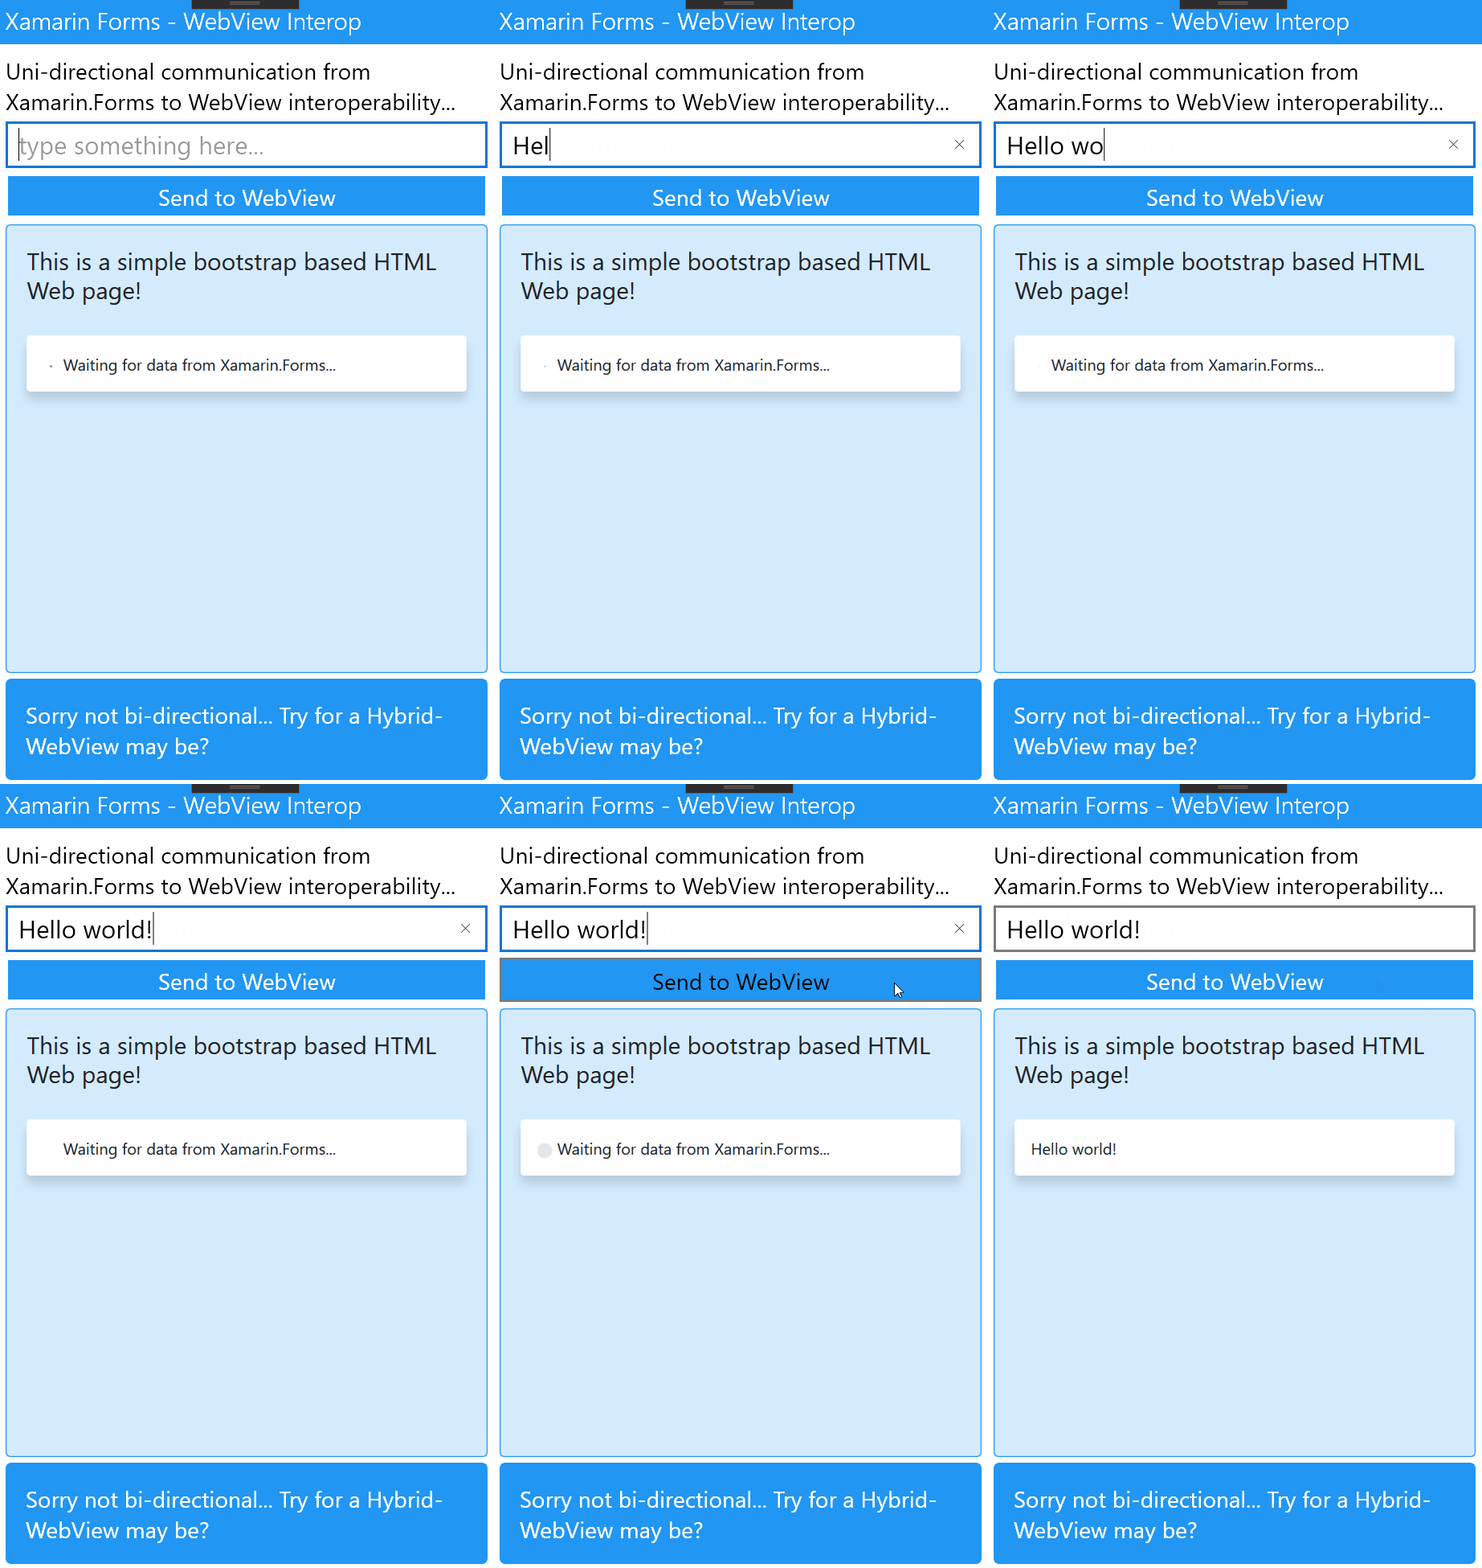
Side by side iOS, Android and UWP working like charm! 😉

As you can see in my simple Xamarin.Forms demo, I am demonstrating a simple C# .NET to Javascript call with data and Javascript to C# .NET call with data, a true bi-directional communication bridge!

Here we are typing some text in the Xamarin.Forms Entry element and sending it into the HTML inside the WebView. And then typing some text in the HTML Text Input element inside the WebView and click on HTML Button, and sending it to the Xamarin.Forms Label to be displayed, works like a charm!

I have shared the demo app code in my github as usual: github.com/XFWebViewInteropDemo

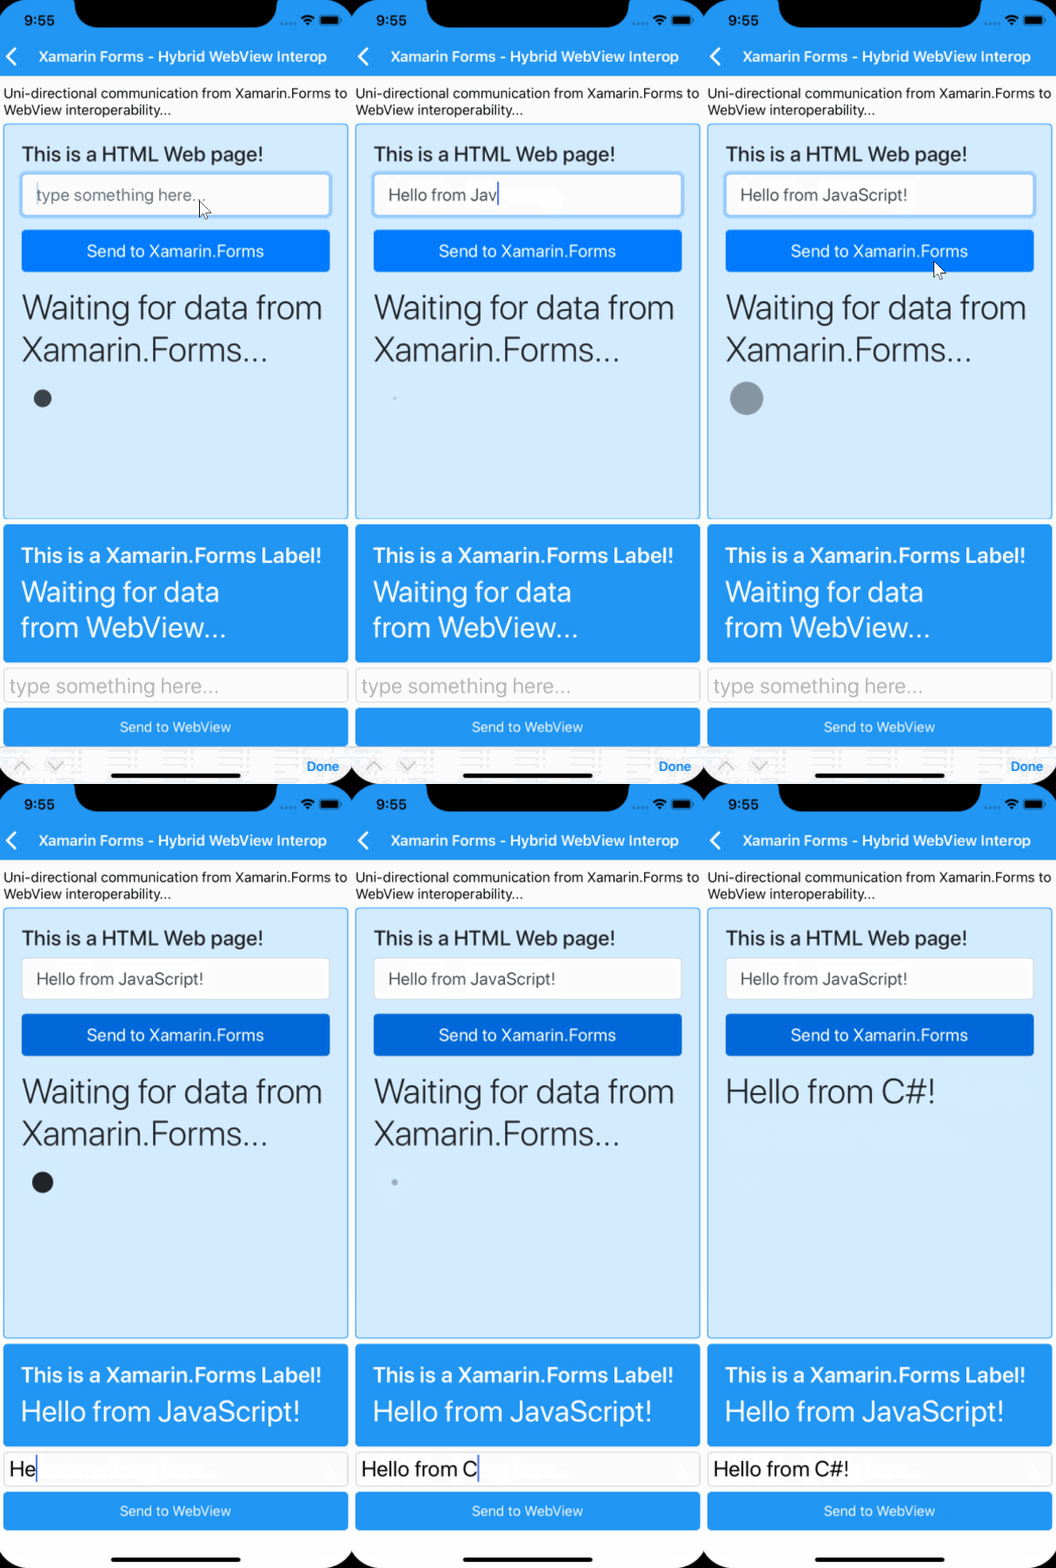
A little chat conversation between Javascript to C# and vise-versa! 😉

Yeah just a fun little demo I have added to the same repo in github! 😀

Extra tips!

Yep it’s that time, for some extra tips based on my experience with Xamarin.Forms Hybrid WebView! Although the extra tips that I already discussed in my previous article Talking to your WebView in Xamarin.Forms! still applies for this as well since we’re still extending from default Xamarin.Forms WebView, but apart from that…

Web Source, Embedded, Code HTML!? all same!

Doesn’t matter whatever the source of the HTML you’re setting in the Hybrid WebView, be it a web source directly from a URL, or loading an embedded HTML File, or even a code generated dynamic HTML content, it doesn’t make a difference.

The only thing that matters is the invokeCSharpAction() in your rendered HTML, so that the native renderers can pick it up and forward the execution to Xamarin.Forms .NET handlers!

Yes! extra parameters!

Even though I’m showcasing only a single parameter during this demo article, from javascript to C# .NET run time, you can easily extend this same implementation to pass any number of parameters as you wish! As I explained in the article make sure to define it in the following bits,

HybridWebView.InvokeAction(string data1, string data2)

Something to keep in mind is that you can only pass a single parameter into the invokeCSharpAction(data).  So in your javascript make sure to merge all the parameters into a single value and have a pipe delimiter (ex: |) like separator for them (ex: data1|data2) that you’re before to the invokeCSharpAction(data) method, which you will break it up on arrival in the native renderer and pass them up to the InvokeAction(data1, data2).

var dataBody = data;
var dataArray = dataBody.Split("|");
var data1 = dataArray[0];
var data2 = dataArray[1];

((HybridWebView)Element).InvokeAction(data1, data2);

Finally wire it all up, you’re good to go! 😉 I might share another article with some cool implementation with this in near future! 😀

Conclusion

You can easily build a communication bridge from C# .NET to javascript environment in Xamarin.Forms WebView! but the other way is not really possible out of the box!

That’s why we’re implementing this Hybrid WebView Control which allows us build a communication bridge from javascript to C# .NET environment directly during run time! 😉

So this concludes my bi-directional communication tunnel with HTML/Javascript inside your WebView in Xamarin.Forms yo!

Well that’s pretty much it!

Share the love! Cheers! 😀

Talking to your WebView in Xamarin.Forms!

Let’s build a communication bridge into your Xamarin.Forms WebView, and talk to it!? 😉 lol Yes let me show you how to pass data into the Web page rendered inside your Xamarin.Forms WebView!

I’m talking about building a uni-directional communication with Javascript inside your WebView in Xamarin.Forms yo! 😀 get your game face on!

WebView in Xamarin.Forms..

Xamarin.Forms provides a neat WebView that could render any Web HTML content efficiently similar to a browser inside your own Xamarin.Forms App.

Earlier there used to be a lots of issues that needed to be dealt with when to comes to rendering HTML content alongside Javascript inside the WebView, but with the recent update it has gotten far better with lots of features and facilities straight out of the box to be used! 😀

Invoking Javascript in the WebView!

Using the WebView straight out of the box, we can execute Javascript methods rendered inside the HTML content. Now I know this used to require a lot hacks and tricks, along side dealing with lot of run time exceptions.

But in the most recent updates of Xamarin.Forms, the WebView has gotten rock solid, and now even provides a dedicated method, EvaluateJavaScriptAsync() to invoking Javascript methods straight out of the box.

WebView.EvaluateJavaScriptAsync(String)


So now you can execute Javascript methods along with data parameters from you C# code in Xamarin.Forms using the default WebView control. EvaluateJavaScriptAsync() is an async method that lets you execute javascript and even await the call to response from the invoke as well.

var result = await webView
        .EvaluateJavaScriptAsync
            ("javascriptmethod('Hello world!')");


All you need to do is call the javascript method you’re targeting to invoke with or without the parameters you prefer using EvaluateJavaScriptAsync() in an asynchronous manner allowing you to await for a result back from the javascript into the .NET environment itself! Yep its that simple to talk to the HTML content in your WebView now! 😀

Let’s give it a try and establish a uni-directional communication with our WebView! 😉

Let the coding begin!

Here I have prepared a small demo where I’m loading some HTML content, along with a nice little javascript bits, into my WebView using HtmlWebViewSource as follows…

webViewElement.Source = new HtmlWebViewSource()
{
    Html =
        $@"<html>" +
        "<head>" +
            ...
            "<script type=\"text/javascript\">" +
                "function updatetextonwebview(text) {" +
                "    document.getElementById
                     (\"textElement\").innerHTML = text;" +
                "}" +
            "</script>" +
            ...
        "</head>" +

        "<body>" +
        ...
        ...
        "</body>" +

        "</html>"
};

Full code on github: /XFWebViewInteropDemo/DefaultWebViewDemoPage.xaml.cs

So here in my HTML content, I have a simple Javascript method, updatetextonwebview(text) where it takes in a value and set it to an HTML text element in the body. Pretty simple and straight forward.

string result = await webViewElement
        .EvaluateJavaScriptAsync
           ($"updatetextonwebview('{textEntryElement.Text}')");


And then I take a Text value from an Entry Element and pass it into the updatetextonwebview() javascript method using EvaluateJavaScriptAsync() of WebView.

Alright, let’s try it out!

Hit F5!

Well if you’re on Visual Studio, just hit F5 and watch the magic!

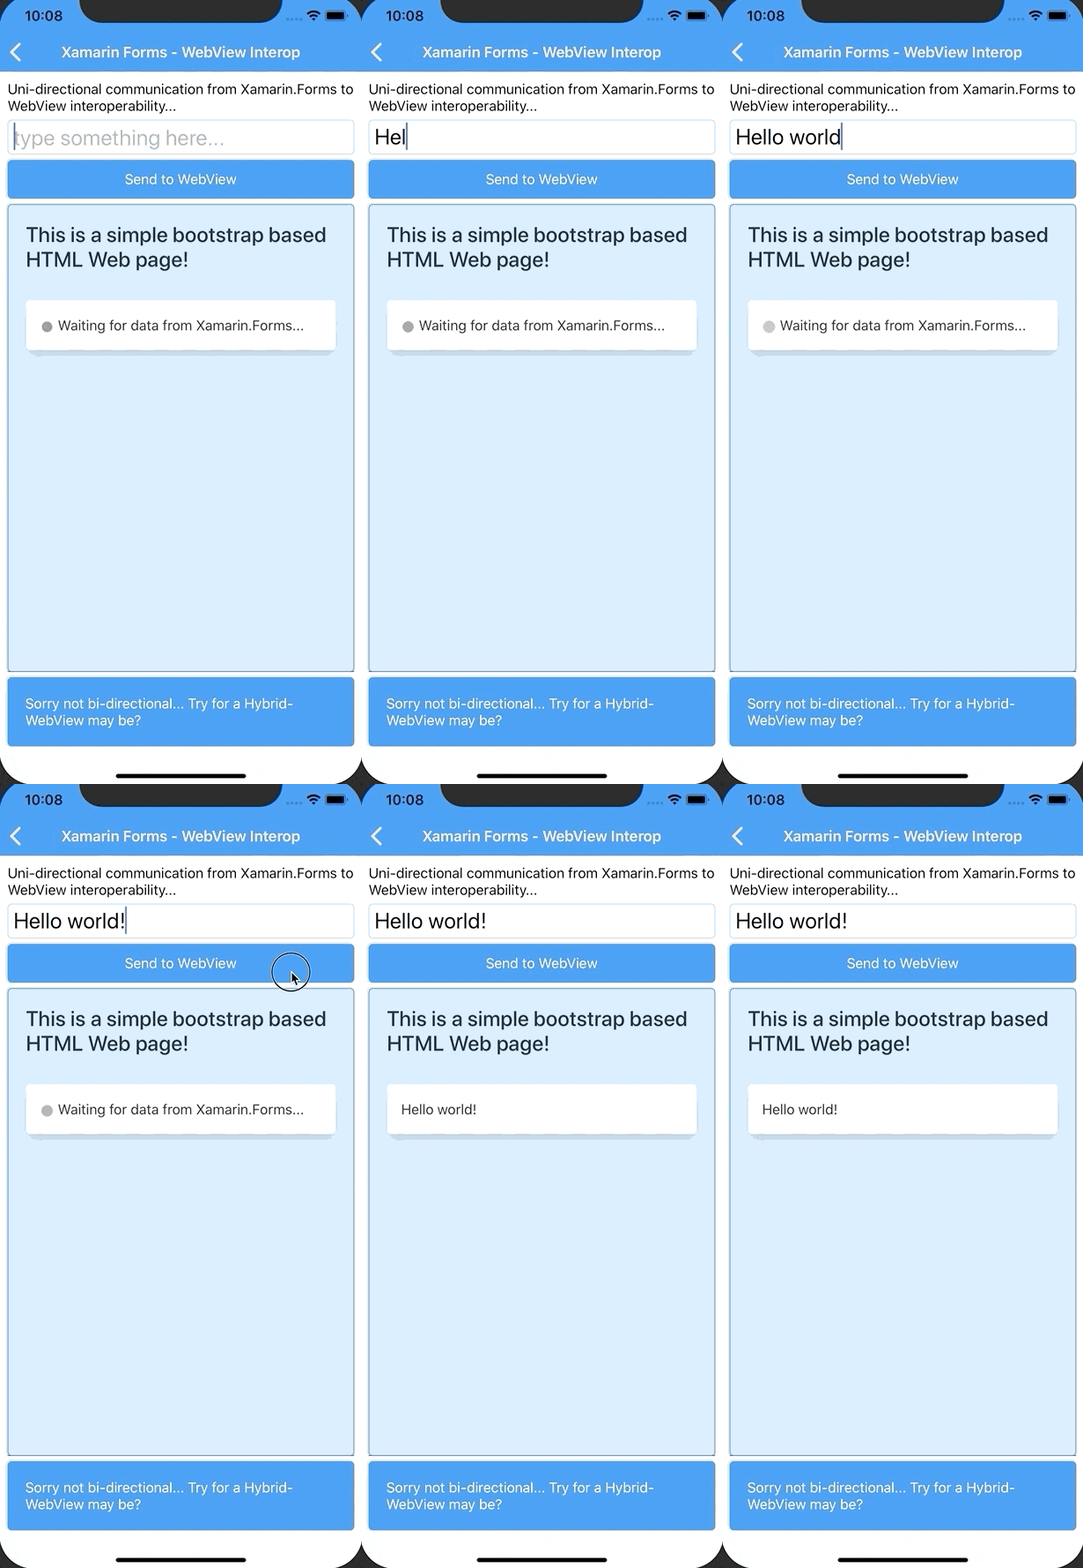
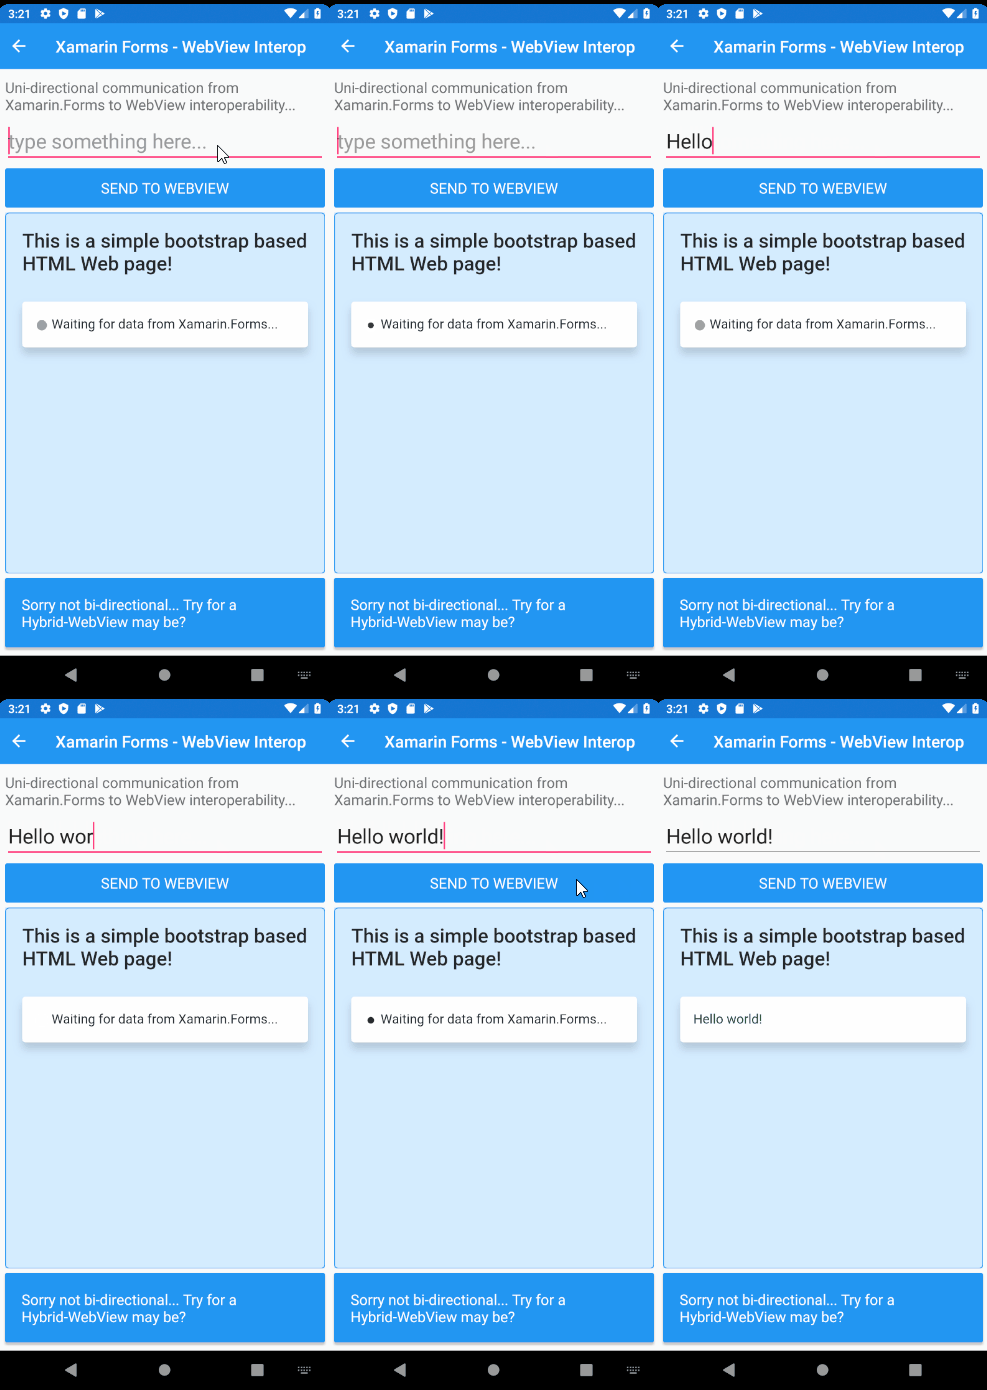
Side by side iOS, Android and UWP with Xamarin.Forms right out of the box! 😉

As you can see in my simple Xamarin.Forms demo, I have an Entry element which I type some text into and then I click on the Button which then going to pass that text data into the WebView’s javascript method. Then inside the javascript, it takes in the data and set it to a text label in the HTML body.

I have shared the demo app code in my github as usual: github.com/XFWebViewInteropDemo

No hacks, no work arounds, no custom renders, just straight out of the box in Xamarin.Forms! Works like a charm! 😉

Extra tips!

Yep it’s that time, for some extra tips based on my experience with Xamarin.Forms WebView!

-Track invoking of Javascript

Using WebView.EvaluateJavaScriptRequested event you can track the javascript invoke calls injecting into the WebView from your .NET code, basically an monitoring mechanism of all your javascript invokes from C# which will allow you to validate them or add extra details as you prefer on demand.

-Track Navigation inside the WebView

WebView provides a whole list of events to track the navigation now, along side back and forward navigation, redirects, and even refresh events.

WebView.Navigating

This event Triggers upon the beginning of the Navigation, allowing you to cancel it on demand. This event provides a WebNavigatingEventArgs object which provides you all the details about the navigation that is about to occur, direction, url endpoint and so on.

This also provides WebNavigatingEventArgs.Cancel property which allows you to cancel that navigation on demand. So yeah a lot of cool bits you can do with it!

WebView.Navigated

This event Triggers after a Navigation completes, providing you with the same details similar to Navigating event. In addition it gives WebNavigatedEventArgs.Result property which tells you whether the navigation was success or failure.

WebView.GoBackRequested | GoForwardRequested | ReloadRequested

Now these are some simplified events thats provided by WebView, allowing you to directly hook into GoBack, GoForward and Reload events when they occur. Although they do not provide facility to cancel those events like how we get in Navigating event. Just a quick easy way to monitor those events as they occur.

-Think Creative!

Most developers miss this point, if you can send a simple text string, then you can pass anything into the WebView’s javascript. Well… in disguise of a string of course!

  • Get device native data
  • Location GPS data
  • Proximity data
  • Internet Connectivity data
  • Captured File/Image data

Those are few examples, yes even an Image captured from the device camera can easily be sent as a byte array converted into a base64 string!  Imagination is the limit yo! 😉

Conclusion

Xamarin.Forms WebView has come a long way since the early days, into a complete mature sandbox environment to render any HTML Web Content inside your Xamarin.Forms app. And it provides lots of features to communicate, pass data back and forth, and even monitor and control the navigation happens inside itself.

This article basically focuses on uni-directional execution from C# .NET code to Javascript environment, while you can still await for the results from the javascript.

But there is no direct execution from Javascript environment to C# .NET yeah? So in my next article I’ll share how to build a bi-directional execution from C# .NET code to Javascript environment with Xamarin.Forms WebView. 😉

Well that’s pretty much it!

Share the love! Cheers! 😀

An infamous(or not?) fact(something important?) about Xamarin Forms Navigation in Android…

Xamarin Forms uses a very neat and simplified Navigation Architecture which can be easily justified among Android, iOS and WinPhone mobile platforms under common grounds.

Xamarin Forms Navigation

Alright, now this is not an article about Xamarin Forms Navigation article, as it is very well explained in Xamarin official documentation. If you want to go check it out right now before you get into this article. https://developer.xamarin.com/guides/xamarin-forms/user-interface/navigation/hierarchical/

Now the way Xamarin Forms handles this navigation during the actual runtime, specifically in native levels are different for each mobile platforms. Of course they have to somehow map Xamarin Forms Navigation paradigm to the Native app navigation paradigm, which is extremely complex and Xamarin has done a great job so far. 😀

Why is Navigation so Important?

Navigation plays a huge part in your Mobile Application development, specially when it becomes more complex when you need to implement deeper customisations to your cross platform app.

So when we get down to complex customisations related to your Navigation, it is very important to be aware of the underlying mechanics of the platform.

Hence with Xamarin Forms, we are dealing with a cross-platform situation, where it is very crucial that we pay attention to three different mobile platforms, and how their navigation is actually handled in Xamarin Forms.

Xamarin has done a great job in handling a common cross-platform navigation pattern, and faded out the Native-compatibility mechanics to the background, to the point a developer doesn’t really have to pay any attention to it. So kudos Xamarin! 😉

Recently I…

So the reason I’m writing this article is because, recently I came across a situation where I had to pay detailed attention for Xamarin Forms Navigation and how it actually handles it in native execution. 🙂

And there’s something very interesting I spotted in how Xamarin Forms handles Navigation in Android runtime..

So I thought of sharing it with everyone, hence most developers doesn’t seem to be aware of this.

Specially amongst the fresh developers of the Xamarin Community, where a lot of developers assume Xamarin Forms follows everything exactly as the Native Framework patterns and properties, which is not actually accurate and they have taken some unique (or may be different) approaches for mapping Native stuff to the Xamarin Forms level, which are quite out of the box. So you need to pay a good attention to their details when you are dealing with complex implementations in Xamarin Forms.

So what’s the big deal I found with Xamarin Forms Navigation in Android ?

Xamarin Forms Navigation in Android?

Now when it comes to handling Xamarin Forms Navigation in Android run time, I noticed something very interesting, which I should blame myself for not paying any attention way earlier for this aspect. However…

If you’re familiar with Native Android development, the standard pattern of how we navigate in-between Activities and Fragments, how the activity lifecycle is handled so on and so forth yeah? (Nope, I’m not gonna get into the details of Android Navigation pattern in this article, if you aren’t aware, please stop reading this article and Google about it, then you may get back here… other wise you might get confused!)

Now have you ever thought how Xamarin Forms actually handles this complex Android Navigation Pattern? And actually map the Xamarin Forms Navigation paradigm to the Native Android Execution?

Now this is where it gets interesting…

Go on to this link which explains the NavigationPage (the page that manages the navigation) of Xamarin Forms, and read the REMARKS! READ IT!

https://developer.xamarin.com/api/type/Xamarin.Forms.NavigationPage/

Let me quote it,

“Note that on the Android platform, INavigation operations do not generate activity lifecycle notifications. For each Page that you push or pop, the Android implementation of NavigationPage simply adds or removes the content of the page to or from a single activity.”

Interesting right?

Now I did some more research about it, and came across more interesting facts.

At Xamarin Evolve 2014…

Watch this Youtube clip where an attendee asks Jason Smith about the Navigation pattern of Xamarin Forms in Android.

Attendee: I was curious why you designed the Xamarin Forms Android to be a Single Activity as opposed to Multiple Activity?

Jason: Couple of minor considerations I guess. At the time Fragments weren’t fully back ported when we started the project. So we couldn’t actually target Fragments, which was really annoying. And Google was advocating the Single Activity approach and on top of that Navigations Paradigms of Activity didn’t fully map to the Xamarin Forms Navigation Paradigm.

Furthermore from Jason Smith…

So I found a post in Xamarin Forms Community Forum  where Jason Smith has commented regarding the navigation further more a s follows…

https://forums.xamarin.com/discussion/17668/running-xamarin-forms-as-one-single-activity-vs-performance-design

TheRealJasonSmith [Jason Smith]

“Xamarin.Forms pre-dates the backporting of Fragments on Android, however it is written in a fashion similar to how fragments work. The Views we add/remove from the view hierarchy are fully cleaned up and disposed of when they go away. This works around the standard issue people had with single activity apps where all the views would stick around eating lots of memory.

Even if you as the user pre-allocate all of your Xamarin.Forms views, we do not realize them into actually android objects until they are needed on screen. We then will remove and dispose those same objects dynamically when they are no longer needed. This means that you should not be paying a significant memory overhead, even if you are not mindful of this yourself.”

So now what does this all tell us?

So after all these findings what is the conclusion we could come to?

In Native Android Development…

Untitled-3

When we develop Native Android application we usually use the standard Multiple Activities approach to propagate the pages and to navigate in between them, and sometimes we throw in some Fragments here and there as needed for memory saving and re-usability.

There is also an approach called “Single Activity Architecture” approach where you maintain only one activity and render all the pages on top of it in Native Android development.

Xamarin Forms Navigation in Android?

Untitled-2

Short and sweet Xamarin Forms does not follow the same standard multiple activity pattern in Android

Instead,

Xamarin Forms uses a unique Single Activity Architecture based pattern in Android which is similar to the use of Fragments, but with a better management of memory with its approach…

As with all our findings this is quite a unique approach that Xamarin Forms has implemented under the hood for Android. Which is very important to keep in mind when you get down to complex implementation of Xamarin Forms in Android.

Advantages and also Disadvantages ?

This gives many advantages and also disadvantages for us developers. Advantages such as good memory management, ease of navigation, instead of dealing with Activities and Fragments directly.

But this also brings many disadvantages which I had struggled in great deals with in Xamarin Forms complex implementations for Android, such as management of a custom ActionBar across your views, adding custom page transition animations for pages, unpleasant UX behavior when hiding ActionBar and so on.

But then again, there is always a way to solve problems in programming. 🙂

That’s it… 🙂

Well there you go, hope this clears any confusion anyone had just like I did sometime back… 🙂 And if you weren’t aware of this before, now you know how to handle stuff when it’s in need during your Xamarin Forms mobile development.

Cheers! 😀

Another reason Why, I Am At app, for Windows Phone is Awesome !

Fed up of the fact that Bing Maps is pretty much useless in Sri Lanka when you need it the most being a Windows Phone User ? 😉 Very well you have nothing to worry about hereafter thanks to ‘I Am At’ app for Windows Phone !

wp_ss_20140630_0004

I Am At app uses a unique sequence of Location targeting, which increases the accuracy of location finding in any country where even Bing Maps doesn’t work !

You see, I Am At app uses the Microsoft Bing Maps Location services in the background of the app, but if by any chance Bing Map fails to find the proper information of a given Location, then our intelligent Location targeting algorithm accesses the other Mapping services such as Google Maps and seek for a much more accurate Location information and provide the user ! 😉 So that you can find your exact location Address wherever you are on Earth and Send or Share with anyone in seconds..!

Now that’s another reason why ‘I Am At’ app is so awesome !

http://www.windowsphone.com/en-us/store/app/i-am-at/b1bcd22a-c57b-4a26-b9e2-3ec6aeb96d01?signin=true

#IAmAt #WindowsPhone #Microsoft #App #Location #Targeting #Places #Travelling #Navigation

http://www.windowsphone.com/en-us/store/app/i-am-at/b1bcd22a-c57b-4a26-b9e2-3ec6aeb96d01?signin=true

Try it out today for free everyone ! 🙂

Always Wonder Where the Heck Am I ?

We Always Wonder…

We always wonder Where am I ? What is the address of this place ? In which road am I in ? how am I gonna tell them where I am right now ? and so on.. We always go through those rush moments, where as we wonder where we are and the address of the location we are at right now !

Then this is for You…

Very well then, let me introduce you the awesome “I Am At” app for Windows Phone. Thanks to this App you can easily find where You are right now preciously, allowing you to find more information about you location !

Welcome to I Am At app for Windows Phone !

You might be At…

You might be at a huge party, or a festival, or carnival, or a sports ground, you can find your exact location and send it to anyone so that they can find you easily ! 🙂 Could be your girlfriend, your best friend, your parents, if you want to find out what you current location is and send it to anyone to find you easily, then here is the App for you, ready at anytime ! 😉

Now I Know What You are Thinking… 😉

Yes, I know what you are thinking, ‘the how the heck is this different from Maps ?’
We will tell you where you are right now very preciously along with the exact Address of your current location, where ever you are on Earth ! Also we will let you send your current location to anyone and share with them, such as text, email and even Social Media Networks instantly ! 🙂

Oh yes we know, this is totally Epic ! (^_^)   Try it now for Free ! 🙂   

http://www.windowsphone.com/en-us/store/app/i-am-at/b1bcd22a-c57b-4a26-b9e2-3ec6aeb96d01  

IAmAt #WindowsPhone #Nokia #Lumia #Places #Locations #Navigation #Travel #Mapping #wp8 #wp81 #Address #WhereAmINow