
Let’s restructure the default project Template for Xamarin.Forms Shell Apps provided by Visual Studio 2019, clean it up, optimize it for the best use of Shell features. 😉
To be more detailed when you create a fresh Xamarin.Forms Shell app, in Visual Studio 2019, you get a certain default template app project provided by VS2019, let me show you how to restructure it in a clean and optimized manner for best use of features, performance and code structure.
Xamarin.Forms Shell is Awesome…
but I had quite a bit confusion understand the reason behind it and the bells and whistles of it, let me explain! So I’ve been working extensively with Xamarin framework for over 4 years now, and I’m confident to say that I have expertized myself on the best use of it. 😀
The way Xamarin.Forms Shell was marketed for was to provide a better alternative for dealing with Master Detailed or Tab Page based Xamarin.Forms Apps. This really made sense to me, since I knew how troublesome or the complexity we have to deal with in those scenarios.
Template Project mess?!
I went through the documentation, followed up on some demo code the community had shared, and once I was confident, it was time to get my hands dirty. So I created a fresh new Xamarin.Forms Shell project in Visual Studio 2019, and started going through the code.
It was a messy chaos! Since the first line of code, it was confusing, with many different Xamairn.Forms implementation practices all over the place in both UI and C# code behind, Xamarin.Forms Classic and Shell navigation mixed up in all over the project and so on. Took me quite a while to get a hold of it. 😦
This is quite a bad set up for a Template project, could be very disorienting for anyone who’s fresh starting off with Xamarin.Forms Shell, let alone Xamarin.Forms itself.
But why?
My best bet is that they wanted to give the perception to the developer that you can interchange and mix up as you like, Xamarin.Forms Classic bits and Shell bits. This is probably in a good intention, but for anyone who’s just starting to grasp it, could be very confusing, mixing up everything together in a template project.
Sure Xamarin.Forms Classic and Shell are completely interchangeable elements, but for a template, you need to give a clear, straight forward way to get started for anyone.
Ze Solution!
So my solution, is to adopt only Xamarin.Forms Shell related implementation, features, and practices into the default Template, so it gives a clear, easy to understand, straight forward view of using Xamairn.Forms Shell to build apps. Thinking in terms of simplest terms, decoupled components with clean and readable code, we need to reflect the best practices of Xamarin.Forms in the Template. 😉
So here I am sharing my journey of restructuring the default project Template for Xamarin.Forms Shell Apps step by step… Also I would like to share this as a guide to fixing up an existing messy project, with all the good coding practices in mind when it comes to Xamarin.Forms! 😀
Default Template Project…
Let’s take a proper look at the what you get fresh out of the box when you create a new Xamarin.Forms Shell project in VS2019 as of now,


So as you can see it promotes MVVM structure in the project, with Models, Views, and ViewModels separated, while also having a separate DataStore service. The basic functionality of this app is to Write text note items with a Title and Description and save them in the memory.
The app consists of ItemsPage where it shows all the text notes added, then ItemDetailsPage where you can view each of the notes, then the NewItemPage which is a modal page allowing you to add new text items, finally a simple AboutPage with a little intro to the Xamarin.Forms Shell.
Issues need Fixes…
Now let me walk you through some of the main problematic bits I found in this template project, one by one…
BindingContext init() inconsistent…
The BindingContext initialization with the ViewModel instance it all over the place, while some pages having it in code behind in the constructor.

And others having it in the XAML itself as shown below..

This should be unified either to code behind Constructor or the other only.
NewItemsPage, no ViewModel!?
For the NewItemsPage, there’s no ViewModel available, and it sets the BindingContext to itself as shown below…

This needs to be modified with its own ViewModel class, and move these data functions into it.
Missing Shell Query Parameters…
The recommended way to pass data between pages in Xamarin.Forms Shell is to use Query Parameter strings, but this is not reflected in the Template project at all. As you can see below, it uses a tightly coupled Constructor parameter object passing instead.

This needs to be changed to use Xamarin.Forms Shell query parameters, as recommended.
Need to unify Color Resources…
Apart from the global Colors and Styles resources defined in the App.xaml, there are page level resources added as well in some pages.

This should be removed and switched to use global context Colors for better re-usability and reduce repetition of code.
Classic Xamarin.Forms Navigation!? Why!?
Now this was a serious WHY? moment I had when I first saw this, no where in the template project is using actual Xamarin.Forms Shell Route based navigation.
All over the project you will see the Classic Xamarin.Forms Navigation being used.

This needs to be changed to use the actual Shell Route based navigation.

To make it worse, for Modal pages, it implements a very bad practice of forcefully pushing the Navigation Bar on top of it. 😮
Now you can see why I have complained it’s a messy mix of everything, which needs cleaning up with a proper project structure.
Let the Restructuring begin!
Let me walk yol through the whole restructuring process I did step by step, so that you get a clear idea how to make changes in your own projects. Also have pushed this up in my Github repo, if you’re interested in taking a peek.
hosted on github:
github.com/UdaraAlwis/XFShellTemplateDemoApp
Alright then let’s on ahead…
Step 1: Cleaning up Colors and Styles…
Let’s get rid of the page level Color values and move them to the App.xaml, allowing them to be shared on an app global context, increasing re-usability and removing redundancy.
<!--
	Application Styles and Resources
-->
<Application.Resources>
	<ResourceDictionary>
		<Color x:Key="Primary">#2196F3</Color>
		<Color x:Key="Accent">#96d1ff</Color>
		<Color x:Key="LightTextColor">#999999</Color>
	</ResourceDictionary>
</Application.Resources>
Make sure to keep one key for each color value, and share that in all the required elements. Now we have a much cleaner XAML! 😉
Step 2: BaseViewModel to Infrastructure!
The BaseViewModel.cs class is not actively being instantiated but provides a base for the ViewModels of the project, so it would make sense to move out the BaseViewModel.cs class into a separate folder called, Infrastructure.

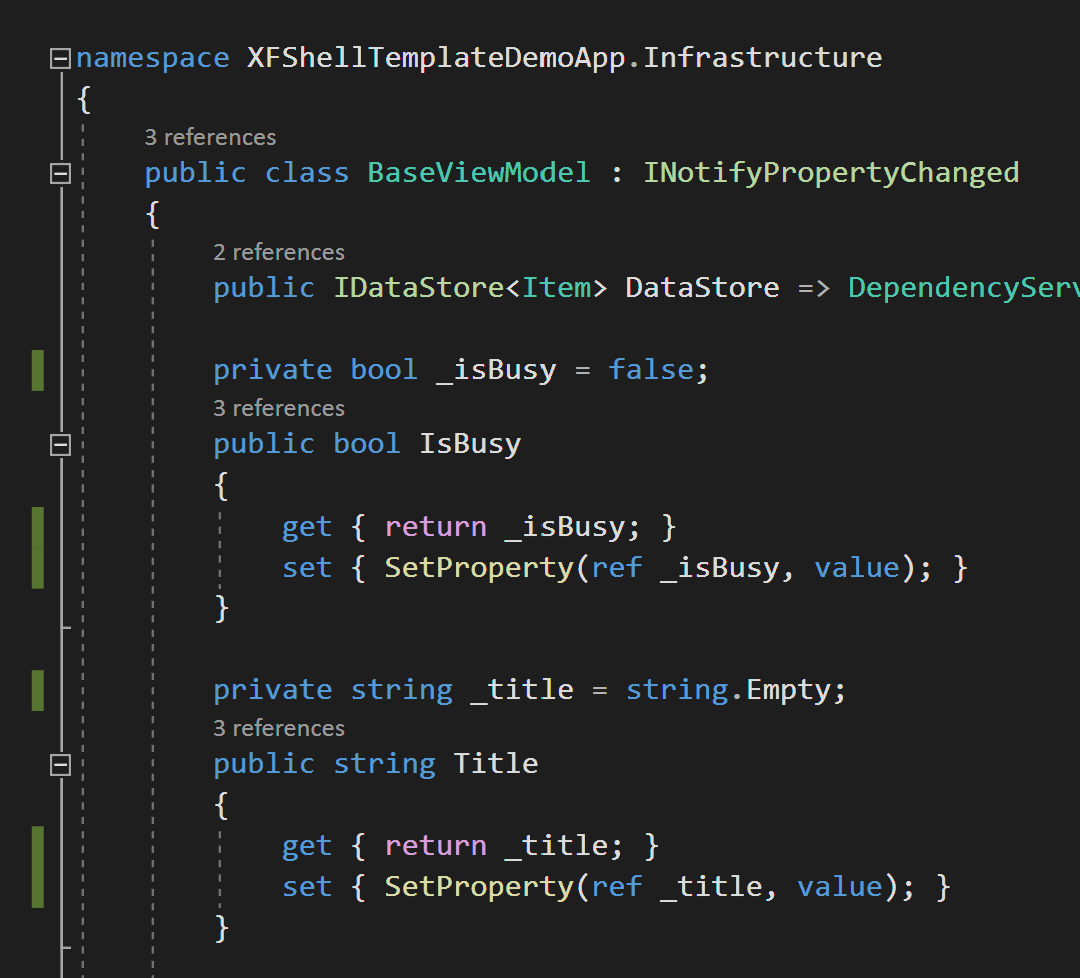
Also let’s do a bit of code refactoring inside the BaseViewModel, with the field naming, such as private fields, by adding _fieldName format as a good C# code standard.
Step 3: BindingContext in the Constructor()
Let’s have the ViewModel instantiation and its assigning to the Page.BindingContext, inside the Constructor() of each page. Yep, and don’t forget to remove the XAML set up added in the default template. 😉
public partial class ItemsPage : ContentPage
{
    private readonly ItemsViewModel _viewModel;

    public ItemsPage()
    {
        InitializeComponent();

        BindingContext = _viewModel = new ItemsViewModel();
    }

    ...
}
This would give better control over the ViewModel’s object instance. The private field will be named accordingly with the “_” prefix, and kept as a private readonly field, since its only going to be instantiated once in the Constructor itself. Make sure to propagate the same for all the Pages in the project.
Step 4: Clean up ItemDetailViewModel!
We need to clean up the ItemDetailViewModel, to be stand-alone and loosely coupled. This will also help us in implementing a proper Shell Route based navigation later.
Let’s convert the Item property into a full fledged property with a private backing field, GETter and SETter. 😉 In the constructor, get rid of the parameter passed in, and let’s assign a dummy value to it as default value.
public class ItemDetailViewModel : BaseViewModel
{
	private Item _item;

	public Item Item
	{
		get => _item;
		private set
		{
			SetProperty(ref _item, value);
			Title = _item?.Text;
		}
	}

	public Command LoadItemCommand { get; set; }

	public ItemDetailViewModel()
	{
		var item = new Item
		{
                        Id = Guid.NewGuid().ToString(),
			Text = "Sample Item",
			Description = "This is an item description."
		};

		Item = item;

		LoadItemCommand = new Command<string>(async (itemId) => await LoadItem(itemId));
	}

	private async Task LoadItem(string itemId)
	{
		Item = await DataStore.GetItemAsync(itemId);
	}
}
Apart from the Item property, I have added a new Command, which will load the Item details object from the DataStore service.
Now that a well structured, clean ViewModel eh! Next let’s handle the parameter that we’re suppose to pass from ItemsPage to ItemDetailPage…
Step 5: Setting up Query Parameters…
As a part of the previous step, we need to handle the selected Item object that’s being passed into the ItemDetailPage. We’re going to handle this properly with Xamarin.Forms Shell Query parameters. So let’s pass the Id value of the selected Item object, as a query parameter into the page as follows, with the QueryProperty attribute.
[QueryProperty(nameof(ItemId), "itemid")]
public partial class ItemDetailPage : ContentPage
{
	private readonly ItemDetailViewModel _viewModel;
	private string _itemId;

	public string ItemId
	{
		get => _itemId;
		set => _itemId = Uri.UnescapeDataString(value);
	}

	...
}
Here we’re maintaining ItemId string property in the Page, where Shell we set the query value into during the navigation.
Do not forget to fire up the LoadItemCommand in the ViewModel of the page, with the ItemId that we acquired during navigation.
...
public partial class ItemDetailPage : ContentPage
{
	...
	protected override void OnAppearing()
	{
		base.OnAppearing();

		_viewModel.LoadItemCommand.Execute(ItemId);
	}
}
Alright, then let’s fix the navigation bits next…
Step 6: Use proper Shell Navigation!
Instead of using Xamarin.Forms Classic navigation, let’s migrate all the Navigation bits to proper Xamarin.Forms Shell Route based Navigation yeah!
Let’s start by registering the Page routes, that we use for navigation. Preferably using lower case letters for all the routes.
public partial class AppShell : Xamarin.Forms.Shell
{
	public AppShell()
	{
		InitializeComponent();

		Routing.RegisterRoute("itemdetailpage", typeof(ItemDetailPage));
		Routing.RegisterRoute("newitempage", typeof(NewItemPage));
	}
}
Then update all the navigation bits to use Shell route based navigation…
...
public partial class ItemsPage : ContentPage
{
    ...
    private async void OnItemSelected(object sender, SelectedItemChangedEventArgs args)
    {
        ...

        await Shell.Current.
                    GoToAsync($"/itemdetailpage?itemid={item.Id.ToString()}");
        ...
    }
}
Now, that’s a proper Shell Navigation in action!
Step 7: Set up NewItemViewModel!
NewItemPage does not have a ViewModel created against it, in order to maintain a proper MVVM structure we need to move all the code behind bits in NewItemPage.xaml.cs into the NewItemViewModel as follows…
public class NewItemViewModel : BaseViewModel
{
    private Item _item;

    public Item Item
    {
        get => _item;
        set
        {
            SetProperty(ref _item, value);
        }
    }

    public NewItemViewModel()
    {
        var item = new Item
        {
           ...
        };

        Item = item;
    }
}
The in the page constructor we assign the instance of this ViewModel to the BindingContext, and you’re done..
Step 8: Use proper Modal Navigation!
The NewItemPage is treated as a Modal page, we should use Shell.PresentationMode instead of classic Navigation.PushModalAsync() for navigating to Modal pages.
First of all make sure we’re navigating to the NewItemPage properly using Shell Route navigation as follows,
...
public partial class ItemsPage : ContentPage
{
    ...
    private async void AddItem_Clicked(object sender, EventArgs e)
    {
        await Shell.Current.GoToAsync($"/newitempage");
    }
}
Next we set up Shell.PresentationMode property in the NewItemPage to render the page navigation as the Modal page we expect it to be, using ModalAnimated value.
<ContentPage
    x:Class="XFShellTemplateDemoApp.Views.NewItemPage"
    xmlns:ios="clr-namespace:Xamarin.Forms.PlatformConfiguration.iOSSpecific;assembly=Xamarin.Forms.Core"
    ios:Page.UseSafeArea="true"
    Shell.PresentationMode="ModalAnimated">

	<!--  Content of the Page  -->

	...

</ContentPage>
Also we should set up the UseSafeArea property for iOS to ignore the iPhone notch, since Modal page overlays the whole app window.
Finally, let’s get rid of the NavigationBar based buttons and use Page Content based Buttons, and modify the UI layout accordingly.
<ContentPage
    x:Class="XFShellTemplateDemoApp.Views.NewItemPage"
    Shell.PresentationMode="ModalAnimated">

    <ContentPage.Content>
        <Grid Margin="0" Padding="0">

            ...

            <StackLayout Padding="15" Orientation="Horizontal">
                <Button
                    BackgroundColor="{StaticResource Primary}"
                    Clicked="Cancel_Clicked"
                    HorizontalOptions="FillAndExpand"
                    Text="Cancel"
                    TextColor="White" />
                <Button
                    BackgroundColor="{StaticResource Primary}"
                    Clicked="Save_Clicked"
                    HorizontalOptions="FillAndExpand"
                    Text="Save"
                    TextColor="White" />
            </StackLayout>

            ...

        </Grid>
    </ContentPage.Content>
</ContentPage>
I have created separate Cancel and Save Buttons which is inside a StackLayout, which in return is inside in the parent Grid Layout where rest of the content resides.
...
public partial class NewItemPage : ContentPage
{
    ...
    private async void Cancel_Clicked(object sender, EventArgs e)
    {
        await Shell.Current.Navigation.PopModalAsync();
    }
}
For dismissing the page we can stick to PopModalAsync() call in the Navigation stack, since Shell doesn’t have it’s own for that.
Step 9: Overall code quality clean up…
Apart from all these structural changes, another aspect I heavily focused on was, the readability of the code and maintaining proper coding standards, down to the variable naming.
It’s important to properly write the code with all these little details in mind so that its easy to read and understandable by anyone who try to understand the code.
Alright then, with that I conclude the restructuring!
Restructured Template Project…
Aaand let’s take a proper look at what we got at the end after the extensive restructuring of the Xamarin.Forms Shell Template project in VS2019,


Here’s it in action in iOS!


in Android!


Once again you may find the whole project code is hosted on my Github repo,
hosted on github:
github.com/UdaraAlwis/XFShellTemplateDemoApp
Feel free to fork it out and use it as anyway you wish, may be even for a starter pack for your Xamarin.Forms Shell App development journey! 😉
Conclusion!
Well that concludes my journey of restructuring the Xamarin.Forms Shell default project template in VS2019, for the best use of Shell features, performance and optimized clean code.
Xamarin.Forms Shell is actually an awesome new paradigm to build Xamarin.Forms app, but honestly the VS2019 Template project could really use some proper restructuring for making it easier and straight forward for the beginners to start off. 😉
Share the love! 😀 Cheers yol!


